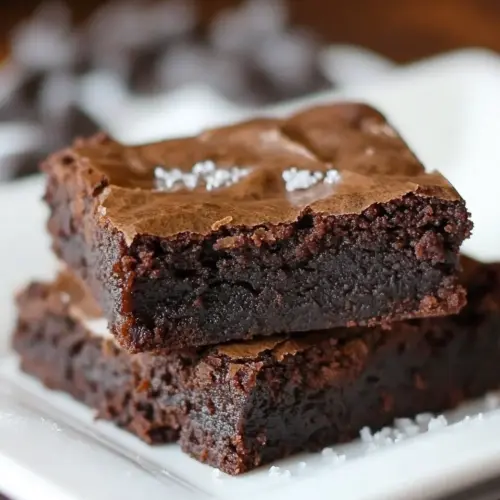
Robert's Absolute Best Brownies
Robert's Absolute Best Brownies are fudgy, glossy chocolate bars with a crackly top and rich buttery depth. This easy, crowd pleasing dessert uses simple pantry ingredients to deliver intense chocolate flavor and a tender, gooey center, perfect for bake sales or easy weeknight treats. Make them to share because they vanish fast and always earn requests for the recipe.
Equipment
- Saucepan
- Whisk
- 8-inch Square Baking Dish
- Parchment Paper
- Sieve
Ingredients
- 6 tablespoon unsalted or salted butter cubed Melted and cubed to provide rich fat that carries flavor and creates a tender, fudgy crumb; use unsalted to control seasoning or salted for a slight flavor boost. Melt gently with chocolate to ensure smooth texture and glossy batter, and cool slightly before mixing with eggs to prevent curdling.
- 8 ounces bittersweet or semisweet chocolate chopped (I used semisweet chocolate chips) Melted and chopped to contribute deep chocolate flavor and structure; bittersweet adds intensity while semisweet yields a sweeter profile. Combine with butter over gentle heat for a homogeneous base that determines the brownie’s cocoa character and richness.
- 3/4 c sugar Granulated sugar to sweeten and tenderize the batter while contributing to crust development through caramelization. Cream or whisk with eggs and melted chocolate to help dissolve and integrate, which influences texture and moistness of the finished brownies.
- 1 teaspoon vanilla extract Aromatic vanilla extract to enhance and round out chocolate flavors; provides subtle sweet fragrance and depth. Add with the sugar and eggs or folded into the batter for consistent distribution and balanced flavor complexity.
- 2 large eggs room temperature Beaten at room temperature to incorporate air for lift and to bind ingredients, adding richness from yolks and structure from proteins. Whisk in gradually after cooling the chocolate mixture to prevent cooking, producing a glossy batter that bakes into moist, tender brownies.
- 1/4 c all-purpose flour All-purpose flour to provide structure and minimal gluten that keeps brownies dense yet tender; measured sparingly for a fudgy texture. Sift or lightly fold in to avoid overworking, ensuring even distribution and desired chew without toughening the final product.
Instructions
- Preheat your oven to 350 degrees F.: You will feel the kitchen warm as the oven climbs to temperature, and a properly preheated oven ensures even rise and the correct set of the center. A consistent, true oven temp prevents underbaked centers or overly dry edges. If your oven runs hot, the edges can brown too quickly, so consider an oven thermometer to verify temperature.
- Line a 8" x 8" baking dish with parchment paper, making sure to leave an overhang to make lifting brownies out easier. Lightly butter the paper or spray with cooking spray. Set aside.: The tactile step of pressing parchment into the corners makes later removal effortless, and the light greasing prevents sticking while encouraging a clean release. You'll notice the parchment holds the batter shape and helps edges bake uniformly. A common mistake is skipping the overhang, which makes lifting and slicing messy and risky for broken brownies.
- In a medium saucepan, melt butter and chocolate. Stir until the chocolate is melted and the mixture is smooth. Remove from heat.: As the butter and chocolate mingle, you will smell roasted cocoa and buttered caramel notes. The mixture should become velvety and glossy; small streaks are fine as you finish stirring off heat. Avoid overheating, because scorched chocolate becomes grainy or bitter, and rapid cooling can lock in lumps. If it thickens unevenly, transfer to a warm bowl to finish smoothing.
- Add sugar and whisk until combined.: Once the sugar meets the warm chocolate, you will feel the batter tighten and the aroma deepen. Whisking here helps dissolve the sugar , which supports that shiny crust later. If the sugar remains gritty, continue whisking off heat for a bit longer. A frequent slip is not whisking enough, which leaves slight graininess in the final texture.
- Add eggs, one at a time, whisking well after each addition.: As you incorporate each egg , the batter will lighten and gain an elastic sheen, almost like a satin sauce. This is important for structure and that glossy finish, so take the time to fully emulsify each addition. If you add both eggs at once, you risk uneven blending and a less cohesive batter, which can affect rise and crumb.
- Add vanilla and whisk again.: The little burst of vanilla will lift the chocolate scent and add warmth. Whisking integrates the aroma so it is distributed evenly rather than sitting as a sharp top note. Too much vanilla can overshadow the chocolate, so stick to the measured amount. If the batter cools and stiffens slightly, a few vigorous whisks will bring back the gloss.
- Sift the flour through a sieve right over the chocolate mixture. Whisk until incorporated. At this point you need to whisk the batter vigorously for 1 minute. I poured the batter into a bowl of my standing mixer and let it do the work. Whisk until the batter becomes smooth and glossy and there is no graininess from sugar. It will start to pull away from the sides of saucepan or bowl.: The sifted flour disperses in fine ribbons, minimizing lumps and preventing over mixing. As you whisk vigorously, you are developing just enough structure for the bars to set while keeping the interior tender. The glossy transformation is a tactile cue, and when the batter pulls away from the sides you know it is ready. Overbeating after this point can create a denser texture, so stop once you see smooth, shiny batter.
- Pour batter into prepared dish and bake for 30 minutes, until the center is almost set. Do not overbake.: As the pan goes into the oven you will smell the chocolate intensify and a faint caramelization begin at the edges. The visual cue to watch is the center that looks slightly glossy and jiggles only a bit, while the edges are set and pull away a touch from the pan. Overbaking will dry the interior and lose the fudgy quality, so check early if your oven runs hot. If it looks too loose after the time is up, give it a few more minutes but check often.
- Cool completely before cutting.: Cooling lets the internal steam redistribute and the crumb firm up, which makes neat slices possible. You will notice the aroma settle into a deeper chocolate note as it cools, and the texture becomes pleasantly dense when set. Cutting too soon causes ragged pieces and sticky knife residue, so be patient and allow the bars to reach room temperature or chill briefly for the cleanest squares.
Notes
- Cool completely before cutting into squares to ensure clean slices and a set interior, which helps the brownies keep their shape when plated.
- Pan size matters using an 8 inch pan concentrates the center and creates thicker bars; a 9 inch pan will yield thinner, slightly faster baking pieces.
- Sift the flour directly over the batter to avoid lumps and minimize mixing, which preserves tenderness in the crumb.
- Whisk vigorously after adding the flour until the batter becomes glossy, this step dissolves sugar and produces that desirable crackly top.
- Use good chocolate quality affects flavor dramatically, choose semisweet or bittersweet depending on your preferred balance of sweet to bitter.
- Add-ins optional if you want nuts fold them in lightly right before baking to maintain batter aeration and even distribution.