Roasted Cornish Hens
Roasted Cornish Hens offer a crispy, aromatic main with tender meat and herb scented pan juices. This easy weeknight dinner shines with pantry staples like olive oil, garlic powder, and rosemary, delivering a restaurant style result without hours of fuss. Perfect for small gatherings or cozy fall suppers, it is an approachable yet elegant dish worth making for special moments.
Equipment
- Large rimmed baking dish
- Small Bowl
- Instant read thermometer
- Kitchen twine
- Paper towels
Ingredients
- 2 cornish hens, about 3 pounds each Roast for rich, juicy meat and crispy skin; serves as the main protein and centerpiece for the dish. Season skin and cavity well to infuse flavor throughout during roasting. Rest after cooking to let juices redistribute and ensure tenderness.
- 2 tablespoons olive oil Coat birds evenly to promote browning and help herbs and spices adhere to the skin. Provide a subtle fruity flavor and help crisp the skin while roasting for appealing texture. Use to rub under and over the skin for maximum flavor penetration.
- 2 teaspoons kosher salt Season generously to enhance natural savory flavors and aid in moisture retention during roasting. Dissolve into surface moisture to create a thin briny crust that boosts overall taste. Adjust amount to preference but avoid over-salting to maintain balance.
- 1 teaspoon garlic powder Sprinkle inside and on the skin to contribute a warm, roasted garlic aroma and umami depth. Blend with other dry spices for an even flavor profile that complements poultry. Use sparingly to avoid overpowering delicate hen meat.
- 1 teaspoon dried thyme Add earthy, slightly floral notes that pair beautifully with poultry and herbs during roasting. Scatter under the skin and around the cavity to release aromatics as the hens cook. Combine with other herbs for a layered, savory complexity.
- 1/2 teaspoon onion powder Dust over the birds to impart a mild savory-sweet onion background without adding moisture. Combine with other dry spices to build a rounded seasoning blend. Use in the cavity and on vegetables to elevate overall flavor.
- 1/2 teaspoon paprika Sprinkle for a hint of smoky sweetness and to enhance the roasted color of the skin. Contribute gentle warmth that complements thyme and rosemary without dominating. Adjust to taste for subtle depth in the seasoning mix.
- 1/4 teaspoon black pepper Grind over the skin to add sharp, pungent heat and to balance salt and herb flavors. Enhance the savory profile and provide a finishing bite that lifts the overall dish. Use freshly cracked for the most vibrant aroma.
- 1 carrot, cut into 1 inch pieces Scatter around the roasting pan to add natural sweetness and body to the pan juices. Caramelize in the oven to enrich the sauce and complement the hens' savory notes. Cut into uniform pieces so they cook evenly alongside the poultry.
- 1 stalk celery, cut into 1 inch pieces Add aromatic backbone and a mild vegetal savor to the roasting bed to flavor pan juices and stock. Soften and release flavor during roasting to blend with other aromatics for a cohesive taste. Chop consistently to ensure even cooking.
- 2 cloves garlic, smashed and peeled Crush and place with the hens to release intense garlic aroma and savory depth while roasting. Soften and mellow as it cooks, contributing to the overall richness of the pan juices. Leave smashed to infuse flavor without overpowering.
- 2 sprigs rosemary Nest among the hens to release piney, resinous aromatics that penetrate the meat and fat while roasting. Remain intact to provide subtle herbal notes to the pan juices and finished dish. Use sprigs whole for easy removal before serving.
Instructions
- Preheat your oven to 400 degrees F.: The oven warming produces a stable environment, so when the hens go in they begin to brown evenly and develop crisp skin rather than steaming. You will smell the oven heat and sometimes a faint toasted note as it reaches temperature. Common mistake to avoid, placing the birds in before the oven is fully hot which can delay browning and lead to rubbery skin.
- Pat your cornish hens dry with a paper towel and place them in a large-rimmed baking dish.: Drying the surface removes excess moisture that would otherwise steam the skin, so you get immediate sizzling contact and quicker browning once in the oven. The sound of meat meeting a hot pan is a quiet promise of crisp skin; visually, the birds will accept oil and seasoning better when dry. A frequent error is skipping this step and ending up with soggy skin, so take the extra minute to be thorough.
- In a small bowl, combine the olive oil, salt, garlic powder, dried thyme, onion powder, paprika, and black pepper.: Mixing the seasonings into olive oil creates a cohesive rub that spreads easily and bakes onto the skin, promoting a consistent flavor and color. The aroma will be quietly herbal and savory as you whisk the oil and spices, and the oil helps transfer heat to the skin for even crust formation. Avoid under mixing, which can leave pockets of concentrated seasoning that may scorch during roasting.
- Drizzle the oil mixture over the cornish hens and rub it all over, making sure to coat the hens on all sides.: Rubbing ensures the skin is evenly seasoned and that the oil penetrates small nooks, supporting golden browning. You will feel the slickness of oil under your fingers and notice the surface take on a light sheen, ready for the oven. One common misstep is applying too little oil, which can prevent even browning and lead to dry patches.
- Fill the cavity of each hen with two-quarters of the onion, half of the carrot, half of the celery, one clove of garlic, and one sprig of rosemary.: The aromatics inside the cavity steam gently and infuse the meat with delicate flavor as the hens roast, creating fragrant pan juices. When you slide them in, there is a mild herbal and vegetal scent that will deepen while cooking. Do not overpack the cavity, as blocking air circulation can hinder even cooking and create a raw center.
- Tie the legs with kitchen twine and tuck the wings under the bird. This will prevent them from burning in the oven.: Securing the legs and tucking wings improves presentation and encourages even cooking, the birds hold a compact shape and the extremities are less exposed to direct heat. You will see a tidier silhouette and hear less aggressive sizzling from exposed wing tips. A typical mistake is skipping this step, which can lead to scorched wingtips and unevenly cooked legs.
- Roast the hens for 50-55 minutes or until an instant-read thermometer registers 160 degrees F. Baste the hens with juices from the pan after 25 minutes.: As they roast you will notice the skin deepen in color, the pan juices reduce and scent the kitchen with roasted herbs and meat. Basting mid roast encourages even browning and helps carry flavor back onto the skin, though do it swiftly to avoid losing oven heat. A common error is overbasting, which can cool the oven interior and prolong cooking, so be quick and decisive.
- Remove the hens from the oven and cover the pan with aluminum foil.: Tenting the pan traps residual heat and allows carryover cooking to finish the hens without drying them out. You may hear a gentle hiss as steam settles and the aroma becomes concentrated under the foil. Avoid sealing too tightly, which can steam the skin and soften the crisp texture you worked to achieve.
- Rest the hens for 10 minutes, or until the internal temperature registers 165 degrees F.: Resting lets juices redistribute, so when you carve, the meat remains moist and tender rather than pooling out onto the cutting board. During this time the birds finish cooking quietly, and the smell settles into a rich roasted note. Skipping rest often leads to drier slices, so always allow this pause.
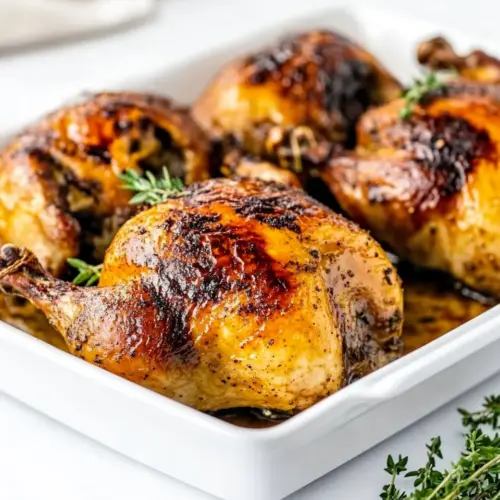
- Serve the cornish hens whole or carved with a garnish of fresh herbs or flakey sea salt. Enjoy warm.: The final moment is all about presentation and small finishing touches that elevate the dish, like a sprinkle of coarse salt or a fresh herb sprig. Visually the skin should be deep golden, and the meat should appear succulent when sliced. Serve promptly, because the best textural contrast between crisp skin and juicy meat is enjoyed warm; leaving them too long will soften the skin.
- Store any leftover hen in an airtight container in the fridge for up to three days.: Cooling leftovers properly preserves texture and safety, and the residual aroma will mellow in the fridge while keeping the meat usable for quick meals. Make sure to cool before sealing to avoid condensation that can sog the skin. A typical mistake is storing while still hot, which can encourage bacterial growth and degrade quality.
Notes
- Increase crispness: For extra crispy skin, refrigerate the seasoned hens uncovered for 1 to 2 hours before roasting to dry the skin further, which concentrates flavor and promotes a deeper Maillard reaction in the oven.
- Herbal twist: Use additional fresh rosemary sprigs tucked in the cavity or under the skin for a more pronounced herbal note that perfumes meat from the inside as it cooks.
- Pan juices boost: After roasting, deglaze the pan with a little warm stock or water and scrape up browned bits to make a simple jus you can spoon over sliced hens for added richness.
- Even cooking: Rotate the baking dish once during roasting if your oven has hot spots, this helps both hens reach uniform color and doneness without one side over browning.
- Meal stretching: Shred leftover meat into salads or sandwiches for quick lunches, the roasted flavor transfers nicely and keeps meals interesting across the week.