Roasted Beet Hummus
Roasted Beet Hummus is a creamy vibrant dip that blends earthy roasted beet with smooth chickpeas and nutty tahini. The result is silky, colorful, and perfect for easy weeknight snacking or a show stopping appetizer. Bright lemon and garlic balance the sweetness, making it a compelling addition to any mezze platter or casual gathering, worth making again and again.
Equipment
- Oven
- Baking Dish
- Tin foil
- Food Processor
Ingredients
- 1 small beet Roasted to deepen sweetness and earthiness, adds vibrant color and a silky texture when puréed into hummus. Provides natural sugars that balance the savory elements and creates a visually striking pink hue. Can be wrapped in foil and roasted until tender to maximize flavor.
- 2 cloves garlic Crushed and softened to infuse pungent, aromatic bite that complements the beets and chickpeas. Helps build savory depth and sharpness; raw or roasted garlic will change intensity. Can be finely minced or smashed for even distribution in the spread.
- 1 (19 fluid ounce) can chickpeas drained Rinsed and drained to supply creamy body, protein, and fiber that form the hummus base. When blended, creates a smooth canvas that carries beet flavor and absorbs seasonings. Aquafaba may be reserved if a thinner texture is needed, but draining prevents excess watery hummus.
- Juice of 1/2 lemon Squeezed to contribute bright acidity and lift, cutting through the earthiness and oil for balance. Helps preserve color vibrancy and accentuates other flavors while adding a fresh citrus note. Use freshly squeezed for best brightness and clarity.
- 2 tablespoons tahini Whisked to provide a nutty, slightly bitter creaminess that enriches the hummus and aids emulsification. Adds depth and a traditional tahini flavor that complements chickpeas and beet sweetness. Stir thoroughly before measuring, as separation can occur in the jar.
- 1/3 cup olive oil Streamed in to create a glossy, smooth emulsion and carry flavors across the palate with healthy fats. Helps achieve desirable spreadable consistency while contributing richness. Use good-quality extra virgin olive oil for fruity undertones.
- Pinch salt Sprinkled to enhance and balance flavors, bringing out sweetness and reducing bitterness when combined with lemon and tahini. Small adjustments can dramatically improve taste, so add gradually and taste as you go. Fine sea salt dissolves quickly for even seasoning.
- Pepper to taste Ground to adjust seasoning and add a subtle sharpness that rounds out the dish. Freshly cracked pepper provides a mild heat and aromatic lift without overpowering the other components. Add sparingly and finish with a light grind for best control.
Instructions
- Pre-heat oven to 450 F.: The moment you slide the beet into the oven you want a hot environment so it begins to caramelize quickly, which enhances sweetness and creates those roasted aromas I love. You'll notice the kitchen filling with a warm, slightly sweet scent as sugars brown; that smell is a reliable indicator the beet is transforming. A common error is starting at a lower temperature which yields a steamed texture instead of the desired roasted caramelization. Make sure your oven reaches the stated temperature before you put the beet in, and use an oven thermometer if yours runs cool.
- Line a baking dish with tin foil. Wash beet and trim the leaves/stem back (leaving an inch or two) if your beet has any. Don't trim the tail as you'll lose juice (and thus flavor) while roasting.: Lining the dish helps contain any juices that escape and makes cleanup effortless, and keeping a bit of the stem and tail preserves moisture and internal juices while the beet bakes. When you wash the beet you may notice faint earthy scents; that is normal and will mellow with roasting. Avoid cutting the beet into small pieces now, because the increased surface area can dry it out. A typical pitfall is trimming too close to the root which allows sweetness to leach into the foil rather than concentrating in the beet itself.
- Add beet to the foil-lined baking dish and then cover with tin foil. Roast for at least 45 minutes. Check if beet is done by inserting a skewer. If it slides in easily (through the beet's centre), it's done.: The foil tent traps steam and creates an oven within an oven effect, promoting even cooking and preventing the exterior from burning before the center softens. As the beet roasts you will hear almost no noise, but visually its skin will darken and become slightly blistered. The skewer test is the best guide, because times vary by beet size; undercooked beets are firm and harsh tasting, while overcooked ones may be too soft and lose texture. If the skewer resistance is still there after 45 minutes give it another 10 to 15 minutes and recheck.
- Remove from oven and let cool for 5-10 minutes.: Letting the beet rest allows its internal juices to redistribute, making it easier to handle and peel. You may notice a warm, sweet steam as you lift the foil; that aroma signals the sugars have concentrated. Try not to rush this stage because peeling a very hot beet can burn you and also make the flesh harder to handle cleanly. If you peel immediately while too hot you risk tearing the flesh and losing precious juices.
- When the beet is cooling, you can get the hummus going. Add the chickpeas, garlic, lemon juice, tahini, salt, and pepper. Blend on high and slowly drizzle in olive oil. Blend until smooth (this may take a few minutes).: Starting the hummus while the beet cools is efficient and ensures the chickpea base reaches the ideal creamy texture without overheating the processor. As you blend you'll hear a steady, smooth hum and see the mixture transform from chunky to glossy; that change in sound and texture is your cue to continue. Slowly drizzling the olive oil helps emulsify the mixture, producing a silkier mouthfeel. A frequent mistake is rushing the oil addition which can break the emulsion and leave the hummus oily or separated; take your time and pause to scrape down the bowl if needed.
- Once beet has cooled for a few minutes, peel it (I used a knife). Cut beet into a few chunks and place into food processor. Blend on high until it's smooth and mixed together.: After peeling you'll notice the beet 's interior gleaming and deeply colored, releasing a fragrant, earthy sweetness as you slice. Adding it to the already creamy hummus lets the color and flavor meld without overworking the chickpeas. As you process, watch for a uniform magenta color and listen for the motor to move smoothly, which indicates proper blending. One common issue is adding the beet too hot which can warm the hummus and slightly alter texture; make sure it has cooled enough to avoid this. If the mixture seems dense, add a small splash of reserved olive oil or a teaspoon of water to coax it to a perfect spreadable consistency.
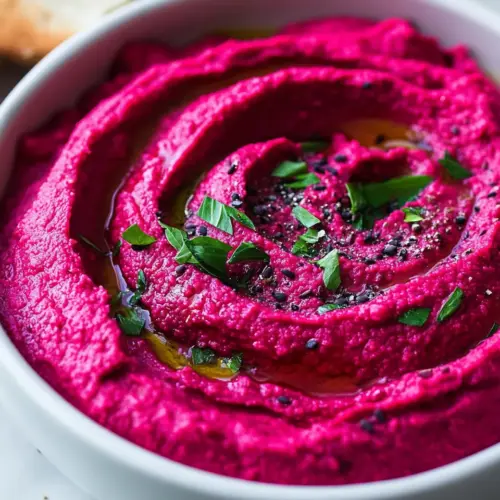
- Serve chilled with an extra drizzle of olive oil if desired.: Chilling the hummus firms the texture and lets the flavors settle so the sweet roasted beet and tangy lemon balance each other beautifully. When plated, a final drizzle of olive oil adds shine and a fruity finish, and you might choose to sprinkle a little freshly cracked pepper for contrast. Serve cold to experience the clean interplay of flavors; serving too warm can mute the brightness. A common serving mistake is leaving it out too long at room temperature, which over time can make the hummus loose and less vibrant, so return any leftovers to the fridge promptly.
Notes
- Scale the beet: If you prefer a subtler beet presence, use a slightly smaller beet or blend only part of the roasted root into the hummus, reserving some for garnish; this keeps the color muted while maintaining the roasted notes.
- Adjust creaminess: For an ultra smooth texture, peel the skins off the rinsed chickpeas before blending or add a tablespoon of warm water while processing to loosen the mixture for a silkier finish.
- Brighten the flavor: If the hummus tastes flat after blending, add an extra squeeze of fresh lemon and a pinch more salt, tasting between additions until the acidity balances the beet sweetness.
- Control garlic intensity: For a milder garlic note, use one clove of raw garlic or lightly roast the cloves with the beet so they become sweeter and less pungent.
- Make it oil free: If you want to reduce oil, add water or reserved chickpea liquid little by little while blending to achieve a creamy texture without relying on as much olive oil.
- Serve chilled or room temperature: Chilling sharpens the texture and color, while serving at room temperature highlights aromatics and makes spreading easier for toasts and sandwiches.