Reindeer Cookies
Reindeer Cookies are soft, peanut buttery holiday treats topped with pretzel ears, a warm Rolo nose, and a bright red candy center. These crispy edged, chewy centered cookies are easy to make and perfect for festive cookie exchanges or family baking nights. They re simple to assemble, visually delightful, and a guaranteed crowd pleaser for holiday parties.
Equipment
- cut and serve turner
Ingredients
- 1/4 cup unsalted butter (57 g) Creamy and cold, helps create a tender, rich cookie base when creamed with sugars; contributes flavor and moistness while aiding spread during baking.
- 1/4 cup vegetable shortening (50 g) Solid and stable at room temperature, provides structure and helps cookies hold shape; adds flakiness and contributes to a tender crumb when combined with butter.
- 1/2 cup creamy peanut butter (130 g) Smooth and fatty, binds dry ingredients while imparting peanut flavor; contributes to chewiness and enhances overall richness in each bite.
- 1/2 cup granulated sugar (100 g) Fine and crystalline, adds sweetness and promotes browning through caramelization; helps incorporate air when creamed with fats for a lighter texture.
- 1/2 cup light brown sugar, packed (110 g) Moist and flavorful, brings deep caramel notes and additional sweetness while contributing moisture; balances textures and enhances chewiness in the cookies.
- 1/2 teaspoon vanilla extract (2.5 ml) Fragrant and liquid, imparts aromatic sweetness that rounds out flavors; small amount enhances overall flavor complexity without affecting texture.
- 2 eggs, large Large and versatile, provide structure and leavening through fat and proteins; help bind ingredients, add moisture, and contribute to the cookie's tenderness.
- 1 3/4 cups all-purpose flour (219 g) Powdery and starchy, forms the bulk of the dough and gives structure through gluten formation; determines texture and thickness depending on mixing and handling.
- 1 teaspoon baking soda (5 g) Fine and reactive, produces carbon dioxide when activated to create lift and spread; helps create a lighter, slightly airy texture in the cookie crumb.
- 1/4 teaspoon salt Granular and mineral, balances sweetness and enhances flavor depth; strengthens dough slightly and controls the chemical leavening reaction.
- 36 mini pretzel twists Crunchy and salty, used as antlers to create a decorative and textural contrast; provides a savory snap that complements sweet elements.
- 18 rolo candies Soft caramel-coated chocolate, melts slightly when warmed to form a glossy candy center and acts as the nose for the reindeer decoration.
- 18 red m&m candies Colorful and crunchy, used as the iconic red nose decoration and provides a sweet, crisp contrast to the soft cookie.
- 36 candy eyes, or mini chocolate chips Small and edible, provide eye details or chocolate flavor if mini chips are used; add whimsy and small bursts of chocolate or visual appeal.
- 1 small tube decorating frosting Piped and sweet, used to attach small candies and add facial details; offers precise decorative accents and helps secure pieces in place.
Instructions
- In a mixing bowl, cream together butter, shortening, peanut butter, 1/2 cup granulated sugar, and brown sugar until light and fluffy, about 2 minutes.: You will notice the mixture lighten in color and become aerated, which creates tiny pockets of air that help the cookies rise slightly and develop a tender crumb. The aroma at this stage is rich and slightly caramelized from the brown sugar mingling with the peanut butter , and you should hear a faint buzz from the mixer as it works the fats into a smooth, glossy texture. If the fats are too cold, the mixture will look lumpy and will not incorporate air, producing dense cookies, so allow the unsalted butter and vegetable shortening to soften beforehand. A common pitfall is overcreaming, which can make the dough too soft and cause excessive spreading in the oven, so stop once the mixture is light and fluffy.
- Add eggs, mixing after each addition. Mix in the vanilla.: When you add the eggs , the batter will become silkier and slightly more fluid, and the mixer will sound smoother. Adding eggs one at a time ensures they emulsify properly, which stabilizes the dough and gives a uniform structure. The scent of vanilla extract lifts the deeper notes from the brown sugar and peanut butter . If you add cold eggs straight from the fridge, the fats can seize and the mixture may appear curdled, so bring eggs to room temperature or add them slowly while mixing. Avoid high speed once the eggs are incorporated, because that can over-aerate and weaken the dough.
- In a separate bowl, whisk together flour, baking soda, and salt.: Whisking distributes the baking soda and salt evenly through the all purpose flour , so the cookies rise uniformly and the seasoning is balanced. You will see the dry mix lighten in color and form a homogenous powder, which makes folding into the wet ingredients predictable. If the flour contains lumps, break them up now to avoid pockets that do not hydrate, as those would create uneven texture. A common oversight is not measuring flour correctly, which leads to overly dry dough, so spoon and level for accuracy.
- Stir dry ingredients into the wet ingredients and mix gently to combine. Don't over-mix. The dough will be very soft. Refrigerate for at least 30 minutes, or up to 3 days.: At this stage you will feel the dough transform from sticky batter to a cohesive, very soft mass. The surface will be slightly tacky, and the scent will be warm and nutty. Chilling firms the dough, allowing the fats to solidify and making the cookies easier to shape, which also controls spread during baking. Overmixing here develops gluten in the all purpose flour , resulting in tougher cookies, so fold just until no streaks of flour remain. If the dough seems too loose to form, a brief chill will make it manageable; if you skip chilling, expect more spreading in the oven.
- Preheat oven to 375 degrees F.: Heating the oven to the right temperature ensures the exterior sets quickly while the interior stays soft, creating that desirable contrast. You should smell a faint warm, dry air from the preheated oven when you open it, and the heat helps the Rolo melt properly when placed on a freshly baked cookie. An oven running cool can lead to pale cookies that do not set, while too hot an oven will brown them too quickly, so use an oven thermometer if your oven is uncertain.
- Line a cookie sheet with parchment paper.: The parchment provides a nonstick surface and helps cookies bake evenly across their bottom, preventing hot spots and making cleanup easier. You will notice the parchment retains a slight warm scent from the oven but nothing overpowering. Avoid greasing the sheet in addition to using parchment, as extra fat can cause additional spreading. If you skip parchment, rotate the sheet halfway through baking to avoid uneven browning.
- Scoop dough into large balls and roll them into an oval shape. Place on prepared baking sheet. Bake for 9-12 minutes, until set and no longer glossy looking.: As the cookies bake, they will puff slightly and the edges will set first, creating a gentle ridge while the centers remain soft. Watch for the glossy sheen to disappear and for the bottoms to take on a hint of golden color, which indicates doneness without overbaking. You will hear a faint crackle as moisture leaves the cookie and see tiny steam vents on the surface. A common mistake is underbaking for a soft center that will collapse, so err on the side of fully set but not browned, and rotate the pan if your oven heats unevenly.
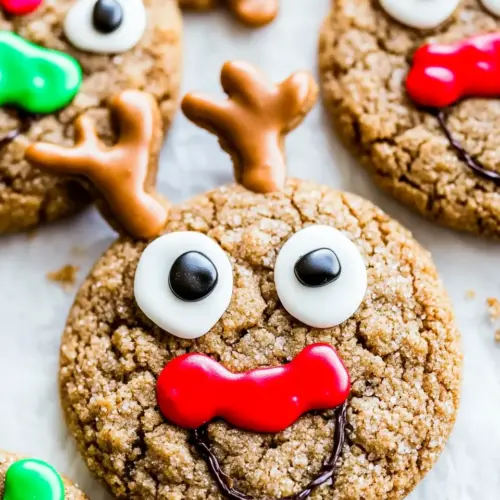
- Remove from oven. Press pretzels into the top of the cookie, for the ears. Press a rolo into the center, for the nose. Add two candy eyes, or chocolate chips for the eyes. Place a dot of frosting in the center of the rolo to secure a red m&m candy on top, for the nose. Allow to cool on baking sheet, then transfer to cooling rack.: Right after the cookies come out you will see the surface sheen gone and the centers slightly domed, which is the perfect time to press in the decorations as the Rolo will soften and adhere. The contrast between the hot cookie and the melting caramel creates a warm, sticky bond that secures the nose. Adding a dot of decorating frosting anchors the red m m candies so they do not roll off later. If you wait too long and the Rolo cools, the candy will not stick, so work quickly but carefully. Transfer to a cooling rack once the cookies have set enough to move without distorting, and let them cool completely so the caramel firms and the pretzels stay crisp.
Notes
- Swap shortening impact Use only unsalted butter if you prefer a purer butter flavor, though the cookies may be slightly less tall than with shortening.
- Make ahead strategy Chill shaped dough balls on a tray, then freeze them; bake from frozen adding a minute or two to the bake time, for fresh cookies on demand.
- Decorating station setup Arrange bowls of mini pretzel twists, Rolo candies, candy eyes, and red m m candies so guests can personalize their own reindeers efficiently.
- Firmer cookie option Chill the dough longer before baking to reduce spread when you want a more defined oval shape for decorations.
- Storage tip Layer baked cookies with parchment between layers in an airtight container to prevent sticking and maintain crisp pretzels.