Red Velvet Cookie Dough Frozen Yogurt
Red Velvet Cookie Dough Frozen Yogurt is a creamy, tangy frozen treat studded with chewy cookie dough pieces and chocolate chips. This easy to make, visually striking dessert blends cocoa notes, bright red color, and a silky cream cheese swirl, making it perfect for summer parties or a Valentine’s Day celebration. It’s a playful twist on frozen yogurt that’s worth making for both flavor and texture.
Equipment
- Loaf tin
- Mixing Bowls
- Whisk
- Spatula
Ingredients
- 1/4 cup buttermelted Melted to incorporate fat and moisture, helps bind the dough and adds tenderness to the frozen yogurt base while contributing a subtle buttery flavor that improves mouthfeel.
- 1/2 cups sugar Granulated sugar for sweetness and structure, helps provide scoopable texture by lowering freezing point and balancing tartness from yogurt in the frozen dessert.
- 1/4 cup brown sugar Brown sugar for molasses flavor and moisture retention, enhances chewiness in cookie dough bits and deepens overall sweetness with a slightly caramel note.
- 1/2 cup flour Flour for structure in the cookie dough pieces, provides a safe-to-eat starch base when combined and cooked briefly if desired to reduce raw flour taste.
- 1/4 cup cocoa powder Cocoa powder for chocolate flavor and color contrast, adds a rich, slightly bitter component that balances sweetness and boosts the red velvet profile.
- 1 pinch salt Salt for flavor enhancement and balance, intensifies sweetness and chocolate notes while rounding out the overall flavor profile of the frozen yogurt.
- 2 tablespoons reduced fat cream cheesesoftened Reduced-fat cream cheese softened to add creaminess and tang, helps create smooth, spreadable cookie dough pieces and contributes to the signature red velvet tang.
- 2 cups non-fat Greek yogurt Non-fat Greek yogurt for a thick, tangy frozen base, supplies protein and creamy texture while keeping the dessert lower fat and slightly tart.
- 2 tablespoons red food colouring (or beetroot juice from canned beetroot slices) Red food colouring or beetroot juice for vibrant red hue, provides the characteristic red velvet color without affecting texture and can be swapped for a natural alternative.
- 1/3 cup chocolate chips Chocolate chips for bursts of chocolate pockets, add texture contrast and rich flavor throughout the frozen yogurt while remaining firm when frozen.
- 8 oz reduced fat cream cheese Reduced-fat cream cheese to provide richness and velvety texture, used for making a creamy layer or cookie dough pieces that complement the yogurt base.
- 1 cup non-fat Greek yogurt Non-fat Greek yogurt to balance richness with tang and body, contributes additional volume and smoothness while keeping the overall dessert light.
- 1/4 cups sugar Sugar for sweetness and cryoprotectant effect, helps achieve desired sweetness level and improves scoopability by lowering freezing point in the yogurt base.
- 1/2 teaspoon Vanilla Bean Paste Vanilla bean paste for aromatic vanilla depth and flecks of real vanilla, enhances overall flavor complexity and complements the red velvet and chocolate notes.
Instructions
- Whisk together the melted butter and sugars in a medium-sized bowl until creamy and well blended. Mix in the flour, cocoa powder and salt, beating to combine. Add in the cream cheese and mix until well blended; pour in the yogurt and red colouring. Mix until well blended. Fold the chocolate chips through and mix until smooth and creamy.: The bowl will pick up a warm, buttery scent as you stir, and the sugars will begin to dissolve into the butter , creating a glossy, slightly grainy mixture. Use a wooden spoon or sturdy whisk and scrape the sides so nothing clings, because pockets of dry sugar can lead to unevenly sweetened dough. If your butter is too hot it can melt the brown sugar excessively and alter texture, so let the butter cool briefly until warm not hot. A common mistake is rushing while the butter is scalding, which can make the dough greasy, rather than tender.
- Pour into a lined loaf tin and prepare cream cheese swirl:: As you add the dry flour , sift the cocoa powder if it is lumpy so the color stays even, and the mixture will thicken and become more dough like. You should notice a faint chocolate aroma emerge, and the texture should shift from glossy to pliable. Stir until just combined, because overworking will activate gluten in the flour and can make bits tough in the cold. Watch for any streaks of dry flour ; they mean you need a few more gentle stirs but stop before the dough tightens.
- Combine the cream cheese, yogurt, sugar and vanilla paste, mixing well until smooth and creamy. Pour the cream cheese mixture over the red velvet mixture and swirl through the red velvet.: The softer spoonfuls of reduced fat cream cheese will make the dough silkier, and you should see small creamed pockets disappear as you beat. When you pour in the stated amount of non fat Greek yogurt and drop in the red food colouring , the mixture takes on that signature hue and creamy consistency. Stir gently so you keep the color even and avoid splashing. A troubleshooting note, if the color looks patchy add the color in small increments until uniform, but avoid over coloring which can affect flavor.
- Freeze for over 4 hours or until set.: At this point the aroma becomes a mix of tang and cocoa, and the visual should be consistently red without streaks. The texture will be thick yet pourable, like a dense batter. If you notice separation, give it a few more gentle stirs; persistent separation can come from cold ingredients, so allow them to warm slightly to room temperature before beating. Avoid vigorous beating, which traps air and can cause icy texture when frozen.
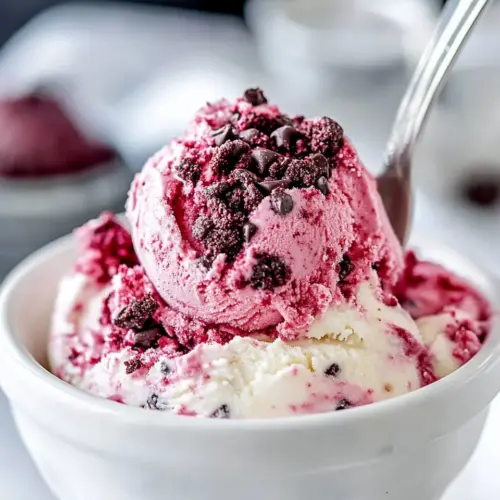
- Remove from freezer for about 10 minutes before serving!: Folding in the chocolate chips should be done with a spatula, using wide scoops so the chips distribute evenly without breaking. When you finish, the mixture will have tiny bites of chocolate dotting the red canvas, adding snap when you scoop it later. If you mix too aggressively the chips can clump at the bottom, so fold gently and scrape the bowl all the way down to capture any chips hiding there.
- Pour into a lined loaf tin and prepare cream cheese swirl: Pour the red velvet mixture into a lined loaf tin, noticing how it settles with a glossy surface. The lining makes release effortless after freezing. While the base rests in the tin, gather the cream cheese swirl ingredients; this parallel work keeps things efficient and ensures the swirl is fresh and pourable. A typical misstep is waiting too long and having the base start to freeze unevenly, so move promptly to prepare the swirl.
- Combine the cream cheese, yogurt, sugar and vanilla paste, mixing well until smooth and creamy: Beat the larger portion of softened reduced fat cream cheese with the additional non fat Greek yogurt , the smaller sugar measure, and the Vanilla Bean Paste until velvety. You will see tiny vanilla specks and the aroma will turn warm and fragrant. This mixture should be lump free; if you see curds, keep beating at low speed. Overbeating can incorporate too much air which may affect the swirl texture once frozen, so aim for smooth and dense rather than foamy.
- Pour the cream cheese mixture over the red velvet mixture and swirl through the red velvet: Dollop the creamy swirl on top in spoonfuls then use a knife or spatula to create loose swirls so that the two components remain distinct yet marbled. The visual swirl should show veins of white against the red, promising contrast in each scoop. If you over swirl, the two layers will fully combine and you will lose the ribboned effect; swirl modestly for the best look and texture.
- Freeze for over 4 hours or until set: The freezing step is when the texture transforms. After about four hours the center should be firm but scoopable, with the edges solid. The aroma will be muted, and the texture should be dense yet creamy, not icy. A common error is trying to speed this by setting the freezer to an extreme cold setting which can freeze the mixture rock hard; keep the normal freezer temperature and allow time, which yields a smoother mouthfeel.
- Remove from freezer for about 10 minutes before serving: Allowing the container to sit at room temperature for about ten minutes softens the top and makes scooping effortless, revealing the marbled cross sections and shining chocolate chips . You will notice softer edges and a creamy scoop texture. If you skip this rest, your scoops may be crumbly and the flavors less expressive, so a short wait pays off in presentation and taste.
Notes
- Use beetroot juice: Replace the red food colouring with beetroot juice for a natural hue, but reduce additional liquid elsewhere to maintain texture.
- Mini chocolate chips: Swap to mini chocolate chips so they stay evenly distributed and soften slightly in the frozen base for a gentler bite.
- Softened cream cheese technique: Ensure both cream cheese portions are at room temperature to avoid lumps in the swirl and to create a silkier ribbon.
- Scoop presentation: For parties, freeze in individual ramekins and unmold after resting ten minutes to serve elegant single portions.
- Adjust sweetness: Tweak the two sugar measures to taste, remembering that freezing mutes sweetness, so small increments are best while tasting the swirl.