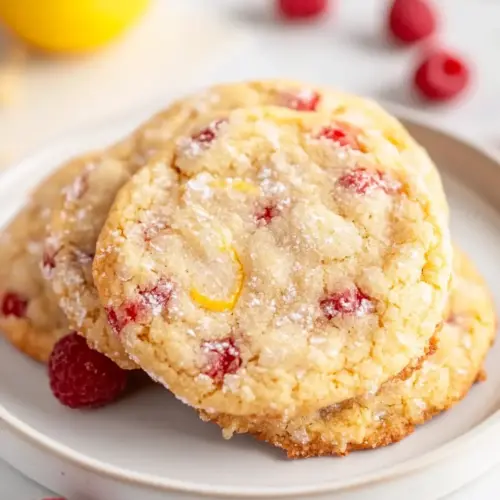
Raspberry Lemon Cookies
Raspberry Lemon Cookies are soft, slightly crisp treats bursting with bright lemon zest and sweet raspberry swirls. These easy to make cookies have tender centers and bakery worthy tops, perfect for spring gatherings or a cozy afternoon. Make them ahead by chilling the dough for deeper flavor, and enjoy sharing a batch that looks as pretty as it tastes.
Equipment
- KitchenAid stand mixer
- Nordic Ware Aluminum Half Sheet Pans
- Pre-Cut Parchment Paper Baking Sheets
- 2-ounce Ice Cream Scoop
Ingredients
- 2 3/4 cups all-purpose flour Provide structure and bulk to the cookie dough, helping form the crumb and absorb moisture; sift or whisk to ensure even distribution and prevent lumps. Enable proper development of gluten when mixed, which affects chewiness and texture depending on mixing time.
- 1 teaspoon baking soda Act as a leavening agent when combined with acidic components and heat, producing carbon dioxide to lighten the dough and create lift. Ensure even measurement to avoid overly dense or excessively risen cookies.
- 1/2 teaspoon baking powder Assist with gentle leavening and tenderizing the crumb by reacting with other leaveners and fats; contributes subtle rise and helps control browning. Use measured amounts to maintain balance between tenderness and structure.
- 1/2 teaspoon salt Enhance overall flavor balance by moderating sweetness and highlighting citrus and fruit notes; also contributes to dough chemistry and can strengthen gluten slightly. Dissolve evenly into the dough to avoid salty pockets.
- 1 1/2 cups granulated sugar Provide primary sweetness and aid in creaming with butter to create air pockets that contribute to leavening and texture; also helps with browning and flavor. Granulated sugar's granularity influences spread and chewiness of the cookies.
- Zest of two large lemons Deliver concentrated lemon aroma and essential oils that brighten the flavor profile; zest adds intense citrusy fragrance without extra acidity. Finely grate to avoid bitter pith and distribute evenly through the dough.
- 1 cup unsalted butter softened Contribute richness, moisture, and tenderness while lending flavor and aiding creaming with sugar to incorporate air for lighter texture. Use softened butter to ensure proper emulsion and even distribution throughout the dough.
- 1 egg Bind the dough by providing structure and moisture, adding richness and contributing to leavening through steam and protein coagulation when baked. Beat lightly for even incorporation without overworking the gluten.
- 1/2 teaspoon pure vanilla extract Impart a subtle sweet-vanilla aroma that rounds out flavors and enhances perception of other ingredients; adds depth without altering texture. Measure small amounts precisely to avoid overpowering delicate lemon and raspberry notes.
- 4 tablespoons fresh lemon juice Supply fresh citrus acidity and bright flavor that balances sweetness and activates leavening agents; also adds moisture to the dough for tenderness. Strain or juice carefully to avoid seeds and distribute juice evenly for consistent flavor.
- 1/2 cup raspberry preserves I used Bonne Maman Introduce concentrated raspberry flavor and natural pectin that creates fruity pockets and a sticky contrast to the cookie crumb; swirled or dolloped into dough it provides bursts of fruitiness. Choose a smooth preserve for even distribution and to prevent large fruit chunks that affect shaping.
Instructions
- In a medium bowl, whisk together the flour, baking soda, baking powder, and salt. Set aside.: You will notice a faint floury smell and a uniform pale mixture when the dry flour and leaveners are fully combined, which ensures even rise and prevents pockets of baking soda . Sifting is not required, but whisking breaks up clumps and aerates the mixture, helping the cookies stay light. A common mistake is mixing the leaveners directly into wet ingredients, which can cause uneven texture, so always combine them first and set them aside.
- In the bowl of a stand mixer fitted with the paddle attachment or in a large mixing bowl, add the sugar and lemon zest. Using your fingertips, rub the zest into the sugar until the sugar is moistened and fragrant.: As you rub the lemon zest into the sugar , the aroma will erupt, giving citrus oils that perfume the sugar and infuse the entire cookie. The sugar will feel slightly damp and clumpy when the oils are released, a tactile clue that you have extracted enough flavor. Avoid overdoing the rubbing to prevent making the sugar too wet, which can alter creaming; a few dozen rubs are usually enough.
- Using the stand mixer or an electric hand mixer, beat the butter into the lemon sugar until light and fluffy, 3-5 minutes. Add the egg, vanilla extract, and lemon juice and beat until well combined.: Once you add softened butter , the mixture will change from grainy to creamy, and you will hear the mixer shift to a smoother sound. After 3 to 5 minutes the texture should be pale and airy, which traps tiny air pockets for lift. When the egg , vanilla , and lemon juice are incorporated, the batter smells bright and buttery. A typical misstep is using cold butter , which prevents proper creaming and leads to dense cookies, so make sure it is softened but not melted.
- Slowly add the dry ingredients, mixing just until combined.: As you fold in the dry mix, you will notice the dough change from glossy to slightly matte, and small streaks of flour should disappear quickly. This gentle mixing preserves tender crumb by avoiding overdeveloped flour proteins. Overmixing is a common pitfall that produces tough cookies, so stop as soon as the last streak of dry ingredient vanishes and the dough is uniformly colored.
- Dollop the raspberry preserves in spoonfuls across the top of the dough, then use a rubber spatula to fold the preserves into the dough. Only fold the dough 3-5 times – you want to have streaks of preserves swirled into the dough, rather than mixing it in completely.: When you see vivid ribbons of raspberry against the pale dough, you will know you have folded just enough. The preserves will leave glossy streaks that look striking after baking. If you fold more than instructed, the preserves will fully blend into the dough and lose the attractive swirls, so be gentle and count your folds.
- Use a 2 oz (4 tablespoon) scoop (ice-cream-scoop size) to scoop the dough onto a parchment-lined baking sheet. You can place the dough balls close together since they will not be going into the oven yet.: The dough will be dense and pillowy to the touch, and scooping creates uniform mounds that bake evenly. Positioning the scoop so some preserve swirls sit at the top helps achieve decorative tops after baking. A frequent error is making uneven scoops which bake inconsistently, so aim for consistent portions and wipe the scoop between uses if the dough sticks.
- Place the baking sheet, uncovered, in the refrigerator to chill overnight or for at least 4 hours.: Chilling firms the butter and sets the shape, preventing excessive spread and encouraging those rounded, puffed centers. You will notice the dough cools and becomes easier to transfer; the preserves may thicken slightly. Rushing this step often leads to flat cookies, so be patient and give the dough adequate chill time.
- When ready to bake, preheat the oven to 350°F. Place no more than 6 of the dough balls onto a lined baking sheet; keep the remaining dough balls in the refrigerator until ready to bake them.: As the oven heats the space will smell faintly of warm metal and anticipation, and the consistent heat ensures even browning. Limiting how many you bake at once avoids crowding and allows air to circulate for uniform edges. A common oversight is crowding the tray which causes uneven baking, so leave room between mounds.
- Bake for 14-16 minutes, or until the edges are golden and the centers are puffed but still appear slightly underdone. Let the cookies cool on the baking sheet for 5 minutes before transferring to a wire rack.: During baking you will hear a soft crackle and see edges take on a light golden color while centers remain slightly domed; that contrast signals a tender interior with set edges. Cooling briefly on the sheet allows carry over cooking to finish the centers without overbaking, and transferring to a wire rack prevents sogginess. Overbaking is the usual mistake here, which dries the cookie, so remove them when the centers still look a touch soft.
Notes
- Position preserves on top: When scooping, try to place larger swirls of raspberry near the surface so they create pretty marbling on each cookie top.
- Use chilled dough for neater cookies: Chilled dough holds shape better in the oven, giving you rounded cookies with soft centers and defined edges.
- Adjust scoop size carefully: If you use a smaller 1.5 tablespoon scoop, expect 24 to 30 cookies and shorter bake times around 8 to 12 minutes.
- Substitute scoop sizes mindfully: A 3 tablespoon scoop will produce large cookies that bake in roughly 12 to 15 minutes if you do not have the 4 tablespoon scoop.
- Prep ahead: You can make the dough a day ahead and keep it refrigerated, which is perfect for hosting since it saves time the day you plan to serve.