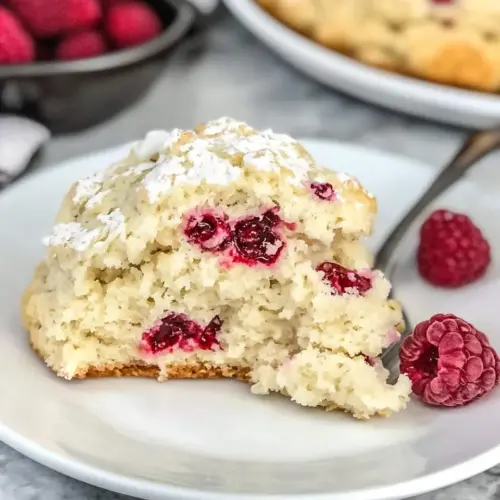
Raspberry Cream Scones
Raspberry Cream Scones are tender, flaky scones studded with bright raspberries and enriched with heavy cream. These easy, buttery scones bake quickly for a satisfying breakfast or brunch, offering a lightly sweet crust and soft, creamy interior. Make a double batch to freeze for busy mornings, they reheat beautifully and remain delightfully fresh.
Equipment
- Mixing Bowl
- Whisk
- Pastry blender
- Baking Sheet
- Parchment Paper
- Biscuit cutter
Ingredients
- 2 cups flour Provide structure and bulk to the scone dough by forming the dry base; whisk with leavening and sugar to ensure even distribution and a tender crumb when baked. Use spoon-and-level measuring for accuracy to maintain proper dough consistency and avoid toughness from overworking.
- 1 tablespoon baking powder Leaven the scones by creating lift and lightness, reacting with the cream to produce air pockets during baking. Measure precisely and mix thoroughly with the flour so rising is uniform and scones remain tender rather than gummy.
- 3 tablespoons sugar Add subtle sweetness and help with browning, balancing tartness from raspberries while contributing to the scone’s flavor profile. Dissolve with the wet ingredients to avoid gritty spots and ensure even caramelization on the crust.
- 1/2 teaspoon salt Enhance flavor depth and control seasoning, preventing blandness while balancing sweetness and acidity. Combine with the dry ingredients so salt is evenly distributed and enhances the butter and cream notes throughout the scone.
- 5 tablespoons cold butter, cut into 1/4-inch cubes Provide richness and tender flakiness by coating flour particles and creating steam pockets as it melts, yielding layered texture. Keep cold and cut into small cubes to prevent over-softening; minimal handling preserves pockets of butter for flakier scones.
- 1/2 cup fresh raspberries Introduce fresh fruity tartness and bursts of moisture that contrast the rich dough, adding bright flavor and visual appeal. Fold gently to avoid squashing berries and releasing excess juice, which can make the dough soggy and affect baking.
- 1 cup heavy cream Bind the dough, supply fat for tenderness, and activate the baking powder to create a soft, rich crumb with golden color. Keep chilled and mix just until combined to avoid overworking gluten, ensuring moist, tender scones.
Instructions
- Preheat oven to 425º.: As the oven warms, notice the subtle change in your kitchen air where anticipation meets warmth. Preheating ensures those first moments in the oven create rapid steam from the cold butter , helping the scones rise, and sets the stage for a golden crust. A common mistake is placing scones into an oven that is not fully hot, which can make them spread instead of lifting, so resist the urge to start too early.
- Combine flour, baking powder, sugar, and salt in a mixing bowl. Whisk to combine.: When you whisk, listen for a soft whisper of the dry ingredients settling together, and watch the mixture take on a uniform pale tone. This even distribution of leavening and salt guarantees consistent rise and balance throughout each scone. Avoid skipping this step, because uneven leavening pockets will yield uneven texture where some scones rise more than others.
- Cut in butter with a pastry blender until it looks like coarse cornmeal with a few slightly larger lumps. Gently stir in fruit.: As you work the cold butter into the dry mix, feel the grainy, coarse texture change under your tool. Those pea sized bits are perfect; they are the little pockets that steam and create flakiness. When you fold in the raspberries , do so softly so they stay intact and do not smear into the dough. A common error is overworking here, which warms the butter and yields dense scones.
- Add heavy cream and stir with a spatula or fork till dough begins to form.: When the heavy cream hits the dry mix, it transforms into a shaggy dough that clings together in moist clusters. You should see patches of dry flour still, and that is okay, because continued handling will bring it together. The cream's fat contributes tenderness and flavor. Overmixing at this stage is a frequent pitfall, producing tough scones instead of flaky ones.
- Pour out onto the countertop and knead very carefully till the dough comes together into a slightly sticky mound... only about 5-10 seconds.: Touch the dough and you should feel slight tackiness, not wet stickiness. Gentle kneading unites strands, but doing this too long tightens gluten and makes the crumb chewy. The right feel is a cohesive ball that still yields to a fingertip. Avoid heavy, pounding kneads, which are a foolproof route to dense scones.
- Pat into a rectangle about 1 inch tall. Cut into 8-12 rounds using a biscuit cutter.: Patting the dough gently gives it uniform height which helps even baking. As you press, watch the edges form clean lines without compacting the center. When you press out rounds, you should hear a soft thud and see the dough separate cleanly. Forcing the cutter up and down repeatedly crushes layers, so press straight down and lift to leave the layers intact.
- Place onto parchment or Silpat lined baking sheet. May brush with cream and sprinkle with sugar if desired.: Lining the sheet prevents sticking and encourages even bottom browning. Brushing with extra heavy cream before baking makes a shiny, golden top, and a sprinkle of sugar adds sparkle and crunch. Be mindful that too much brushing can create pooling, which can steam the bottoms and soften the crust.
- Bake 11-14 minutes till light brown. Cool on a rack for 10 minutes before serving. May serve warm or at room temperature. These freeze well.: As they bake, pay attention to aroma and color, the kitchen will fill with a warm, toasty scent and the edges will gently brown. The sound is silent, but the visual cue of even, light browning signals doneness. Let them rest so steam redistributes, giving a tender crumb. A common trap is underbaking, which leaves a gummy center, so rely on color and a springy top to judge completion.
- You may also make these in the food processor. Be careful not to over-process.: If you use a processor, the mixing is quick and the mixture should still show pea sized bits of fat. The noise is obvious and the dough comes together rapidly, but it is easy to overwork, turning the dough into a paste. Pulse briefly and check frequently to avoid warming the butter and losing flakiness.
Notes
- Chill everything: Keep the butter and even the bowl chilled when possible, because cold fat creates flaky pockets as it melts during baking.
- Pulse if using a processor: When you use a food processor, pulse in short bursts to avoid turning the dough into a paste and to preserve pea sized bits of butter.
- Measure flour correctly: Spoon the flour into the cup and level it off rather than scooping, which can add too much and dry the dough.
- Protect the fruit: Toss raspberries gently in a tablespoon of flour before folding into the dough to reduce sinking and bleeding.
- Watch the oven color: Bake until the tops are a light golden brown, not dark, to keep interiors tender and not overbaked.
- Freeze extras: Flash freeze scones on a tray, then transfer to a bag so you can reheat single portions without thawing the whole batch.