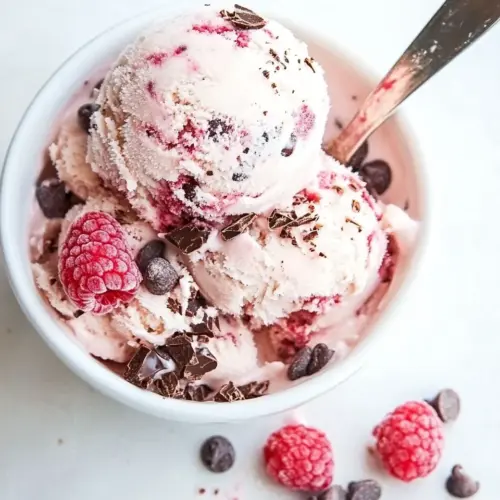
Raspberry Chocolate Chip Ice Cream
Raspberry Chocolate Chip Ice Cream is a creamy, custard style frozen treat that balances bright, tart raspberries with crunchy dark chocolate chips. Silky egg yolks and rich heavy cream create an indulgent texture, while the fruit swirl keeps it refreshing. Perfect for summer gatherings or easy weeknight dessert, this recipe delivers scoopable richness and satisfying contrast you will want to make again and again.
Equipment
- Medium Saucepan
- Large Mixing Bowl
- Whisk
- Ice Cream Maker
- Fine-mesh strainer
- High-speed blender or food processor
Ingredients
- 3 cups half and half Provide rich dairy fat and liquid to create a smooth, creamy ice cream base; helps balance sweetness and contributes to a velvety mouthfeel. Warm gently with cream and sugar to temper egg yolks for a custard-style texture, ensuring stability and richness in the finished ice cream.
- 1 cup heavy cream Add additional fat for extra creaminess and a luxurious texture; complements the half and half to increase body and mouth coating. Whisk into heated mixture to enrich the custard, which improves scoopability and prevents iciness after freezing.
- 8 egg yolks Emulsify and thicken the custard base while adding a deep, silky texture; yolks also provide structure that prevents crystallization. Whisk into the warmed dairy and sugar mixture off heat to create a smooth, stable custard before chilling and churning.
- 1 1/4 cup granulated sugar Sweeten and help dissolve into the custard to provide even sweetness and aid in texture control; sugar also lowers freezing point slightly for scoopable ice cream. Gradually combine with eggs and warm dairy to create a balanced custard that tastes sweet without being cloying.
- 1 teaspoon vanilla bean paste Enhance and deepen overall flavor with concentrated aromatic notes, adding a rounded vanilla profile that complements chocolate and fruit. Stir into the cooled custard or add with dairy to integrate evenly without overpowering the other ingredients.
- 1 cup mini dark chocolate chips or chopped dark chocolate Contribute intense dark chocolate flavor and pleasant textural contrast with little bursts of chocolate in each bite; chips or chopped chocolate create melt-in-your-mouth pockets. Fold into the churned or slightly soft ice cream near the end of churning to distribute evenly without melting.
- 2 cups raspberries Introduce bright, tart fruit flavor and natural color that balances sweetness and richness from dairy and chocolate. Mash or fold in as a ripple or layer to provide fresh berry notes and intermittent fruity bursts throughout the ice cream.
- 1/4 cup granulated sugar Increase fruit sweetness and help macerate raspberries, drawing out juices to create a syrupy component or swirl. Combine with raspberries and lemon juice to form a balanced, slightly sweetened fruit mixture for folding into the churned ice cream.
- 1 tablespoon lemon juice Add acidity to brighten and balance the sweetness while enhancing raspberry flavor and preserving vibrant color. Mix with the berries and sugar to release juices and lift the overall flavor profile of the ice cream.
Instructions
- Set a medium saucepan over medium heat. Pour in half and half and heavy cream. Simmer the mixture, stirring every so often, until the mixture is warmed. Remove from heat and set aside.: As the mixture warms you will notice a gentle steam rising and a faint sweet dairy scent filling the kitchen, the surface rippling softly as small bubbles form at the edge, signaling that it is ready for tempering. This warming step is crucial because it brings the half and half and heavy cream to temperature, which helps prevent scrambling the egg yolks later. A common mistake here is letting it boil vigorously, which can scald the dairy and create off flavors. If you see large rolling bubbles, reduce the heat right away and let it cool slightly until small bubbles form along the edge. Stirring occasionally distributes heat evenly and prevents a skin from forming on top, which can alter texture if incorporated into the custard.
- In a large mixing bowl add egg yolks and whisk until smooth. Slowly pour in sugar and whisk until combined.: Whisking the egg yolks with the sugar creates a pale, ribbon like mixture that will thicken when heated and give the base its silkiness. You should feel the mixture lighten and thicken under the whisk, and the sugar should dissolve into a glossy paste. The why here is that properly combined yolks and sugar allow for even thickening and prevent grainy texture in the finished ice cream. A common error is rushing the sugar addition, which can leave gritty granules; take your time and check between fingers for smoothness if needed.
- Add in a small amount of cream mixture to the egg mixture and whisk until combined. Slowly add in more cream until the egg mixture is warmed. Continue whisking in the cream until it’s all been added.: When you start tempering, the first small additions should be whisked vigorously so the temperature of the egg yolks rises without cooking into curds. You will notice the yolks relax and loosen as warm liquid is incorporated, and the mixture will become silkier and warmer to the touch. The reason this matters is it protects the emulsifying proteins in the yolks, ensuring a smooth custard rather than scrambled bits. A frequent mistake is pouring all the hot cream in at once, which cooks the yolks; slow and steady is the correct approach.
- Add the mixture back into the saucepan and set over low heat. Stir constantly until the mixture has thickened and reached 175 degrees F.: As you return the mixture to the warmth, stir gently but constantly; you will see it coat the back of a spoon and leave a defined line when you draw your finger through it. That visual cue tells you the custard has thickened properly and proteins have set enough to give body while still remaining pourable. Reaching around 175 degrees F ensures safety and correct texture. Overheating beyond this can lead to a grainy custard, so avoid letting it climb higher. A common pitfall is turning up the heat to speed the process, which risks curdling and scorched flavor, so keep the heat low and patient.
- Remove the mixture from the heat and pour into a storage container. Let cool on the counter for 30 minutes, stir in vanilla bean paste, raspberry puree, cover and let cool in the refrigerator overnight.: After removing from heat you will notice a warm, fragrant custard with gentle vanilla and dairy aroma. Cooling on the counter briefly lets the temperature drop safely before adding delicate ingredients like pureed raspberries , and stirring in the vanilla bean paste incorporates tiny flecks that boost flavor perception. Chilling overnight deepens flavor and allows the custard to relax, which improves freezing structure and reduces ice crystals. A common mistake is rushing this rest period; churning a warm base will produce a coarse texture and diminished flavor complexity. Cover the container to prevent absorption of other fridge odors.
- Pour into an ice cream maker and process according to the manufacturer’s directions. Once the mixture reaches soft serve texture stir in dark chocolate chips.: During churning you will hear a steady, rhythmic sound as air is incorporated and the custard thickens; visually it goes from glossy liquid to a denser, cream like mass. The goal is a soft serve stage where it holds shape but still flows slightly. Stirring in the dark chocolate chips at this point gives even distribution and prevents them from melting into the base. It is important not to overchurn, because too much air can make the ice cream overly fluffy and affect scoopability. A common mistake is adding chips too early, which leads to melting and clumping rather than little pockets of chocolate in the finished scoop.
- Cover the top of the ice cream and freeze for at least 4 hours before serving.: Once transferred to a container you will notice the temperature drop quickly and the texture firming. Press a piece of plastic directly on the surface to prevent freezer burn and icy crystals from forming. Letting it harden for at least 4 hours gives it the right scoopable firmness without becoming rock solid. A typical error is slicing into it too soon, which yields a slushy center; plan ahead so you can serve firm, neat scoops.
- Add all ingredients to a small saucepan and simmer over medium heat until the berries start to soften. Mash the berries until juicy and soft. Remove from heat, puree in a high-speed blender or food processor, strain through a fine mesh strainer, set aside and let cool. Throw out any pulp or seeds left in the strainer.: When making the puree you will smell a bright, fruity aroma as the raspberries release juice, and the color deepens to a vivid red. Mashing helps break down the fruit so the blender can produce a smooth puree, and straining removes seeds for a silkier ribbon in the final ice cream. Letting the puree cool prevents it from warming the custard when combined. A common mistake is skipping the straining step, which can leave an overly seedy texture that distracts from the silkiness of the custard.
Notes
- Increase chocolate intensity by swapping the mini dark chocolate chips for finely chopped higher percent dark chocolate, adding deeper bitterness and melt in the mouth pockets.
- Enhance raspberry swirl reserve a few whole raspberries to fold in after churning for bursts of fresh fruit and visual appeal.
- Adjust sweetness reduce the granulated sugar in either the custard or raspberry puree slightly if you prefer a more tart profile, tasting the puree before folding.
- Richer base increase the ratio of heavy cream to half and half for a denser, more luxurious mouthfeel, keeping in mind it will raise fat content and change scoopability.
- Texture variation fold in the dark chocolate chips at different stages, later for crunch, earlier for softer chocolate ribbons, depending on your preferred bite.