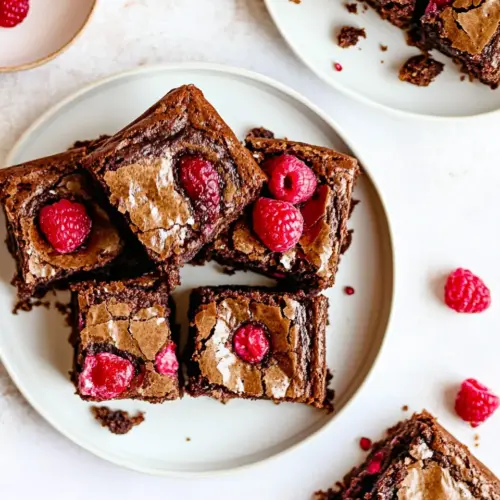
Raspberry Brownies
Raspberry Brownies are fudgy, chocolatey squares studded with bright raspberries and pockets of melted chopped chocolate. With a crackly top and tender interior, these easy, crowd pleasing bars deliver rich cocoa flavor and fruity contrast, perfect for casual gatherings or an indulgent weeknight dessert, making them a must make for chocolate and fruit lovers.
Equipment
- 9×13 inch metal baking pan
- Parchment Paper
- Mixing Bowl
- Whisk
- Spatula
Ingredients
- 1 cup butter, melted and slightly cooled Melted and slightly cooled to provide rich fat and moisture that yields fudgy brownie texture; helps dissolve sugars and bloom cocoa for a smooth batter. Incorporate carefully with sugars to create an emulsion that traps air when eggs are added, improving structure and mouthfeel.
- 1 cup granulated sugar Granulated and used to sweeten the batter while contributing to the brownie’s tender crumb; helps with creaming and dissolves into the melted butter for even sweetness. Control amount precisely to balance overall sweetness and prevent overly cakey results.
- 1 cup packed brown sugar Packed to add deep, caramel-like sweetness and extra moisture that enhances chewiness; complements the brown butter notes and intensifies flavor complexity. Use to balance the darker cocoa flavors and to keep the brownies moist over time.
- 4 large eggs Whisked in to build structure, richness, and stability while contributing to the dense, fudgy bite; eggs also help emulsify fats and liquids for a cohesive batter. Beat until just combined to avoid over-aeration which could cause a cake-like texture.
- 1 tablespoon pure vanilla extract Added for aromatic sweetness and to enhance chocolate’s flavor with warm vanilla notes; helps round out bitter or acidic elements in the batter. Stir in near the end of mixing to preserve volatile aromatic compounds.
- 1 cup all-purpose flour Sifted or measured to provide the dry matrix that holds the brownie together, contributing gluten for chew and density. Mix gently after adding to avoid developing too much gluten which would lead to toughness.
- 1 cup Dutch processed cocoa powder, or unsweetened cocoa powder Sifted or whisked into the dry mix to impart deep chocolate flavor and richness; choice of Dutch-processed or unsweetened affects acidity and leavening interaction. Ensure even distribution to prevent lumps and to balance the overall chocolate intensity.
- 1 teaspoon espresso powder, optional Optional and dissolved to enhance and intensify chocolate flavor through salty, roasted notes; a small amount amplifies depth without becoming a distinct coffee taste. Add sparingly and dissolve fully into the wet ingredients for even flavor boosting.
- 1 teaspoon kosher salt Added to season and heighten all flavors, balancing sweetness and enhancing chocolate’s complexity; kosher salt’s flaky texture dissolves easily for consistent seasoning. Adjust slightly to taste if using a different salt type to avoid over- or under-salting.
- 1 1/4 cups chopped chocolate, divided Chopped and divided to contribute pockets of melted chocolate and texture variation, with some mixed into the batter and some scattered on top. Use higher-quality chocolate for better melt and flavor; reserve some pieces to create glossy chunks and contrast in every bite.
- 1 1/2 cups raspberries, fresh or frozen Fresh or frozen and folded in to provide bright, tart bursts that cut through the richness; raspberries add moisture and a fruity counterpoint to dense chocolate. Gently fold to minimize crushing and maintain whole berries for appealing texture and appearance.
Instructions
- Preheat oven to 350°F. Spray a 9×13" metal baking pan with nonstick cooking spray. Line with parchment paper with an overhang on the sides and spray again. This will make it easy to lift the brownies out of the pan after baking. Set the pan aside.: When you enter the kitchen, the first sensory clue is the gentle hum of the oven warming up, and the faint scent of warm metal as the air heats. Preparing a 9 by 13 inch metal baking pan with nonstick spray and parchment creates a reliable release, so you will see clean edges once the brownies are out. The parchment overhang will act as handles to lift the slab out, which also makes slicing effortless. A common mistake is skipping the second spray after lining the pan, which can lead to sticky corners. Pay attention to the parchment orientation so it covers the entire base evenly and does not crease; uneven lining can cause the batter to pool in one area, creating inconsistent thickness.
- In a large mixing bowl whisk together melted butter, granulated sugar, and brown sugar. Whisk until sugar is dissolved. Add the eggs and vanilla extract and whisk until smooth and combined.: Right after combining, the batter will have a glossy sheen and you may hear the whisk faintly scraping as the sugars start to dissolve into the warm butter . That dissolving moment is important because it prevents graininess and helps the top form a thin crackly crust. Once you add the eggs and vanilla , the mixture becomes silkier and slightly more fluid, which signals proper emulsification. Overwhisking here can incorporate too much air, leading to a cakier texture, so whisk with intention until it feels cohesive and smooth. If the butter is too hot you will cook the eggs , so test by touching the bowl gently to the wrist to ensure it is warm but not hot.
- Sift the flour, cocoa, salt, and espresso powder (if using) into the mixing bowl. Stir with a spatula until combined. Don't over mix.: The scent of cocoa will lift as you sift, releasing a chocolate aroma that fills the room. Sifting removes lumps and ensures even distribution, so the batter remains uniform. When stirring with a spatula, you should see streaks disappear and the texture change from glossy to slightly thicker, indicating the flour has hydrated. Over mixing at this stage develops the gluten and will lead to tougher brownies, so stop when the last streak of flour vanishes. A mistake I often see is mixing until completely aerated; you want a dense, cohesive batter not whipped volume. Use gentle folding motions to keep the batter fudgy and tender.
- Fold in 1 cup of chopped chocolate and the raspberries. Stir carefully so you don’t break up the raspberries.: As you fold in the first cup of chopped chocolate , you will notice the batter taking on flecks and glossy pockets where the chocolate begins to melt into warm batter. Adding the raspberries next introduces bursts of bright color and a faint fruity perfume. Use a soft folding motion so the raspberries remain intact and do not bleed into the batter, which preserves visual appeal and prevents the whole pan from turning pink. If you press or stir too aggressively you will end up with puréed fruit and a change in texture; take your time and fold using the edge of the spatula to minimize pressure. If using frozen raspberries , fold them in straight from the freezer to avoid excess moisture leaching out.
- Spread evenly into prepared pan and sprinkle the remaining 1/4 cup of chopped chocolate on top of the brownies.: Smearing the batter into the pan, you should aim for an even thickness so every square bakes uniformly; the surface will look glossy and slightly textured from the folded fruit and chocolate. After smoothing, scatter the reserved chopped chocolate over the top, which will melt into glossy pools and create a pretty finish once baked. A visual cue you are ready is seeing an even sheen and no major air pockets; tapping the pan gently on the counter helps the batter settle. Avoid pushing the batter too hard into corners which can compress the structure and produce uneven crumb density.
- Bake for 25-30 minutes on the middle rack in the oven until the brownies are just set to touch. Don’t over bake the brownies. They will set up as they cool. Remove from oven and let cool before cutting into squares.: While baking, you will notice the aroma shift from buttery to deeply chocolatey, with a hint of fruity brightness escaping from the oven. The top should form a thin, crackly layer and the edges will pull slightly away from the pan. A gentle touch at the center should feel set but not stiff, and a toothpick inserted may show a few moist crumbs, which is ideal. Overbaking is the most common error here; it dries out the fudgy interior. Letting the brownies cool fully allows the steam to redistribute and the crumb to firm up, making cleaner slices. If you slice while warm you risk smearing and loss of the defined raspberry pockets.
Notes
- Butter handling: If your butter is too hot it will cook the eggs, so cool melted butter until warm before mixing. This ensures a smooth, emulsified batter and prevents curdled egg bits in the finished product.
- Sugar balance: You can slightly reduce the granulated sugar by up to two tablespoons if you prefer less sweetness, but keep the brown sugar to maintain chewiness. Large reductions will change texture noticeably.
- Chocolate options: Use chopped baking chocolate or a good quality bar for the best melting behavior; chips often contain stabilizers that change melt. Chopping allows uneven sizes that create delightful pockets of molten chocolate.
- Raspberry selection: Fresh raspberries give a cleaner presentation, while frozen ones are practical and work well when folded in straight from the freezer to limit bleeding. Either option tastes excellent with the deep cocoa notes.
- Espresso enhancement: A teaspoon of espresso powder is optional but recommended to amplify chocolate flavor without adding a coffee taste. It acts as a flavor booster and is nearly undetectable as coffee.