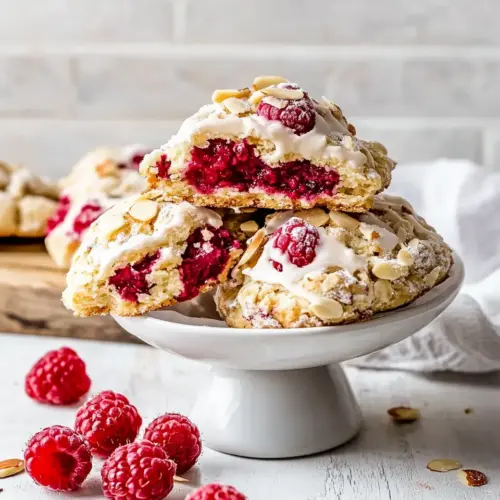
Raspberry Almond Biscuits
Raspberry Almond Biscuits are tender, flaky biscuits studded with bright raspberries and finished with a silky almond glaze and crunchy sliced almonds. This easy, slightly sweet treat offers crisp edges and soft interiors, perfect for brunch or a tea time. The almond notes make them feel special, and they come together quickly for an easy weeknight or weekend bake.
Equipment
- Large Bowl
- Medium Bowl
- Rubber spatula
- Baking Sheet
- Wire Rack
- Whisk
Ingredients
- 2 cups all-purpose flour Provide structure and bulk to the dough, forming the base of the biscuits and contributing to tenderness when properly mixed and handled.
- 3 tablespoons granulated sugar Add subtle sweetness and help tenderize the crumb while lightly caramelizing during baking for a hint of color and flavor.
- 2 teaspoons baking powder Leaven the biscuits by producing gas when combined with liquids and heat, creating a light and airy interior texture.
- 1/2 teaspoon baking soda React with acidic components to add lift and help neutralize flavors; also contributes to tender crumb when balanced with baking powder.
- 3/4 teaspoon kosher salt Enhance overall flavor balance and strengthen gluten slightly, while controlling fermentation and preserving savory contrast to sweet elements.
- 1 cup cold buttermilk Introduce acidity and moisture that activate leaveners, contribute tangy flavor complexity, and help create a tender, moist crumb.
- 1/2 cup unsalted butter, melted and cooled slightly Provide richness and moisture to the dough while adding a subtle buttery flavor; melted form helps hydrate dry ingredients evenly.
- 1/2 teaspoon pure vanilla extract Impart warm, familiar aroma and mellow sweetness that complements both the raspberry and almond flavors without overpowering them.
- 1/2 teaspoon almond extract Deliver concentrated nutty fragrance that reinforces the almond theme and brightens the overall flavor profile in small amounts.
- 1 cup frozen raspberries Contribute bright tartness and fruity moisture pockets within the biscuits, offering bursts of flavor and a contrast to the rich dough.
- 1 cup confectioner’s sugar Form the base of the glaze by adding smooth sweetness and a silken texture that coats the biscuits for a sweet finish.
- 2 tablespoons heavy cream or whole milk Thin the glaze to desired consistency and add creaminess, helping the glaze set with a glossy finish and pleasant mouthfeel.
- 1/4 teaspoon almond extract Reinforce the almond flavor in the glaze with its concentrated nutty aroma, tying the icing to the biscuit’s interior flavor notes.
- 1/4 cup sliced almonds Provide crunchy texture and a toasted nutty accent when sprinkled on top, adding visual appeal and complementary flavor contrast.
Instructions
- Preheat oven to 475°F. Line a large baking sheet with a Silpat baking mat or parchment paper. Set aside.: The moment the oven heat fills the kitchen you'll notice a dry, warming scent that signals fast oven spring awaits, which helps give the biscuits a crisp exterior and tall rise. Make sure the rack is in the middle of the oven to promote even browning on both top and bottom, and have your baking sheet ready so you can transfer shaped biscuits quickly. A common mistake is preheating too low, which yields dense, pale biscuits rather than golden ones. If using a convection oven, check them a few minutes earlier because the circulating heat bakes faster.
- In a large bowl, whisk together the flour, sugar, baking powder, baking soda, and salt. Set aside.: You will smell the dry, slightly sweet aroma of the flour as it mingles with sugar and salt, and the fine dust will sift lightly in the air when whisked. This step ensures even distribution of leavening so every biscuit rises uniformly. I like to whisk until the mixture looks homogenous and slightly aerated, which helps with lightness. If you skip this, you risk pockets of uneven rise where one biscuit may puff more than the others.
- In a medium bowl, combine cold buttermilk and the slightly cooled melted butter. Stir with a spatula until combined and small clumps form. It is ok if the mixture is lumpy. Stir in the vanilla and almond extracts.: You will see little pearl like clumps forming in the liquid, and the aroma of almond extract and vanilla will lift the mixture. These clumps help create tender pockets in the dough once baked. The coldness of the buttermilk helps keep the fats from fully integrating, preserving some structure that yields flaky layers. If the butter is too warm, the mixture will become uniform and the biscuits can lose their lift.
- Add buttermilk mixture to dry ingredients and stir with rubber spatula until just combined and the biscuit batter pulls away from sides of bowl.: As you combine the wet into dry you will notice the batter transition from dusty to a soft, slightly sticky mass that clings to the spatula. Stop stirring as soon as the batter mostly comes together to avoid overworking gluten, which would make the texture tough rather than tender. The dough should be slightly shaggy and just cohesive. Overmixing is a common error here, and it tightens the dough, producing a chewier biscuit.
- Gently fold in the raspberries.: When you fold in the raspberries , move slowly so the fruit does not burst and color the entire dough. You will see gentle pockets of pink emerging, and the occasional whole berry will sit like a jewel in the batter. Folding preserves the integrity of the berries so they retain their tart pockets of juice. Rushing this step or stirring vigorously will crush the berries and add excess moisture, potentially making the biscuits dense.
- Scoop biscuit batter (approximately 1/4 cup per biscuit) and drop on prepared baking sheet, spacing biscuits at least 2 inches apart.: As you scoop and drop the batter, you will hear a soft thunk and notice domed mounds forming on the sheet. Spacing matters so the biscuits brown evenly and do not merge during baking. Wet hands or a floured scoop can help release the batter without squishing it. If you pack the scoops too tightly or leave them too close, the sides will bake together and the biscuits will lack crisp edges.
- Place the baking sheet in the oven, on the middle rack, and bake until the biscuit tops are golden brown, about 10 to 14 minutes.: The oven will amplify the buttery aroma, and within minutes you may see the tops puff and take on color. Look for a warm golden tone and slightly firm tops when you tap them gently. The high heat encourages a quick lift and a browned exterior while keeping the interior tender. If you rely only on time without checking color, you might underbake pale biscuits or overbake dry ones, so watch for the visual cues.
- Remove from the oven and let biscuits cool for 5 minutes on the baking sheet. Transfer biscuits to wire rack and let cool completely.: Cooling briefly on the sheet lets residual heat finish setting the crumb while preventing the bottoms from becoming soggy. Moving them to a wire rack allows air to circulate so the exterior stays crisp as they finish cooling. If you try to glaze piping hot biscuits, the glaze will run off and not set properly, so patience at this stage pays off.
- While the biscuits are cooling, make the almond glaze. In a medium bowl, whisk together the confectioner’s sugar, heavy cream or milk, and almond extract. Whisk until smooth.: Whisking creates a glossy, velvety glaze; you'll notice the confectioner’s sugar dissolve and the mixture become silky. The small amount of almond extract in the glaze brightens the whole flavor profile. If the glaze seems too thick, add a little more cream or milk a teaspoon at a time; too thin and it will run off the biscuits instead of coating them.
- Drizzle the glaze over the cooled biscuits and sprinkle with sliced almonds. Serve.: The final drizzle should create glossy ribbons over the tops, and the toasted or raw sliced almonds add crunch and a toasty aroma. Let the glaze set briefly before stacking or storing so it does not smear. A common misstep is glazing warm biscuits, which melts the glaze into a thin puddle rather than a pretty finish.
Notes
- Toast the sliced almonds: Toasting the sliced almonds in a dry pan until fragrant deepens their flavor and adds a warm crunch that contrasts beautifully with the soft biscuit.
- Use cream for richer glaze: Swap the milk for heavy cream in the glaze for a silkier mouthfeel and a slightly more indulgent finish that still sets well.
- Keep berries frozen: Folding in frozen raspberries helps them hold shape and reduces bleeding during mixing, preserving pretty color spots in the biscuits.
- Sift confectioner’s sugar: Sifting the confectioner’s sugar before whisking ensures the glaze is smooth and lump free, especially helpful if your sugar has settled.
- Chill dough briefly if warm: If your kitchen is hot and the batter feels overly loose, pop the bowl in the fridge for a few minutes to firm up the fats and make scooping cleaner.
- Adjust almond extract sparingly: Almond extract is potent, so add it carefully to the dough and glaze to avoid an overly strong, artificial taste.