Quick and Easy Carmelitas
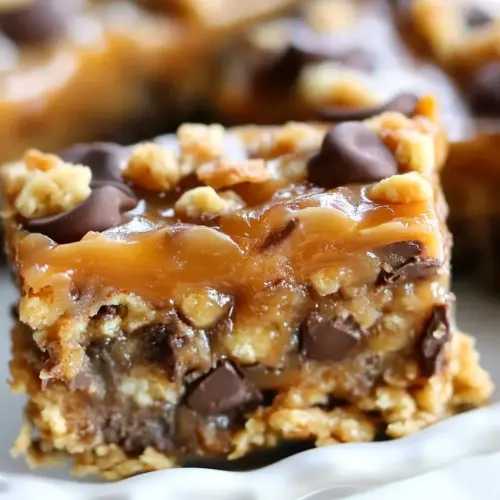
Quick and Easy Carmelitas are crispy golden cookie bars layered with silky caramel and pockets of melty chocolate, an easy make ahead treat perfect for bake sales or weeknight desserts. These bars deliver chewy, rich texture with minimal fuss thanks to ready made cookie dough and simple caramel melted with evaporated milk, making them an irresistible, crowd pleasing option you will want to make again and again.
Equipment
- 9-inch square baking pan
- Parchment Paper
- Microwave-safe container
- Sharp Knife
Ingredients
- 30 oz refrigerated chocolate chip cookie dough 1 roll Provides a buttery, sweet cookie base and binds the bars together; pressable dough forms the top and bottom layers and bakes to a golden, chewy texture. Soften slightly for easier spreading and ensure even thickness for consistent baking.
- 11 oz KRAFT caramels 1 bag Melts into a rich, gooey caramel layer that adds chewiness and sweetness between cookie layers; chop or unwrap pieces for even melting and stir with milk for smooth consistency. Use as the primary source of caramel flavor and structure in the filling.
- 1/4 cup evaporated milk Thins and softens the caramel when heated, creating a glossy, pourable caramel sauce that melds with the chocolate and cookie layers. Warm gently to prevent burning and achieve a smooth, cohesive filling consistency.
- 1 cup semi-sweet chocolate chips Adds pockets of melty chocolate throughout and a glossy topping when sprinkled over warm caramel; semi-sweet chips balance the caramel sweetness with cocoa intensity. Scatter evenly so chocolate melts into ribbons and provides chocolate bites in each bar.
Instructions
- Preheat oven to 350 F. Slice a little more than half of the cookie dough into 1/4" rounds and lay in a single layer on a parchment lined 9-inch square baking pan.: When the oven reaches the target temperature you will notice a steady, warm hum and a faint scent of dry heat, which primes the sugars in the dough to brown evenly. This step matters because baking into a fully heated oven ensures the base sets properly and the top pieces brown without overbaking. A common mistake is underheating the oven, which can lead to a gummy center. Be sure to position the rack in the center for balanced heat distribution.
- Use your fingers to press into a single, solid, even layer.: The tactile task of slicing and laying dough creates even patches that will fuse into a cohesive crust. You should feel the dough soften slightly as you slice; if it is too sticky chill for a few minutes. This technique helps create air pockets that become crisp edges during baking. Avoid crowding the pan or overlapping rounds, which can prevent proper browning.
- Bake for 20 to 25 minutes or just until golden brown. Removed from the oven and let cool slightly.: As you press, you will hear a faint squishing sound and see the circles merge into a near seamless sheet. Aim for uniform thickness so the crust bakes evenly to a golden tone. Pressing firmly but gently helps remove large air pockets, producing a stable base for the caramel. A common error is overworking the dough which can make it tough, so press just enough to join the pieces.
- Combine unwrapped caramels and evaporated milk in a microwave-safe container and heat on high for 1 minute. Stir and heat on high in 30 second intervals until caramel is completely melted.: Watch for the edges turning a warm golden color and a toasty aroma filling the kitchen, which signals the Maillard reaction at work. This window sets the crust without drying it out. Remove when centers are set but not overbrowned. If you bake too long the base will become hard and brittle, so check at the earlier time and add minutes if needed.
- Sprinkle chocolate chips over the slightly cooled chocolate chip cookie crust.: The pan will radiate warmth and you may see a thin sheen on the crust where butter has surfaced. Cooling slightly stabilizes the structure before adding wet filling. This pause prevents the caramel from sinking through the crust. Do not let it cool completely or the caramel will not spread smoothly.
- Drizzle caramel on top of the chocolate chips.: Initially you will hear quiet bubbling and see the caramels soften and meld with the milk. Starting with a full minute jumpstarts the melt, creating a glossy base for stirring. This step is essential so the caramel becomes pourable without overheating. A frequent misstep is continuous high heat which can scorch the sugars, so set short intervals after this initial minute.
- Crumble the remaining cookie dough (should be less than half remaining) over the top of the caramel. It doesn't have to be perfect or even.: Each stir smooths the mixture, releasing a warm, sweet aroma and creating a thick ribbon of caramel. Stop heating when the mixture flows easily and no chunks remain. The stir integrates the evaporated milk , making the texture creamy and stable. If you overheat you risk graininess, so cool for a moment if it seems too hot.
- Return the carmelitas to the oven and bake for another 12-15 minutes or until just beginning to turn golden brown.: As you scatter the chips, they will sit glossy on the surface and start to soften from residual heat. The contrast of softening chips against the cookie base adds a pleasing mosaic effect. Placing them on a slightly cooled crust prevents them from melting completely into the caramel. Too hot a crust will cause the chips to lose shape and blend into the filling.
- Let cool to room temperature and then refrigerate for at least 2 hours.: The warm caramel should flow in ribbons, seeping into tiny crevices around the chocolate chips . The sound is a gentle swish and the look should be shiny and even. A smooth pour helps create a consistent chewy layer. Pouring while too hot could make the chocolate overly runny, while pouring too cool gives a clumpy texture, so aim for pourable warmth.
- Sit out for 15 minutes before cutting and serving.: Break the reserved dough into uneven pieces and scatter them so the top has rustic texture. You will hear soft crumbles and see pockets of caramel peeking through, which bakes into a pleasing, slightly crisp top. This irregularity is intentional and creates contrast. Avoid packing the crumbs densely, or the caramel may not bubble through and set properly.
- Return the carmelitas to the oven and bake for another 12 to 15 minutes or until just beginning to turn golden brown: During this bake you will notice gentle bubbling at the edges, and the top crumbs will take on a light golden hue. This brief bake sets the caramel and crisps the top without drying the filling. It is crucial because it melts the crumbs into the caramel slightly, bonding the layers. Overbaking here is common and will yield a harder bar, so watch closely in the final minutes.
- Let cool to room temperature and then refrigerate for at least 2 hours: Cooling allows the caramel to firm and flavors to meld; you will see the surface lose its high gloss and become set. Refrigeration helps the bars slice neatly, as chilled caramel cuts cleaner than warm. If you skip chilling, bars will be too soft and ooze when cut, a very common frustration. Give them the full rest for best texture.
- Sit out for 15 minutes before cutting and serving: Bringing the bars slightly closer to room temperature softens the caramel just enough for easier chewing while keeping the structure intact. You may notice a subtle softening and renewed shine as they warm. This short tempering step ensures ideal bite satisfaction. Cutting while fully cold can cause slight crumbling, so wait the recommended time.
Notes
- Cookie Dough Handling If your cookie dough is too firm to slice, let it sit at room temperature for 5 to 10 minutes until it gives slightly, making slices more uniform and easier to press into the pan.
- Caramel Melting Stir the caramels and evaporated milk frequently as you microwave, and use 30 second intervals after the first minute to avoid burning and to keep the sugar smooth and glossy.
- Even Crust When pressing the first half of the dough into the pan aim for consistent thickness using the bottom of a measuring cup, this helps even baking and reduces thin spots that brown too fast.
- Chocolate Placement Scatter the chocolate chips while the crust is only slightly warm, not hot, so they soften but maintain little pockets of chocolate rather than fully blending into the caramel.
- Cooling Patience Refrigerate for the full recommended time before cutting, chilled caramel slices cleaner and you avoid a sticky, messy presentation that is frustrating to serve.