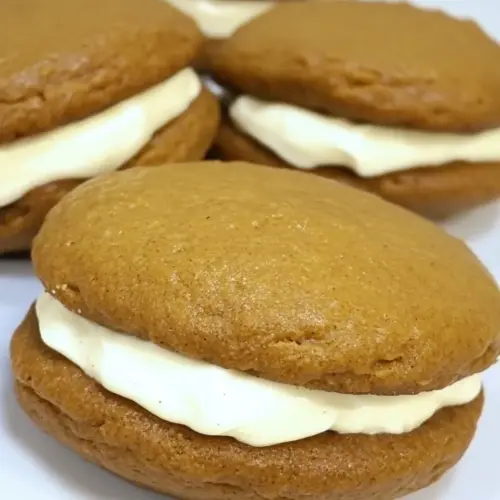
Pumpkin Whoopie Pies with Maple Cream Cheese Filling
Pumpkin Whoopie Pies with Maple Cream Cheese Filling are soft, spiced sandwich cookies with a silky, tangy filling. Creamy and slightly sweet, these treats marry warm spices and real maple for an easy seasonal dessert that works for parties or weeknight baking. Make a batch to share, they vanish quickly and keep well chilled for fuss free entertaining.
Equipment
- Mixing Bowls
- Whisk
- Cookie Scoop
- Baking Sheets
- Parchment Paper
- Cooling rack
- Electric Mixer
- Spatula
Ingredients
- 3 cups (375 g) all-purpose flour Provide structure and bulk to baked goods; creates the crumb and absorbs moisture for proper texture. Sift or spoon into measuring cup to avoid packing and ensure accurate amounts. Combines with leaveners to form the base of the whoopie pie batter.
- 2 tablespoons cinnamon Add warm, aromatic spice and depth of flavor to the batter; complements pumpkin with classic autumnal notes. Blend thoroughly with dry ingredients to distribute evenly and avoid clumps. Adjust slightly to taste if preferring more or less spice intensity.
- 1 teaspoon baking powder Contribute gentle lift and lightness to the baked cakes by producing carbon dioxide when heated. Combine with other leaveners and dry ingredients to ensure even rising. Measure precisely to prevent overly domed or flat cakes.
- 1 teaspoon baking soda Produce rapid rise and help create a tender, airy texture when reacting with acidic components in the batter. Work together with baking powder for balanced leavening action. Ensure freshness for reliable rising.
- 1 teaspoon salt Enhance flavor balance and strengthen gluten structure slightly while controlling yeast or chemical leavening activity. Dissolve well into wet ingredients for even distribution. Use measured amounts to avoid overly salty taste.
- 1 teaspoon ground ginger Introduce warm, sharp spiciness that brightens the pumpkin flavor profile and pairs with cinnamon and nutmeg. Mix into the dry ingredients to ensure consistent seasoning throughout. Small quantities go a long way in layered spice blends.
- 1/2 teaspoon (0.5 teaspoon) ground nutmeg Deliver sweet, aromatic warmth and hint of clove-like flavor that rounds out the spice blend in pumpkin baked goods. Incorporate with other spices to avoid hotspots of flavor. Use measured fraction for balanced spice.
- 1 cup (200 g) granulated sugar Provide sweetness, tenderization, and help with caramelization of the cake surfaces during baking. Cream with oil and sugars to dissolve and integrate for proper texture. Offers neutral sweetness that balances dark brown sugar’s molasses notes.
- 1 cup (220 g) dark brown sugar Contribute deep, molasses-like sweetness and moisture, enhancing chewiness and rich flavor in the cakes. Cream with granulated sugar and oil for a cohesive batter. Adds complexity and pairs well with pumpkin and spices.
- 1 cup (218 ml) canola or vegetable oil Supply fat for tenderness, moistness, and a soft crumb; helps carry flavors and lubricate proteins and starches. Pour in and mix until just combined to avoid greasy texture. Choose neutral oil to let spices and pumpkin shine.
- 3 cups (735 g) chilled pumpkin puree, canned pumpkin Bring concentrated pumpkin flavor, moisture, and dense texture; acts as the primary flavor component in pumpkin whoopie pies. Keep chilled to preserve structure and prevent batter from becoming too loose. Use canned pumpkin puree specified for baking rather than pie filling.
- 2 eggs Provide structure, richness, and additional moisture; helps bind ingredients and contribute to cake lift. Beat into batter one at a time for even incorporation and to maintain emulsion. Use large eggs for consistent results.
- 1 teaspoon vanilla extract Add sweet, floral background and enhance other flavors; contributes to aroma in both cake and filling. Stir into wet ingredients for even distribution. Use pure extract for best flavor clarity.
- 3 cups (360 g) powdered sugar Form bulk and sweetness in the filling while contributing smooth texture when sifted and beaten. Add gradually to cream cheese and butter to achieve desired frosting consistency. Ensure it's free of lumps by sifting if needed.
- 8 ounces (226.8 g) cream cheese, at room temperature Contribute tangy, creamy flavor and silky texture to the filling; helps balance the sweetness of powdered sugar and maple syrup. Bring to room temperature for easy beating and smooth consistency. Use full-fat cream cheese for best stability.
- 4 ounces (113.4 g) unsalted butter, at room temperature, (1/2 cup) Provide richness, body, and a tender mouthfeel to the filling while helping stabilize the emulsion with cream cheese. Soften to room temperature to ensure smooth incorporation and avoid lumps. Measure precisely to maintain filling firmness.
- 3 tablespoons maple syrup Introduce natural sweetness and distinct maple flavor to the cream cheese filling, enhancing autumnal character. Add gradually and taste to reach desired maple intensity without thinning the filling. Use real maple syrup for authentic flavor.
- 1 teaspoon vanilla extract Enhance aroma and round out the sweetness in the filling with a delicate vanilla note; pairs well with maple and cream cheese. Add to filling after creaming butter and cream cheese to integrate flavor evenly. Use pure vanilla extract for best results.
Instructions
- Preheat oven to 350 degrees F. Line baking sheets with parchment paper or a silicone baking mat.: When you open the oven you should feel the warm dry air ready to transform batter into soft cookies, and the prepared sheets prevent sticking while promoting even browning. I always test one tray first so I can hear the faint sizzle as they hit the hot pan and see the edges set just right. The why here is even heat distribution and easy cleanup. A common mistake is skipping the lining, which can cause sticking and tearing of the cakes; if you do not line, grease the sheet lightly and watch for earlier browning.
- In a large bowl, whisk together the flour, cinnamon, baking powder, baking soda, salt, ginger and nutmeg. Set aside.: The aroma of the spices blooming as you whisk them into the flour is immediate and fragrant. Dry whipping distributes the leavening and spice evenly so each cookie rises and tastes balanced. I wave my hand over the bowl and inhale briefly, because that scent tells me the spice proportion is right. The reasoning is to avoid pockets of baking soda or clumps of spice that would create uneven flavor or texture. A common error is to skip sifting or whisking, which can leave lumps or uneven spice pockets; take the extra moments to whisk thoroughly.
- In a separate bowl, whisk the granulated sugar, the dark brown sugar, and the oil together. Add the pumpkin puree and whisk to combine thoroughly. Add the eggs and vanilla and whisk until combined.: When you combine sugars with oil the mixture looks glossy and smooth, and folding in the pumpkin transforms it into a thick, deeply colored batter base. Adding the eggs and vanilla creates a cohesive emulsion, and you will notice the batter's sheen deepen. This step matters because it ensures moisture and fat are evenly distributed, impacting final texture. Avoid under mixing which can leave streaks of pumpkin or sugar; however, over mixing will make the batter too loose and affect rise.
- Gradually add the flour mixture to the pumpkin mixture and whisk until completely combined.: As you incorporate the dry into the wet, watch the batter change from glossy to a soft, holdable consistency that will mound when scooped. The visual cue is no streaks of dry flour , and the batter should be homogenous. The why is to prevent overworking gluten, keeping the cookies tender instead of tough. A frequent mistake is dumping all the flour at once and overmixing; add gradually and stop when fully combined.
- Use a small cookie scoop or a large spoon to drop a rounded, heaping tablespoon of the dough onto the prepared baking sheets, about 1 inch apart.: Dropping uniform mounds ensures even baking, and you will hear a soft plop as the dough lands on the parchment. The cookies spread just a touch, so spacing is important to avoid merging. Uniformity results in consistent appearance and baking time. Many people crowd the sheet to save time, which leads to merged cookies and uneven centers; keep the spacing and use a scoop for consistency.
- Bake for 10 to 12 minutes, making sure that the cookies are just starting to crack on top and a toothpick inserted into the center of a cookie comes out clean. The cookies should be firm when touched. Remove from the oven and let the cookies cool completely on a cooling rack.: During baking you will see tiny fissures form on top and the aroma of spices deepen. The edges will set and the centers will spring back slightly when touched, signaling readiness. Cooling on a rack prevents steam buildup that would soften the bottoms, preserving texture. The reason this timing is critical is to keep them soft and cakey rather than dry. A common mistake is overbaking for a crisp cookie; aim for slight give and let residual heat finish the set off the tray.
- To make the filling, beat the butter on medium speed until smooth with no visible lumps, about 3 minutes. Add the cream cheese and beat until smooth and combined, about 2 minutes. Add the powdered sugar a little at a time, then add the maple syrup and vanilla and beat until smooth.: You will notice the butter become pale and silky, and when the cream cheese joins it, the mixture turns luxuriously smooth and glossy. Adding the powdered sugar gradually prevents airborne clouds and ensures a silky texture, while the maple syrup adds aroma and a warm sweetness. The why is texture and stability for piping or spreading, and chilling later helps firm the filling. A pitfall is using cold cream cheese , which causes lumps; always bring it to room temperature for a smooth result.
- To assemble the whoopie pies: Turn half of the cooled cookies upside down. Pipe or spoon the filling (about a tablespoon) onto that half. Place another cookie, flat side down, on top of the filling. Press down slightly so that the filling spreads to the edges of the cookie. Repeat until all the cookies are used. Put the whoopie pies in the refrigerator for about 30 minutes to firm before serving.: Turn half of the cooled cookies upside down. Pipe or spoon the filling (about a tablespoon) onto that half. Place another cookie, flat side down, on top of the filling. Press down slightly so that the filling spreads to the edges of the cookie. Repeat until all the cookies are used. Put the whoopie pies in the refrigerator for about 30 minutes to firm before serving. : As you assemble you will feel the soft give of the cookie and watch the filling spring outward to the edges when pressed, creating the ideal sandwich. The chilled pause firms the filling so slices are neat and they transport well. The reason this matters is presentation and mouthfeel, chilled filling holds its shape and contrasts with the tender cookie. Common mistakes include overfilling, which causes leaking, or assembling while the cookies are warm, which will make the filling melt and the pies collapse; always ensure the cookies are fully cooled.
Notes
- Measure flour by weight to ensure consistent texture and avoid dense cookies, especially important when baking in different climates.
- Keep pumpkin chilled before mixing so the dough holds together and the cookies do not spread excessively in the oven.
- Use a cookie scoop for uniform mounds, which guarantees even baking and matching pairs for assembling.
- Add powdered sugar gradually to the filling to keep it smooth and prevent a gritty texture, especially if your sugar is slightly compacted.
- Chill after assembly for at least 30 minutes so the filling firms and slices remain neat when plated or packed.