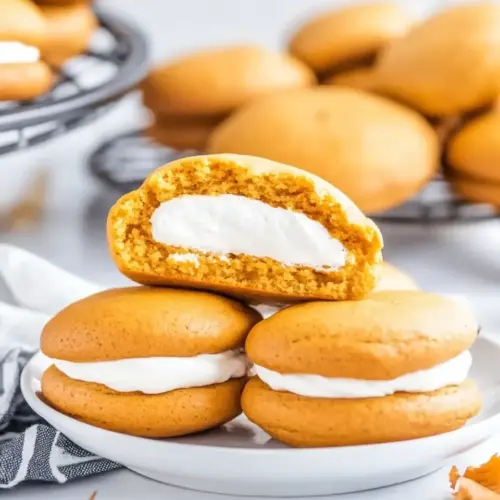
Pumpkin Whoopie Pies
Pumpkin Whoopie Pies are soft, spiced cookie sandwiches with a creamy, tangy filling. These pillowy treats are moist, lightly spiced, and perfect for a fall dessert or holiday table. They are easy to share at parties and bake in a single batch, making them a cozy and crowd pleasing option to make this season.
Equipment
- Mixer
- Sheet pans
- Parchment Paper
- Cookie Scoop
Ingredients
- 1 3/4 cups light brown sugar Sweeten and deepen flavor while adding moisture and a tender crumb; helps balance spices and enrich the dough for whoopie pies. Use beaten well to incorporate air and create a consistent batter texture.
- 1 cup salted butter 2 sticks, softened Provide fat for structure, richness, and a smooth mouthfeel; creamed with sugar to trap air for lighter cakes. Ensure softened butter is at room temperature for even mixing and optimal emulsion.
- 2 large eggs Bind ingredients together, add moisture, and contribute to leavening through steam and coagulation; eggs also provide structure and richness. Beat until combined to help create a uniform batter and stable crumb.
- 15 ounces pumpkin puree about 2 cups Contribute moisture, dense texture, and pumpkin flavor while reducing the need for additional liquid; adds natural sweetness and color to the whoopie pies. Use pure pumpkin puree for consistent results and to maintain proper batter consistency.
- 2 1/2 cups all-purpose flour Form the bulk of the dry structure, providing gluten for chew and strength while balancing wet ingredients; all-purpose flour yields a tender yet supportive cake. Measure carefully and avoid overmixing to prevent toughness.
- 2 tablespoons pumpkin pie spice Impart warm, spicy autumn flavor and aroma while complementing pumpkin; balances sweetness and enhances depth. Adjust slightly if using pre-blended mixes to match personal spice preference.
- 1 teaspoon baking soda React with acidic components to produce carbon dioxide for leavening, creating lift and lightness in the cakes. Measure precisely to ensure proper rise without a metallic aftertaste.
- 3/4 teaspoon baking powder Provide additional chemical leavening to fine-tune rise and texture, contributing to a slightly puffier, tender crumb. Use alongside baking soda to balance acidity and control browning.
- 3/4 cup salted butter softened Add richness and smooth texture to the filling or batter, supplying fat and mouthfeel; softened butter helps create a creamy, spreadable frosting. Beat thoroughly for a light, aerated frosting consistency.
- 8 ounces cream cheese softened Give tangy richness and creamy body to the filling; helps stabilize and contrasts sweetness with slight acidity. Soften to room temperature for smooth incorporation into butter and sugar.
- 4 1/2 cups powdered sugar sifted Sweeten and thicken the filling, creating a smooth, spreadable consistency while providing structure and stability; sifted powdered sugar prevents lumps. Add gradually to reach desired sweetness and texture.
- 2 tablespoons heavy cream Thin and loosen the frosting slightly while adding richness, helping achieve a smooth spreadable consistency; heavy cream also aids in whipping and sheen. Add small amounts until the filling reaches the preferred softness.
- 1/2 teaspoon salt Enhance overall flavor by balancing sweetness and intensifying other ingredients while controlling seasoning; salt also strengthens gluten slightly in the batter. Use measured amount to avoid over-salting delicate cakes and filling.
Instructions
- Preheat the oven to 350°F. Line two sheet pans with parchment paper and set aside.: The air in your oven will gradually warm and the aroma of baking will begin to build, signaling the start of the transformation. You should hear the faint hum of the oven elements and feel a steady, even heat if you open the door carefully. Accurate oven temperature matters for even rise and proper setting of the cookies, so use an oven thermometer if your oven tends to run hot or cold. A common mistake is placing pans before the oven reaches temperature, which can lead to flatter cookies.
- Use a mixer to beat the light brown sugar and butter together until creamy and fluffy. Add in one egg and beat until fully combined and then add the other egg. Be sure to scrape down the sides to ensure everything is mixed.: As you whip the brown sugar with the softened butter , you will notice the mixture lighten in color and become airy, creating tiny pockets that help the cookies rise. After adding each egg , the batter should look smooth and cohesive, and scraping the bowl prevents pockets of unmixed butter or sugar. This stage is essential for texture and even baking. Avoid overbeating after the flour is added, because that can develop gluten and make cookies tough.
- Beat in the pumpkin puree.: When you add the pumpkin , the batter will loosen and take on a rich, rust colored hue. The scent of autumn spices and pumpkin will grow more pronounced, and the batter should feel moist but not runny. Stir gently until uniform, being careful not to overwork the mixture. If the batter becomes too slack, resist adding too much flour; instead check your measuring technique or chill the bowl briefly before scooping.
- In a separate, large bowl whisk together the all-purpose flour, pumpkin pie spice, baking soda, and baking powder.: Whisking these dry elements distributes the pumpkin pie spice and leaveners evenly so each scoop has the same balance of flavor and lift. The dry mix will smell warmly spiced, and you should see a consistent color throughout. If you skip this step, you risk uneven pockets of baking soda or spice, which can cause irregular rise or bitterness.
- Beat the flour mixture in with the butter mixture. Mix until fully combined but do not overmix.: As the dry ingredients fold into the wet, the batter will thicken and the texture will transform into a soft, scoopable dough. You should stop mixing as soon as you see no streaks of flour, because excess stirring develops gluten and yields chewier cookies instead of tender ones. A common error is overmixing while trying to smooth the batter, so finish by hand if needed to avoid overworking.
- Use a medium cookie scoop to scoop mounds of batter onto the prepared sheet pans. Leave about 2-inches between each cookie.: Scooping creates uniform cookies that bake evenly and match up nicely when paired. You will notice the batter holds its shape but has a slightly domed top; spacing them allows for gentle spreading without sticking. If your scoops vary widely in size, the smaller ones will bake faster and can overbrown, so keep a steady hand or use a scale for precision.
- Bake in the oven for 12-15 minutes or until the middle sets. Remove from the oven and let the cookies cool completely.: During baking you will see the edges set and the centers spring back slightly when touched, and the scent of spices will intensify. Proper bake time ensures the cookies are cooked through but remain soft. Letting them cool fully is crucial because a warm cookie can compress and cause the filling to melt. Taking them out too early leads to underbaked centers, while overbaking will dry them out.
- To make the filling, beat the salted butter and cream cheese until fully combined and creamy. Gradually beat in the powdered sugar, heavy cream, and salt until light and fluffy, about 5 minutes.: As you whip, the filling will become velvety and pale, with a faint sheen and a cloud like texture. The cream cheese tang cuts through the sweetness of the powdered sugar , and the heavy cream helps achieve a smooth, pipeable consistency. If the filling seems too thin, chill briefly and rewhip; if too thick, add a splash more cream. A frequent mistake is adding the sugar too quickly, which can make the filling gritty.
- To assemble the pies, take one cookie and pipe filling onto the bottom of the cookie. Top with another cookie and refrigerate until ready to serve.: When assembled, the filling should be visible but not overflowing, creating a neat sandwich that is pleasing to hold and eat. Press gently to spread the filling evenly to the edges; the contrast of the soft cookie and creamy center is the signature of these pies. Refrigerating helps the filling firm so the pies slice cleanly and transport easily. Avoid stacking while still warm, as the filling can squish out and become messy.
Notes
- Swap the piping style to create different looks, from rustic spread to neat rosette tops, depending on the occasion.
- Adjust sweetness levels by tasting the filling as you add powdered sugar, stopping when it balances tang and sweetness to your preference.
- Chill for firmer slices if you plan to package the pies, as a brief rest in the fridge helps them keep their shape.
- Make mini versions by using a smaller scoop for bite sized treats that are great for parties and sampling.
- Double the batch carefully and watch cooling time, since larger quantities can lengthen assembly and affect texture if rushed.