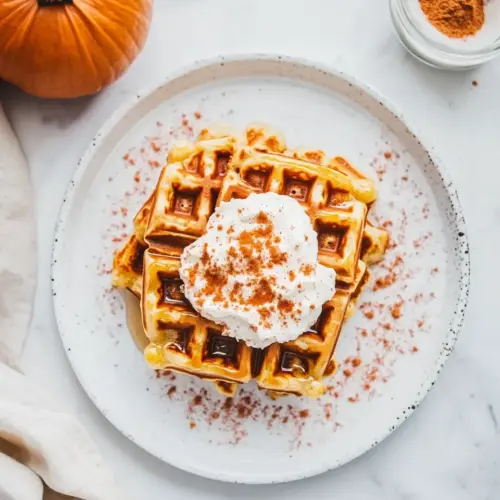
Pumpkin Waffles
Pumpkin Waffles deliver warm, spiced aroma and a crisp outside with a tender, pumpkin rich interior, perfect for easy weekend breakfasts or a festive Thanksgiving brunch. This recipe is creamy, slightly sweet, and approachable, making it ideal for family mornings and cozy gatherings. Try it for a reliable, comforting waffle that celebrates fall flavors and invites seconds.
Equipment
- Waffle Iron
Ingredients
- 2 -1/4 cups flour Combine to provide structure and bulk to the waffle batter, creating a tender crumb when mixed properly; flour absorbs liquids and helps bind other ingredients through gluten development. Adjust mixing gently to avoid overworking which can lead to tough waffles, and measure accurately for consistent texture.
- 1/2 teaspoons alt Season lightly to enhance overall flavor balance and accentuate sweetness while keeping sodium low; salt also strengthens the gluten network and controls yeast or leavening activity. Use sparingly to avoid overpowering spices and sugars, and distribute evenly throughout the dry ingredients.
- 4 teaspoons baking powder Leaven vigorously to produce lift and create a light, airy interior by releasing carbon dioxide when moistened and heated; baking powder is crucial for waffle rise and crisp edges. Sift or whisk into dry ingredients to ensure even dispersion and avoid pockets of metallic taste.
- 1 tablespoon cinnamon Spice warmly to impart aromatic depth and a classic fall flavor profile; cinnamon complements the pumpkin and brown sugar with sweet, woody notes. Add to the dry mix for even flavor distribution and consider adjusting to taste for stronger or subtler spice presence.
- 1 tablespoon pumpkin pie spice Season boldly to contribute a complex, spiced pumpkin-pie character with notes of nutmeg, cloves, and allspice; pumpkin pie spice ties the flavors together for seasonal warmth. Incorporate with other dry spices so the blend permeates every bite of the waffle.
- 1/4 cup light brown sugar or granulated sugar, packed Sweeten and add moisture while contributing a hint of caramel complexity when using brown sugar; packing the sugar ensures accurate sweetness and helps with caramelization. Substitute with granulated sugar if preferred, but expect a slight difference in flavor and texture.
- 2/3 cup pumpkin Moisturize and enrich by adding pronounced pumpkin flavor and dense moisture to the batter, lending tender texture and autumnal color; pumpkin also contributes mild natural sweetness and fiber. Puree should be well-drained and measured to avoid thinning the batter excessively.
- 1 cup whole milk room temperature Hydrate and thin the batter to proper consistency while contributing mild dairy richness and a tender crumb; room-temperature milk mixes more smoothly with eggs and fats. Use whole milk for added fat and flavor, but other milks can be used with slight texture differences.
- 1 teaspoon vanilla extract Flavor subtly to enhance overall aroma and bring out sweet and spiced notes; vanilla rounds and harmonizes the pumpkin and sugar. Add to wet ingredients so the scent distributes evenly without being lost during cooking.
- 4 large eggs room temperature Bind and leaven further while contributing richness and structure; room-temperature eggs emulsify fats and liquids, improve rise, and create a tender interior. Separate or beat as directed for desired texture, and ensure they are at room temperature for best incorporation.
- 6 tablespoons unsalted butter melted and cooled Enrich and add fat for flavor, tender crumb, and crisp exterior; melted and cooled butter blends smoothly into the batter without cooking the eggs. Pour in gradually to emulsify with other wet ingredients and avoid leaving pools of oil in the batter.
- Syrup see note 2 Serve optionally to add sweetness and moisture on the finished waffles, enhancing flavor and mouthfeel; syrup provides contrast to the spiced pumpkin base and can be chosen to complement brown sugar notes. Offer warmed syrups and apply sparingly to avoid soggy waffles.
- Whipped cream optional Garnish optionally to contribute light creaminess and a sweet, airy finish that balances the warm spices; whipped cream adds visual appeal and a soft texture contrast. Pipe or dollop just before serving to maintain structure and avoid melting into the waffles.
Instructions
- Melt butter and set aside to cool to room temperature. Warm the milk slightly in the microwave or let it reach room temperature naturally. Run uncracked eggs under warm water to bring them to room temperature. Make sure all wet ingredients are the same temperature or batter will get clumpy.: The kitchen will smell buttery and warm, a comforting scent that signals the start of things. Letting melted butter cool prevents it from cooking the eggs later and helps it incorporate into the batter as a silky ribbon, rather than causing hot spots. You should feel the melted butter as smooth on your spoon and not steaming, which is the cue it is ready. A common mistake is pouring in piping hot butter, this can scramble the eggs and cause lumps, so patience is key. If you see small white specks or separation, give it a gentle whisk to recombine before adding.
- Whisk together the dry ingredients in a large bowl. Right on top, add all the wet ingredients except the butter. Whisk until combined. While whisking, slowly drizzle in the melted butter. Whisk until smooth. Don’t overmix. For fluffier waffles, let the batter sit for 10 minutes.: Slightly warm milk will feel pleasantly tepid, never hot, and it helps the batter come together with a smooth, homogenous texture. Bringing dairy to room temperature reduces the chance of chilling the fat and egg mixture which can make the batter appear curdled. If the milk is too cold you may notice clumping when mixing in the eggs, so take the time to warm it a bit. Avoid overheating, because hot milk can adversely affect the leavening reaction and the rhythm of the batter.
- Preheat your nonstick waffle iron according to the model’s instructions. Once heated, add 1/3 cup of batter per cavity. Cook until each waffle is nicely crisped on both sides and cooked through in the center.: Warm water against the eggshell will feel slightly warm to the touch within a minute, and this simple step helps the eggs blend smoothly with the other wet ingredients. Room temperature eggs trap air better when whisked and ensure the batter does not seize and become lumpy. If you skip this step, you might find the batter is uneven and thicker in spots. A best practice is to set the eggs out 30 minutes earlier or use the warm water trick for a quick fix.
- Keep cooked waffles warm in the oven while finishing the batch, or serve immediately with your choice of toppings.: Matching temperatures across wet elements prevents the fat from solidifying or the eggs from curdling when combined. You will notice a glossy, even batter when the temperatures align, and the batter should flow off the spoon in a ribbon. Clumpy batter often stems from cold and warm ingredients meeting abruptly, so if you see lumps, let the mixture sit a few minutes then whisk to smooth it out. Avoid overmixing to remove lumps, which can develop gluten and make waffles tough.
- Whisk together the dry ingredients in a large bowl: When you whisk the flour , baking powder , cinnamon , pumpkin pie spice , brown sugar , and salt , you will smell the warm spices lifting up, and the dry mix will look uniform, free of streaks. This step ensures even distribution of leavening so each waffle rises consistently. If the dry ingredients are not well blended, you may find pockets that are overly salty or metallic tasting from isolated leavener. Take a moment to sift or whisk thoroughly for the best rise.
- Right on top, add all the wet ingredients except the butter: Pour the pumpkin , milk , vanilla , and eggs into the dry bowl and begin whisking until homogenous; you will see the batter change from chalky to smooth and slightly glossy. Adding wet to dry in one go helps create a single, manageable bowl and reduces overmixing. If the batter looks streaky or unusually thick, stop and gently fold to bring it together rather than vigorous whisking which can toughen the batter. The aroma will deepen as moisture wakes the spices.
- Whisk until combined: The batter should be smooth with no large lumps, and you will notice a slightly thick but pourable consistency that holds its shape briefly on the whisk. A gentle, steady whisking is enough to hydrate the flour without developing excess gluten. If you overmix, the batter becomes elastic and the cooked waffles can be dense; look for a satiny surface as your cue to stop.
- While whisking, slowly drizzle in the melted butter: As you drizzle cooled melted butter , the batter will shine and loosen into a velvety texture, and a faint buttered aroma will become obvious. Adding the fat slowly allows it to emulsify into the liquid instead of separating. If you pour the butter too fast you may see fat pooling, which causes uneven texture and greasiness. If separation occurs, whisk briskly to bring it back together or warm the bowl slightly then whisk.
- Whisk until smooth: You want a batter that flows in a cohesive ribbon, with the spices fully integrated and no visible streaks of flour. The finished batter should smell warmly spiced and feel slightly thick when scooped. A common error here is leaving small pockets of flour, which will cook into raw bits in the waffle; give it one last smooth whirl to eliminate those.
- Don’t overmix: Overmixing creates tough waffles because of excess gluten development; instead watch for shine and homogeneity, then stop. The batter should not be elastic or stringy. If your batter becomes overly stretchy, let it rest briefly and avoid further vigorous mixing. Overworked batter leads to heavy, chewy waffles, which defeats the purpose of aiming for crisp exterior and tender interior.
- For fluffier waffles, let the batter sit for 10 minutes: Resting allows the leavening to relax and the starches to hydrate, which leads to a lighter interior and better rise. During this time the batter may thicken slightly and the aroma of spices will deepen. If you skip resting, the waffles will still work but might be a touch denser. A pitfalls is leaving it too long without refrigeration, which can cause the batter to overproof and lose structure; keep it within the recommended window.
- Preheat your nonstick waffle iron according to the model’s instructions: Proper preheating ensures even browning and crisp edges; the iron surface should feel hot to the touch and the indicator light should signal readiness. A well preheated iron prevents batter from sticking and yields predictable cook times. If the iron is underheated, waffles will be pale and gummy in the center; if it is too hot you may burn the exterior before the inside cooks through. Consult your model’s manual for best results.
- Once heated, add 1/3 cup of batter per cavity: Portioning consistently results in uniform waffles that cook at the same rate; you should hear a gentle hiss as the batter contacts the hot surface, and the batter will spread slightly to fill the cavity. A 1/3 cup scoop gives an ideal thickness for crispness without being overly thick. Overfilling causes batter to overflow and makes cleanup harder, while underfilling yields thin, fragile waffles.
- Cook until each waffle is nicely crisped on both sides and cooked through in the center: Look for a deep golden brown color and an audible sizzle that subsides as steam decreases, indicating doneness. A toothpick or skewer inserted in the center should come out clean and the waffle should feel firm when lifted. If the center seems soft or doughy, return it to the iron for additional brief cooking. Avoid repeatedly opening the iron as heat loss can prevent proper browning.
- Keep cooked waffles warm in the oven while finishing the batch, or serve immediately with your choice of toppings: Use a cooling rack set over a baking sheet in a 200°F oven to preserve crispness while keeping waffles warm. This prevents steam from making the bottoms soggy and maintains texture until serving. A common mistake is stacking waffles directly, which traps steam and ruins the crisp exterior. If you need to hold them longer, arrange them in a single layer on the rack.
Notes
- Use light brown sugar for deeper flavor: Choosing light brown sugar adds molasses notes that complement the pumpkin and spices, producing a richer, slightly caramelized finish.
- Swap whole milk for a lower fat milk if needed: While whole milk contributes extra richness, you can use 2 percent or a milk alternative, keeping in mind texture will be marginally lighter.
- Let the batter rest for best texture: Allowing the batter to sit for 10 minutes hydrates the flour and helps the leavening work more evenly, leading to fluffier waffles.
- Adjust sugar to taste: If you prefer less sweetness, reduce the sugar slightly; the warm spices will still convey a dessert like feel without being overly sweet.
- Storing leftover waffles: Cool completely, then layer with wax paper and freeze for up to 3 months; reheat in a toaster or oven to regain crispness.
- Make-ahead batter tips: You can refrigerate the batter overnight in a covered container, then stir gently and cook in the morning for an easy breakfast service.