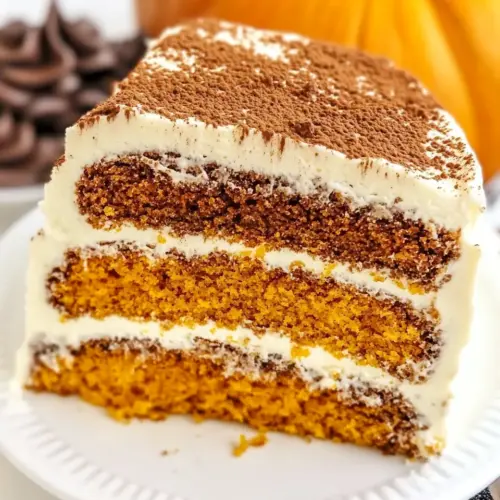
Pumpkin Tiramisu Layer Cake
Pumpkin Tiramisu Layer Cake combines creamy mascarpone filling with spiced pumpkin layers and espresso soaked cake for a rich, seasonal dessert. It’s creamy, spiced, and ideal for holiday entertaining or an easy weeknight treat with an elegant twist. Make it for Thanksgiving or any fall gathering to impress guests with layered flavor and texture.
Equipment
- Mixer
- Three 8 inch cake pans
- Parchment Paper
- Double boiler or metal bowl over simmering pot
- Serrated Knife
- Measuring Cups and Spoons
Ingredients
- 2 1/2 cups (325 g) all-purpose flour Sifted and measured to provide structure and texture, combines with leaveners to form the cake crumb and absorb liquids for a tender, stable layer cake.
- 2 teaspoons baking powder Leavening agent added to create lift and lightness by releasing carbon dioxide when combined with batter, helping the cake rise evenly during baking.
- 1 teaspoon baking soda Leavening agent used alongside baking powder to provide additional rise and a finer crumb by reacting with acidic components in the batter.
- 1/2 teaspoon salt Balanced to regulate gluten formation and enhance flavor, helps control the chemical reactions of leaveners and strengthens the batter slightly.
- 1 1/2 teaspoons ground cinnamon Warm aromatic spice incorporated to complement pumpkin, adding depth and classic autumnal flavor throughout the cake and creamy layers.
- 1/2 teaspoon ground nutmeg Earthy and sweet spice included sparingly to build complexity and harmonize with cinnamon and other warm spices in both cake and filling.
- 1/4 teaspoon ground ginger Bright, peppery spice used in small amount to lend warmth and a subtle zing that rounds out the pumpkin spice profile.
- 1/4 teaspoon ground cloves Pungent, slightly astringent spice added in trace amounts to intensify overall spice blend and contribute a lingering warmth.
- 3/4 cup (168 g) unsalted butter (room temperature) Creamy fat beaten into sugar to create air pockets and richness, tenderizing the cake while contributing flavor and moisture for soft layers.
- 3 tablespoons (45 ml) vegetable oil Neutral oil added for extra moisture and a tender crumb, helping the cake stay soft and keeping layers pliable over time.
- 1 cup (207 g) sugar Granulated sweetener creamed with butter to aerate the batter, providing sweetness and contributing to the cake’s structure and browning.
- 1/2 cup (112 g) packed light brown sugar Moist, caramel-flavored sugar that adds depth and chewiness, enhancing the cake’s flavor and keeping it tender and moist.
- 1 teaspoon vanilla extract Fragrant extract stirred into batter to enhance and round out flavors, boosting the overall aromatic profile of the cake layers.
- 3 large eggs Whole eggs added for structure, richness, and emulsification, creating stability and helping bind ingredients while adding moisture.
- 1 large egg white Extra egg white included to increase protein for structure and lift without adding yolk fat, improving crumb and drying resistance.
- 15 ounces (425 g) can pumpkin puree Smooth vegetable puree contributing moisture, flavor, and color while providing natural sweetness and dense texture suitable for spiced cakes.
- 1 cup (280 g) unsalted butter (room temperature) Soft butter used in the frosting for richness and a silky mouthfeel, providing spreadability and a stable base for whipped components.
- 12 ounces (339 g) mascarpone cheese (cool, but not cold) Creamy, slightly tangy Italian cheese incorporated into tiramisu-style layers for luxurious texture and mild acidity balancing sweetness.
- 8 cups (920 g) powdered sugar Finely powdered sugar dissolved into frostings to sweeten and stabilize, creating smooth, pipeable consistency and firm finish.
- 1 teaspoon vanilla extract Flavoring extract added to the mascarpone or cream layers to intensify aroma and provide a familiar vanilla note throughout the dessert.
- 6 large egg yolks Rich yolks used to build a custard-like tiramisu filling, offering silky texture, color, and additional fat for a creamy mouthfeel.
- 3/4 cup (155 g) sugar Granulated sugar cooked with yolks to sweeten and help form a stable, thickened custard that supports the layered filling.
- 3/4 cup (170 g) mascarpone cheese (cool, but not cold) Additional mascarpone used to adjust texture and creaminess in layered filling, ensuring a balanced tang and spreadable consistency.
- 1 cup (240 ml) heavy whipping cream (cold) Cold heavy cream whipped to soft peaks to lighten the mascarpone mixture, adding airiness and a mousse-like texture to the filling.
- 1/2 cup (120 ml) hot water Hot water used to dissolve espresso powder quickly, producing a strong coffee solution essential for soaking and flavoring layers.
- 2 tablespoons (10 g) instant espresso coffee powder Concentrated instant espresso providing bold coffee flavor without brewing, contributing classic tiramisu notes to the soaking liquid.
- 1/4 cup (60 ml) Kahlua Coffee liqueur added to the espresso soak to introduce depth, sweetness, and boozy undertones that complement the tiramisu components.
Instructions
- Preheat the oven to 350°F (176°C). Line the bottom of three 8-inch (20 cm) cake pans with parchment paper and grease the sides.: Warm, spiced cake rises best when the oven is at the correct temperature from the start, so you should feel a steady, even heat as you slide the pans in. When the pans are prepared the batter can bake evenly without sticking, and the parchment helps you remove layers cleanly, which is crucial for neat assembly and aesthetics. A common mistake is under preparing the pans, which causes tearing when unmolding, so make sure the paper is snug and the sides are greased. The oven should hum gently, not spike or dip, as that will affect rise and crumb texture. Visually, you want the pans to feel warm to the touch around the edges before the batter goes in.
- Combine the flour, baking powder, baking soda, salt, cinnamon and other spices in a medium sized bowl and set aside.: As you sift and whisk these dry ingredients together you will notice the aroma of the spices blooming, which informs the final fragrance of the cake. Even distribution of leaveners ensures uniform rise, and mixing the spices into the flour prevents pockets of intense flavor. A frequent error is tossing spices on top of batter later, which leaves streaks and inconsistent spice; premixing avoids this. The flour mixture should look homogeneous and slightly fragrant, with no clumps of baking powder or soda visible.
- Add the butter, oil, sugar, brown sugar and vanilla extract to a large mixing bowl and beat on medium speed until light in color and fluffy, 2-3 minutes. Do not skimp on the creaming time.: As you cream the butter with sugars the mixture will change from dense and glossy to pale and airy, signaling that air has been incorporated for lift. The texture should look mousse like and hold soft peaks of movement when the beater is lifted. Under creaming is a common issue that yields dense cake, so pay attention to the color shift and texture rather than the clock. You should hear a consistent, gentle hum from the mixer and perhaps notice a faint, sweet butter aroma as the sugar crystals abrade the fat creating tiny air pockets that expand during baking.
- Add eggs and egg white one at a time, mixing until well combined after each addition. Scrape down the sides of the bowl as needed to make sure everything is combined.: Adding eggs gradually helps maintain an emulsion so the batter stays smooth and cohesive. You should see the batter glossy and slightly thinned after eggs are incorporated, and scraping prevents pockets of unmixed egg or flour. A typical hiccup is tossing all eggs in at once, which can cause curdling or separation; steady incorporation keeps the batter uniform. Watch for a silky gloss and steady, ribbon like texture when beaten properly.
- Add half of the dry ingredient to the batter and mix until combined. Add the pumpkin puree to the batter and mix until combined. Add the remaining flour mixture and mix until well combined and smooth. Scrape down the sides of the bowl as needed to ensure everything is well combined. Do not over mix.: This staged addition preserves the air you created and prevents gluten overdevelopment, which keeps the crumb tender. The batter will change from loose to thicker when pumpkin is added, with a warm orange color and a spiced aroma. Over mixing at this point can make the cake tough, so mix just until no streaks of flour remain. The batter should be thick but pourable, and it should fall off a spatula in a slow, steady ribbon.
- Divide the batter evenly between the prepared cake pans and bake for 20-25 minutes, or until a toothpick inserted in the middle comes out with a few crumbs.: As the cakes bake the kitchen will fill with a toasty, spiced scent and the tops will set to a matte finish. Look for a gentle spring back when you press the center lightly, and a golden brown edge forming around the perimeter. A common mistake is removing the layers too soon, which leads to sinking or breaking when unmolding, so test with a toothpick and wait for a few moist crumbs rather than wet batter. Rotate pans if your oven has hot spots so each layer browns evenly.
- Remove cakes from the oven and allow to cool for 3-4 minutes, then remove from pans to a cooling rack to finish cooling.: Letting the cakes rest briefly allows the crumb to set so they release cleanly from the pans, and transferring to a rack prevents residual steam from making the bottoms soggy. You should notice a faint steam lift off the cake and a warm, fragrant aroma as you move them. Trying to unmold while piping hot often causes the layers to tear, so patience here preserves the look. The layers will continue to firm as they cool; wait until they are room temperature before trimming or stacking for best results.
- Add the butter and mascarpone cheese to a large mixing bowl and just beat until smooth. You don’t want to over mix the mascarpone cheese or it can become thin and watery.: Mix until the texture becomes silky and cohesive, with a gentle sheen, then stop. Overbeating mascarpone cheese will break the emulsion and make the buttercream separate, so err on the side of under mixing and finish by hand if needed. The mixture should smell mildly sweet and dairy forward, with no lumps. A sign you overmixed is a runny or greasy texture, at which point chilling briefly can help it firm up before proceeding.
- Add the powdered sugar in two parts and mix until well combined and smooth, again being careful not to over mix. As you add the powdered sugar, it may start to look a little separated, but will come together as you add additional powdered sugar. Just don’t over mix it.: Incorporating the sugar in stages prevents a cloud of dust and helps you monitor consistency. The buttercream will grow thicker and hold peaks suitable for piping when fully combined. If it looks curdled midway, keep mixing gently as it will come together; aggressive mixing when curdled can make separation worse. Aim for a dense, pipeable frosting that holds its shape without cracking when squeezed.
- Add the vanilla extract and gently stir to combine.: This final aromatic lift integrates into the buttercream, smoothing the flavor profile and rounding the sweetness. A quick, gentle stir should distribute the scent evenly without introducing too much air. Over stirring at this point can change texture subtly, so fold in with a spatula if the mixer has already run a long time. The buttercream should smell fragrant with vanilla and feel satiny on the spatula.
- Combine the egg yolks and sugar in the top of a double boiler (or in a metal mixer bowl over a pot of simmer water). Whisk to combine. The mixture will seem a little chunky at first, but will thin out as it heats up. The water should be simmering, not boiling, or it’ll cook the eggs too quickly. To ensure that the steam cooking the eggs doesn’t get too hot, occasionally lift the bowl to release the steam.: As you whisk, the mixture will transform into a glossy, warm custard and the sugar will dissolve, creating a silky base for the tiramisu filling. Gentle, steady whisking prevents curdling and produces a smooth texture that thickens as it heats. A common pitfall is letting the water boil, which causes scrambling. Keep a steady simmer and feel the warmth gently through the bowl as it thickens.
- Continue cooking and whisking vigorously for about 5 minutes, until mixture grows in volume, thickens, turns a pale yellow and reaches 160°F. The sugar should melt, but if it’s still a little grainy, that’s ok. It will smooth out as you go.: You will notice the mixture gain body and a ribbon like quality when a bit is dripped back onto the surface. The pale yellow color and increased volume indicate proper aeration and safe pasteurization, which gives the custard stability and a luxurious mouthfeel. If you stop too early the custard will be runny, and if you overcook you risk a grainy or curdled texture. Use a thermometer for precision and remove from heat at the right moment.
- Transfer the mixture to a mixer bowl, if not already in one, and whip on high speed for about 2 minutes, until they thicken and lighten to a pale yellow.: Whipping introduces air and cools the custard slightly while creating a light, mousse like texture that will blend smoothly with mascarpone cheese . You should see volume increase and a glossy sheen. A typical mistake is to skip this aeration step, which yields a denser filling that lacks lift. The whipped custard should feel airy and still slightly warm when folded into the mascarpone cheese .
- Allow to cool to about room temperature, or slightly warmer, and add the mascarpone cheese. Gently fold together until well combined. You don’t want to deflate the egg yolks. Set aside.: Folding preserves the air you just incorporated, giving a fluffy yet stable tiramisu filling. The mixture should be smooth and uniform, with a gentle, creamy texture. Vigorous stirring here will knock out the air and make the filling dense, so use a spatula and gentle motions. If the mixture seems too loose, chilling briefly will help it set before folding in whipped cream.
- Add the heavy whipping cream to a mixer bowl and whip on high speed until stiff peaks form. Gently fold the whipped cream into the mascarpone mixture in two parts. Set in the fridge until ready to use.: The cold cream whips into glossy, stable peaks that lighten the filling and provide the airy tiramisu mouthfeel. Fold in stages to keep the mixture airy and avoid deflation. Overwhipping can create grainy, butter like bits, so stop when peaks hold and still look satin. The finished filling should be pillowy and hold shape when scooped.
- Combine the espresso powder and hot water for the espresso mixture in a measuring cup. Stir until the powder is dissolved, then add the Kahlua.: This concentrated coffee liquid will soak into the cake layers and provide that classic tiramisu brightness, cutting through the sweetness. The aroma will be strong and inviting, and adding the Kahlua brings a rounded, boozy warmth that deepens the coffee flavor. If you avoid alcohol, substitute as advised in the notes. Ensure the powder is fully dissolved for an even soak.
- Use a large serrated knife to remove the domes from the top of the cakes so that they’re flat. These cakes don’t have a large dome, but I like to make sure they’re completely flat.: Trimming creates stable, even layers which stack neatly and keep the fillings level. The tops should feel slightly springy before trimming, and the knife should glide without tearing if you saw gently. Cutting while the cake is warm can compress the crumb, so do this when the layers are completely cool. A common error is to saw too aggressively, which creates crumbs that complicate decorating; use a steady back and forth motion instead.
- Place the first cake layer on a serving plate or cardboard cake circle. Drizzle 4-5 tablespoons of espresso mixture over the cake layer.: The coffee soak should darken the surface and add moisture without turning the layer soggy. Pour evenly and watch the liquid absorb slowly, leaving a glossy, deepened color. If you puddle too much in one spot you will create soggy patches. Use the listed amount and allow time between drizzles for even absorption.
- Pipe a dam around the outer edge of the cake with the mascarpone frosting. Fill in the center of the dam with about 1/3 of the tiramisu filling and spread into an even layer.: The buttercream dam acts as a barrier to keep the soft filling from oozing, so it must be tall and consistent. When you pipe the dam the buttercream should hold a crisp ridge, and when you spread the filling it should sit level without seeping out. A common mistake is a short or weak dam, which leads to squished layers during stacking. Practice piping a firm, continuous ring for best results.
- Top the filling with the second layer of cake, then another 4-5 tablespoons of the espresso mixture, a buttercream dam and another 1/3 of the tiramisu filling.: As you repeat the process the cake builds height and flavor concentration. Each espresso drizzle should be absorbed similarly, and the second dam gives the next filling a secure home. Pay attention to alignment so the cake remains straight rather than leaning; small shifts compound as you stack. Take time to center each layer carefully.
- Top the cake with the final layer of cake, then drizzle another 4-5 tablespoons of the espresso mixture on top of the cake layer.: The final soak adds that top layer of coffee aroma that will perfume each slice. Allow the top to absorb evenly and avoid over saturating, which can make the top collapse while frosting. Visually, the top should look uniformly dampened with no pooling.
- Add a light crumb coat to the sides of the cake, if you’d like, then fully frost the sides of the cake, leaving the top bare. If your cake layers seem to be moving around a bit more than you want and it’s making it difficult to frost, you can refrigerate the cake for an hour or so to let the dams firm up and hold everything in place better.: A thin crumb coat traps stray crumbs and makes the final frosting smooth, while chilling helps the structure set for cleaner edges. You should feel a slight chill when you touch the sides after refrigerating. Rushing this stage often leads to smeared crumbs on the final coat, so chill and then finish with confident, even strokes for a polished result.
- Pipe a border around the top edge of the cake with the remaining frosting, then fill in the border with the remaining 1/3 of the tiramisu filling.: The final border frames the filling and creates a tidy surface for decoration. The piped edge should be even and hold shape while the center filling stays slightly domed. If your piping is uneven, take a moment to smooth and re pipe; presentation matters for that wow factor. The filling should come up to but not over the border, creating a pleasing visual contrast.
- Sprinkle a little cocoa onto the top of the cake, if desired, then serve. I also decorated with a few pumpkin candies. This cake should be stored well covered (or in an air-tight cake carrier) in the fridge, but served cool, not cold. I’d let it sit out for 30 minutes or so before serving. Best if eaten within 4-5 days.: A dusting of cocoa provides an elegant, bittersweet finish and evokes classic tiramisu. As the cake rests chilled the flavors meld and the texture becomes creamier, but letting it sit out ensures the filling is soft and the flavors pop. Storing properly prevents drying and keeps the layers stable for several days. Avoid leaving it at room temperature for too long, as the dairy components are best kept cool until shortly before serving.
Notes
- Adjust the espresso intensity by increasing the instant espresso powder and reducing Kahlua if you prefer a non alcoholic option, which brightens the coffee notes while avoiding alcohol. Stir the powder thoroughly into hot water and taste before adding so you control the strength.
- Make a lighter frosting by using slightly less powdered sugar in the buttercream. Reducing the sugar makes the frosting less sweet but also thinner, so only decrease a little to keep enough structure for piping dams and borders.
- Prep parts ahead by baking layers and making the buttercream a day ahead, storing each covered in the fridge. Bring the buttercream back to room temperature and re whip briefly before piping to restore texture.
- Swap decorations with seasonal touches like candied pumpkin pieces or a sprinkle of toasted nuts for crunch. Keep the cocoa dusting minimal to avoid overpowering the delicate mascarpone filling.
- Stabilize whipped cream by adding a small pinch of powdered sugar or a stabilizer when whipping, which helps the tiramisu filling hold shape in warmer environments or for longer display times.