Pumpkin Spice Paleo Magic Cookie Bars
Pumpkin Spice Paleo Magic Cookie Bars are creamy, spiced, and satisfyingly textured, combining a tender coconut flour crust with a rich reduced coconut milk layer, swirls of pumpkin, toasted pecans, and dark chocolate chips. These easy to love bars are perfect for fall gatherings or an easy weeknight dessert, delivering comforting spice and a luscious mouthfeel you will want to make again and again.
Equipment
- 8×8-inch pan
- Parchment Paper
- electric hand mixer
- Large Pot
- Mixing Bowls
- Sharp Knife
Ingredients
- 3/4 cup maple syrup divided Adds natural sweetness and moisture; use divided to sweeten both the base and any topping while controlling overall sweetness and texture.
- 1/2 cup coconut oil at room temperature (should be the consistency of softened butter) Provides richness and a soft, spreadable fat; at room temperature it emulsifies with syrup to create a tender, cookie-bar crumb.
- 1 cup coconut flour sifted Acts as a dense, absorbent flour alternative; sifting prevents lumps and ensures even hydration for a light, cohesive structure.
- 1 3/4 teaspoon pumpkin pie spice divided Imparts warm, aromatic spice notes; dividing allows seasoning of both batter and topping for balanced pumpkin-spice flavor throughout.
- Pinch of salt Balances sweetness and enhances other flavors; a pinch brightens the overall profile and can help control sweetness perception.
- 1 can full-fat coconut milk (do NOT use low-fat) Contributes creamy fat and body; using full-fat yields a rich texture and helps bind ingredients for a moist, fudgy bar.
- 1/2 cup pecans very finely chopped Adds crunch and nutty flavor; finely chopping disperses pieces evenly so each bite has texture without overwhelming the bars.
- 1/2 cup dark chocolate chips dairy-free for vegan option Provides chocolatey richness and pockets of melted sweetness; choose dairy-free chips for a vegan-friendly final product.
- 3/4 cup pure canned pumpkin purée Delivers classic pumpkin flavor and moisture; pure purée integrates with spices and syrup to create the signature seasonal base.
Instructions
- Pre-heat your oven to 350°F and line an 8×8-inch pan with parchment paper, rubbing the sides generously with coconut oil. Note: It helps to spray the bottom of the pan before putting in the parchment paper, to secure it. Do NOT skip the parchment paper.: The moment the oven warms the kitchen, you will smell a faint warmth of residual coconut oil and the air will feel ready for baking, which helps set your rhythm. Take time to press the parchment into the corners and rub the sides with additional coconut oil , this prevents the parchment from sliding and ensures easy release later. Use a small spray or dab of oil under the parchment to secure it, because a loose liner can fold when you press the crust in and create uneven edges. One common mistake is not allowing the oven to fully preheat, which can affect the crust rise and bake time, so wait until the oven reaches a steady 350°F to get an even bake. Visually, the lining should sit flush with the pan and feel tacky where you oiled it.
- In a large bowl, using an electric hand mixer, beat 1/4 cup of the maple syrup (reserving the rest for later) with the coconut oil until smooth and creamy. Stir in the flour, 1 tsp of the pumpkin pie spice (reserving the rest for later) and pinch of salt until a wet dough forms.: As you mix, notice how the maple syrup and softened coconut oil emulsify into a glossy, pale mixture that smells faintly of caramel. The texture should feel silky and slightly thick, which helps the coconut flour absorb evenly when added. Once you stir in the flour, 1 tsp of the pumpkin pie spice , and the pinch of salt , the bowl will transform into a wet dough that holds together when pressed. If the mixture seems crumbly, let it rest a minute for the flour to hydrate, because coconut flour needs a bit of time to absorb liquids. Be careful not to overbeat after adding flour, which can dry out the dough; gentle folding prevents a tough crust. A good visual cue is a cohesive, slightly tacky dough that will press flat without falling apart.
- Press the dough evenly into the bottom of the pan. This may be a little bit tough, just be patient with it. I found it easiest to use the palms of my hands, and rinse them off every so often, until the dough was pressed in, if you’re having troubles.: Pressing the dough gives you the foundation for layered bars, and you will feel the resistance of the coconut flour as it compresses into a compact base. I like to use the palms of my hands, dampened slightly to prevent sticking, and press firmly into the corners and edges so the crust is uniform in thickness. If you find spots that resist, rinse your hands and press again; patience yields a neat edge and even bake. A common misstep is leaving the crust uneven, which can lead to over baked thin edges and under baked thick centers, so aim for consistent pressure across the pan. When done, the surface should be smooth with faint finger marks and hold together when lightly prodded.
- Bake the crust just until lightly golden brown, about 8-9 mins. If your crust rises when it bakes, use a small spoon to press it down firmly once it’s out of the oven, making sure not to cut into the crust.: During these minutes you will start to notice a gentle toasty scent as the coconut flour and coconut oil heat up, and the surface will change from pale to a light golden hue. Pull it when the edges take on a hint of color but the center is still firm to the touch, because it will continue to set under the filling. If the crust puffs up slightly, press it down gently with a small spoon right out of the oven, taking care not to gouge; this keeps a flat base for the filling. Avoid leaving it in too long, as over baking yields a brittle crust that can shatter when slicing.
- Once the crust comes out of the oven, whisk together the can of coconut milk and the remaining 1/2 cup of maple syrup in a large pot, set over high heat. Bring the mixture to a boil and boil for 1 minute, stirring constantly. Coconut milk rises a lot when heated, so make sure you use a large pan! Once you've boiled it for 1 minute, turn the heat down to medium and and simmer for 13-16 minutes, stirring frequently, until you have 1 1/4 cups sauce left.: The coconut milk will steam and begin to smell faintly sweet, and the syrup will thin the milk into a glossy liquid that swirls as you stir. Bring it to a boil, stirring constantly, because coconut milk loves to rise quickly and can create a sticky mess if it foams over. Boil for 1 minute, then reduce to medium and simmer for 13 to 16 minutes until reduced to about 1 1/4 cups; you will see it thicken and take on a denser, sauce like coat on your spoon. This reduction creates the luscious layer that binds the bars, and the simmer is what concentrates the coconut flavor and sweetness. A typical error is not using a large enough pot, which can cause boiling over, so choose a roomy pan and keep a close eye while stirring frequently.
- Immediately pour 1/4 cup of the coconut milk mixture onto the crust and GENTLY spread it out. Sprinkle the pecans on top, followed by the chocolate chips. Finally, drizzle all the remaining coconut milk mixture evenly over top, making sure you get enough down the sides.: The warm sauce will sizzle softly against the hot crust and soak into the surface, creating a thin, glossy bridge between the base and the toppings. As you spread, sprinkle the finely chopped pecans evenly so they embed into the sauce rather than sitting on top. Next, scatter the dark chocolate chips , which will melt slightly when the hotter sauce is added later, forming small pockets of chocolate. Finally, drizzle the remaining coconut milk mixture evenly over the top, letting a little run down the sides for uniform coverage. A mistake to watch for is pouring too much at once, which can displace the toppings; pour slowly and use the back of a spoon to nudge the sauce into corners if needed.
- In a small bowl, stir together the pumpkin and remaining 3/4 tsp of pumpkin pie spice.: The texture should be smooth and slightly thick, with the spice fragrant and evenly distributed. This simple mixture adds bright pumpkin flavor and a warm spice note that contrasts the coconut sauce. If the pumpkin seems watery, give it a quick stir and blot any excess moisture with a clean towel, because too wet a dollop can cause the swirl to sink rather than ripple. The aromatic lift from the spice makes the pumpkin pop in every bite, so measure carefully to avoid overpowering the other layers.
- Drop the pumpkin in small blobs (no other word for it) on top of the coconut milk and use a sharp knife to gently swirl it into the milk, making sure not to cut into the crust. You want to swirl the chocolate chips and pumpkin together a little bit. Gently shake the pan around to make sure the coconut milk goes through all the layers.: These dollops will sit as little islands that you then pull through the surface for pretty marbling, and the knife should glide smoothly with a soft tugging motion. You want a swirled effect that leaves pockets of both flavors intact, not a complete mix, because the contrast is part of the charm. Move the pan gently after swirling so the sauce settles and distributes, ensuring the coconut milk reaches all edges. A common slip is over swirling, which can muddy the visual layers, so make deliberate, shallow swirls to maintain definition.
- Place into the oven and bake until the sides are golden brown, about 28-30 minutes.: As the bars bake, the top will set and the edges will take on a warm golden color, while the middle should still feel slightly jiggly but no longer liquid. You will smell toasted pecans and a sweet coconut aroma rising from the oven, and the chocolate may peek through in small glossy patches. Remove when the center registers firm to a gentle touch and the sides have that deepened color, because over baking can dry the filling and under baking leads to runny bars after cooling. If the top browns too quickly, lower the oven rack or tent with foil to allow the middle to finish cooking evenly.
- Remove from the oven and cool to room temperature. Then, cover with tinfoil and refrigerate overnight.: Cooling lets the layers set, and refrigeration solidifies the coconut milk sauce into a sliceable consistency. The bars will firm up significantly overnight, and the flavors marry, deepening the pumpkin and toasted notes. A common impatience is cutting too soon, which yields messy slices, so trust the chill; the texture should be dense but cohesive when sliced the next day. Visually, you will see clean layers and a glossy top after refrigeration.
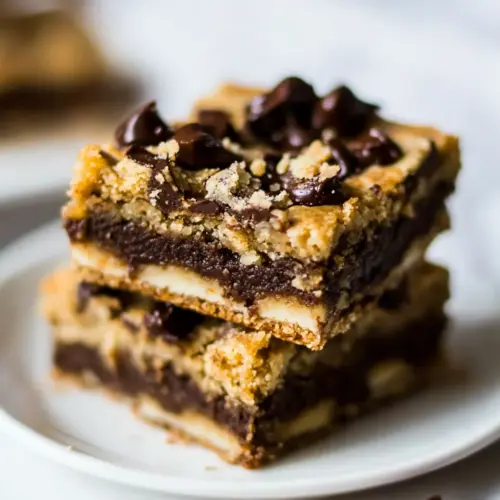
- The next day, run a very sharp knife around the edge of the pan, slice into bars and DEVOUR!: A sharp knife gives clean edges and reduces crumbling, and you may warm a blade under hot water and dry it between cuts for the neatest slices. The first bite should reveal distinct layers, with a tender crust, creamy coconut filling, pumpkin swirls, toasted pecans, and softened chocolate. Enjoy the interplay of textures and flavors, and store extras refrigerated to maintain firmness. Avoid using a dull knife which will tear the bars and create an uneven presentation.
Notes
- Timing matters for the reduction, simmer the coconut milk until it has thickened to about 1 1/4 cups so the filling sets properly, and keep stirring to prevent scorching.
- Consistency of coconut oil is important for the crust, use room temperature oil so it blends with the maple syrup into a smooth dough rather than separating.
- Secure the parchment by spraying the pan lightly before lining, this keeps the liner from slipping when you press the crust and ensures neat edges.
- Evenly chop pecans so the crunch is consistently distributed, avoid large chunks that make slicing uneven or disrupt the layers.
- Use a sharp knife and wipe between cuts to achieve clean bar edges, warming the blade briefly under hot water can help with sticky fillings.
- Refrigerate overnight for best texture, the chill firms the coconut milk sauce and makes slicing tidy and satisfying.