Pumpkin Pizza
Pumpkin Pizza is a creamy and savory seasonal twist featuring spiced pumpkin purée, caramelized onion, browned butter, and melted Gouda with crisped sage. This easy weeknight dinner idea blends sweet and savory elements for a comforting fall meal, perfect for sharing or a cozy solo slice. Try it for a memorable seasonal dinner that feels both inventive and familiar.
Equipment
- Medium pan
- Small Saucepan
- Large Pan
- Oven
- Pizza Pan
- Parchment Paper
Ingredients
- Pizza crust fresh and refrigerated (GF or regular) Provide a sturdy, pre-made base that supports toppings and crisps evenly in the oven; choose refrigerated crusts for convenience and consistent texture whether gluten-free or regular. Ensure the crust is at room temperature before assembling to prevent tearing and to promote even baking. Par-bake briefly if needed to avoid a soggy center from the pumpkin topping.
- 1 tablespoon olive oil Coat pan surfaces and vegetables lightly to prevent sticking while adding subtle fruity richness and aiding flavor meld during sautéing and roasting. Use measured oil to control the crust crispness and to help distribute fat-soluble spices evenly. Warm the oil gently to release aromatics without burning.
- 1/2 a large onion thinly and evenly sliced Slice thinly and evenly to promote quick, uniform caramelization and to add soft, sweet onion flavor throughout the pizza without overpowering other components. Distribute slices so each bite has some tender, cooked onion that complements the pumpkin purée. Cook until translucent and lightly golden to deepen sweetness.
- 1/2 + 1/8 teaspoon cinnamon divided Season in two portions to layer warm, sweet spice notes into both the onion and the pumpkin mixture for balanced baking aroma and taste. Split quantities as directed to accentuate caramelized onions and to finish the pumpkin base with a gentle warmth. Sprinkle carefully to avoid clumping and to achieve even coverage.
- 1/4 teaspoon ginger powder Infuse a bright, slightly peppery warmth that enhances the fall-spice profile of the pumpkin filling and pairs well with cinnamon and nutmeg. Measure precisely since powdered ginger can become dominant if overused. Integrate into the pumpkin mixture for consistent flavor distribution.
- 1/8 teaspoon nutmeg Lend a sweet, woody undertone that complements cinnamon and balances savory elements like sausage and cheese in the pizza topping. Use sparingly to maintain nuance and avoid overpowering the pumpkin’s natural flavor. Add to the spice blend for a cohesive autumnal profile.
- 1/16 teaspoon allspice Introduce a concentrated, clove-like warmth that deepens the overall spiced character without adding sweetness, supporting the pumpkin purée and other spices. Apply in very small amounts because of its potency to prevent bitterness. Blend into the pumpkin-spice mixture for subtle complexity.
- 1/2 cup canned pumpkin purée Provide a creamy, slightly sweet primary topping that brings moisture, body, and pumpkin flavor to the pizza for a seasonal, savory spread. Combine with milk and spices to create a smooth, spreadable consistency that bakes into a silky layer. Use canned purée for consistent texture and flavor.
- 2 tablespoons milk of choice (almond milk is fine) Thin the pumpkin purée slightly to create a spreadable consistency and to lighten the filling, helping it bake evenly without drying. Select milk of choice for flavor preference or dietary needs, such as almond milk for a dairy-free option. Stir in until homogeneous for smooth application.
- 1 teaspoon sugar Add a touch of sweetness to balance savory cheeses and spices, enhancing the pumpkin’s natural flavors without making the pizza dessert-like. Dissolve into the pumpkin mixture to ensure even sweetness throughout. Adjust slightly if using naturally sweetened pumpkin purée.
- 1/2 teaspoon salt Enhance overall flavor by amplifying both sweet and savory elements while aiding in balancing the saltiness of the cheeses and sausage. Measure carefully to avoid oversalting, especially if using added-sodium cheeses or processed sausages. Mix thoroughly into the pumpkin base for uniform seasoning.
- 1 tablespoon unsalted butter (dairy-free butter works) Melt into the pan to enrich sautéed onions and to add a rich, creamy mouthfeel that contributes to browning and flavor complexity; dairy-free butter can be substituted. Use the butter to finish the onions or to baste sage leaves for crisping. Control heat to prevent burning and to extract a nutty aroma.
- 2 chicken apple sausage links sliced (omit for vegetarian) Slice evenly or omit for vegetarian preparations, providing savory, meaty flavor and a hint of apple sweetness that pairs with pumpkin and cheeses. Brown gently to develop caramelized edges and to release juices that can mingle with the onions and spices. Arrange slices across the pizza for distribution.
- 1 cup Gouda cheese grated and tightly packed Grate finely and pack slightly to contribute a mild, creamy, and slightly sweet melting profile that blankets the pizza with a smooth texture and rich flavor. Sprinkle in an even layer to create a melty, cohesive topping that complements both pumpkin and Parmesan. Use full-fat Gouda for optimal melting.
- 1/2 cup Parmesan cheese grated and tightly packed Grate finely and pack to offer nutty, salty, and umami depth that sharpens the overall flavor and helps create a savory crust edge when baked. Combine with Gouda for a balanced melt and complex taste profile. Sprinkle toward the center and edges for even flavor impact.
- 12 fresh sage leaves Fry or crisp to provide an aromatic, herbaceous accent that contrasts the creamy pumpkin and cheeses with bright, savory notes and delicate crunch. Use whole leaves and fry briefly in oil or butter until crisp and fragrant, then scatter over the pizza after baking. Adjust quantity for garnish or integrated flavor.
- Avocado oil (or any neutral flavored oil) for frying Heat for frying to create a high smoke point medium ideal for crisping sage leaves and browning sausage or onions without imparting off-flavors. Choose a neutral oil if seeking unobtrusive frying that preserves delicate aromatics. Use just enough to shallow-fry or pan-sear as directed.
Instructions
- Let the pizza dough proof for one hour at room temperature.: The dough should feel slightly warm to the touch and expand visibly as the yeast becomes active, releasing faint yeasty aromas that hint at a light, airy crust. You'll notice tiny bubbles on the surface, and the dough should spring back slowly when gently pressed, indicating proper fermentation. This step matters because it builds structure and flavor in the crust, leading to a tender but crisp base. A common mistake is rushing this step by using cold dough straight from the fridge, which gives a dense, gummy crust. If the room is cool, place the dough in a slightly warm spot, not direct heat, to avoid killing the yeast.
- While the dough proofs, heat the oil up in a medium pan over medium heat. Add in the onions and stir to coat in oil. Cook, stirring occasionally, until the onions are brown, soft and caramelized. You may need to turn down the heat half way through.: As the onion sweats, you'll first hear a gentle sizzle, then see the edges turn translucent and then amber, releasing a honeyed scent that signals deepening flavor. Stir occasionally to promote even browning and to prevent burning, lowering the heat if the edges darken too quickly. The caramelized onion brings a sweet counterpoint to the savory cheese and pumpkin. A common error is rushing with high heat, which chars the onion and leaves it bitter rather than sweet.
- Once the onions are almost done, stir in 1/2 tsp of the cinnamon and all of the ginger, nutmeg and allspice. Cook until done.: When you add the spices, the pan will release a warm, aromatic plume that fills the kitchen, signaling that the spices are blooming and blending with the onion . Cook briefly so the spices toast lightly and lose any raw edge, but avoid long cooking that can make them bitter. This step deepens the autumnal flavors that harmonize with the pumpkin . Avoid adding spices too early in high heat, which can scorch them and ruin the aromatic profile.
- Add in the pumpkin, milk, sugar, salt and remaining cinnamon and stir.: At this point the mixture will take on a silky, saucy texture as the canned pumpkin melts into the pan, the milk loosens it, and the sugar and salt balance the flavors. Stir continuously until the sauce is smooth and glossy, observing a slight steam and a gentle simmer at the edges. This combination creates the spreadable base for the pizza and controls moisture so the crust does not become soggy. If the sauce seems watery, simmer briefly to reduce; if too thick, add a splash more milk. Over thin sauce will make the crust limp, while overly thick sauce will be pasty and won't meld with the cheese.
- Place the butter in a small sauce pan over medium heat. Cook, stirring frequently until it melts and starts to foam. When it starts to foam, stir it constantly until it turns golden brown.: You'll see the butter foam then shift color to a golden tan, and the aroma will become nutty and toasty, more complex than plain melted butter. This browned butter introduces rich umami like notes and deepens the pumpkin sauce. Timing is crucial here; watch closely because browned butter can go from perfect to burnt very quickly. A typical mistake is walking away and returning to a scorched pan, which imparts bitterness to the sauce.
- Once it's brown, immediately remove it from the heat and stir well into the sauce.: The moment you add the browned butter to the pumpkin mixture, the sauce will pick up a glossy sheen and a warm, nutty aroma that intensifies the spices. Stir thoroughly so the butter integrates and the sauce becomes silky. This technique amplifies richness without adding excess dairy weight. If you delay incorporating the butter, it can continue to cook and become too dark, which alters the flavor negatively.
- Heat a large pan on medium high heat and sear the sliced sausage on both sides until browned, about 1-2 minutes per side.: The sausage should sizzle and develop a deep brown crust that releases savory oils and a caramelized aroma, enhancing the overall umami of the pizza. Searing seals in juices and adds textural contrast to each bite. Keep the pan hot enough to brown quickly, but not so hot that the slices char on the outside before heating through. Overcrowding the pan can cause steaming instead of searing, leading to pale, unappetizing slices.
- Heat just enough oil to cover the bottom of a small pan on high heat. Once hot, add in the sage leaves and cook until lightly browned, only about 1 minute. Transfer to a paper towel lined plate.: The oil will shimmer when ready, and the sage leaves will crisp almost instantly, releasing an herbaceous perfume and a delicate crackle when fried. These crisped sage leaves add a crunchy, aromatic garnish that contrasts with the soft sauce and melted cheese. Work quickly because sage browns in seconds, and transfer immediately to paper towels to stop cooking and preserve crispness. Burning the leaves makes them bitter, so watch intently.
- Heat your oven to 425-450°F (depending what your pizza dough says).: You want a hot oven so the crust puffs and the cheese melts into a glossy finish, producing those desirable blistered spots. Preheat thoroughly for at least 20 minutes on a pizza stone or pan to ensure consistent heat. An oven that is not hot enough will yield a pale, under baked crust and a dull cheese layer, while too hot can over brown the edges before toppings meld.
- Roll or stretch the dough to fit a pizza pan (you can roll the pizza dough on a large sheet of parchment paper and then put the parchment paper on the pizza pan to make it easier!): The dough should feel elastic as you work it, and you will see thin bubbles form that signal a light crust. Using parchment makes transferring to the pan effortless and prevents sticking. Aim for an even thickness so the crust cooks uniformly; thin spots will char and thick spots will remain doughy. Avoid tearing the dough, and if it resists, let it rest a few minutes to relax the gluten before continuing.
- Spread the pumpkin sauce on the dough, leaving an inch or so around the sides for the crust.: When you spread the sauce it should be smooth and not runny, coating the surface evenly while leaving a clean rim for the crust to brown. The visual cue is a uniform layer that does not pool, ensuring an even bake. If you over sauce, the center will be soggy; if you under sauce, the pizza can be dry. Use a back of a spoon to create a slight indent for even topping distribution.
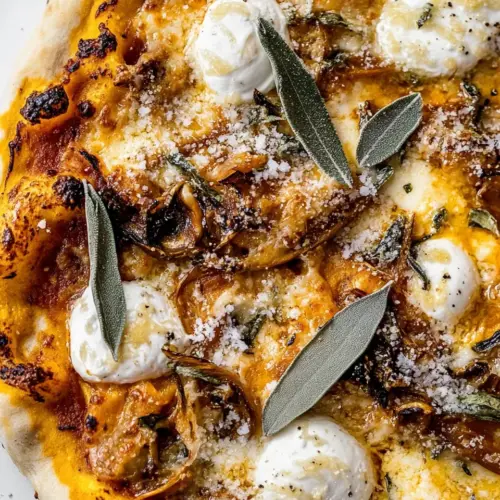
- Spread the sausage on top, followed by the cheeses. Finish off with the sage (you can break them up a little if you want to spread them more evenly.): As you assemble, the sausage provides pockets of savory fat while the Gouda and Parmesan melt into a layered, stretchy, and umami rich top. The crisped sage scattered across adds aromatic pops and visual contrast. Arrange toppings evenly so cheese blankets the surface and meats are well distributed. A common misstep is piling toppings too thickly, which prevents the crust from cooking through and yields a soggy center.
- Bake in the center rack until the crust is brown and the cheese is melted, about 15-20 minutes.: In the oven you will see the crust blister and take on golden brown hues while the cheese melts and bubbles, sometimes forming bronzed spots. The aroma will fill the kitchen with buttery, spiced, and cheesy notes that signal readiness. Use visual cues rather than strict timing alone, because ovens vary. Insert a thin spatula under the crust to check for a crisp bottom if unsure. A raw or doughy center means it needed more time at temperature, while over browning means it was left too long or the rack was too close to the heating element.
Notes
- Crust choice matters Try a refrigerated fresh crust for a tender chew, or a thicker pan style if you prefer a heartier base. Each crust influences bake time and final texture, so adjust oven time modestly to achieve the desired browning.
- Control onion sweetness Cook the onion low and slow until they are deeply caramelized for a complex, sweet balance that complements the pumpkin and spices without competing with the cheese.
- Brown butter for depth Browning the butter adds nutty, toasty notes to the sauce, enhancing the overall flavor. Don’t leave it unattended because it can go from perfect to burnt quickly.
- Sausage searing Sear the sausage slices until they develop a dark crust which boosts savory flavor. If you skip searing, the sausage may release extra moisture and make the pizza wetter.
- Cheese layering Use a mix of Gouda and Parmesan as instructed for melt and umami. Place the Gouda first for melting and finish with Parmesan for sharpness and flavor contrast.
- Sage finishing Fry the sage quickly in hot oil for a crunchy, aromatic garnish that brightens each bite. Add them right before serving to keep them crisp.
- Oven placement Bake on the center rack for balanced heat. If you want more char, move the pizza to the top rack briefly at the end, watching carefully to prevent burning.
- Adjusting sauce consistency If the pumpkin sauce seems thin, simmer briefly to reduce; if it is too thick, stir in a teaspoon of milk at a time until it spreads smoothly.
- Make ahead options Prepare the pumpkin sauce and caramelized onion a day ahead and refrigerate. Bring them back to room temperature before assembling to keep bake times consistent.
- Presentation tip Break the fried sage into smaller pieces to scatter across the pizza for even aromatic bursts in every slice.