Pumpkin Pie Bars
Pumpkin Pie Bars are creamy and spiced with a buttery shortbread like base and a silky pumpkin custard topping. This easy tray bake is ideal for fall gatherings and makes an excellent easy weeknight dessert or holiday contribution. The crisp crust and smooth filling pair beautifully, giving you crowd pleasing results with simple pantry ingredients, so make it for your next get together.
Equipment
- 9x13-inch Baking Pan
- KitchenAid Artisan 5 Quart Stand Mixer
- Parchment Paper
Ingredients
- 3/4 cup butter (salted and softened at room temperature) Creamy and softened to create a tender, rich shortbread-like crust when creamed with sugar; provides fat for structure, flavor, and moisture in the base layer. Chill briefly if dough becomes too soft to help it hold shape during pressing and baking. Use salted butter as specified to balance the sweetness and deepen the overall flavor of the bars.
- 1/2 cup icing sugar (same as powdered sugar or confectioners sugar) Finely ground and powdery to incorporate smoothly into the butter for a delicate, melt-in-your-mouth crust texture; sweetens the base without grittiness. Sift or whisk before adding to remove lumps and ensure even distribution with the flour and butter.
- 1 1/2 cups all-purpose flour All-purpose and provides the primary structural framework for the crust by developing a modest amount of gluten for stability while remaining tender. Measure by spooning into the cup and leveling to avoid a dense crust, and combine gently to prevent overworking the dough.
- 29 ounce canned pumpkin (1 large can) Smooth pumpkin purée supplying concentrated autumnal flavor, moisture, and a thick, custard-like texture for the filling; contributes natural sweetness and color. Use canned pumpkin (not pumpkin pie filling) for consistent texture and to avoid added spices or sugars that would alter the recipe.
- 4 large eggs Large eggs act as emulsifiers and binders to set the pumpkin custard and create a silky, stable filling when baked; they also add richness and structure. Beat lightly before adding to ensure even incorporation and a uniform bake.
- 1 cup brown sugar (packed) Moist packed brown sugar brings caramel-like depth and sweetness to the filling while contributing moisture and a slightly denser mouthfeel. Pack firmly into the measuring cup for accurate sweetness level and dissolve into the filling mixture for a smooth texture.
- 3 teaspoons pumpkin pie spice Warm and aromatic spice blend that seasons the pumpkin filling with cinnamon, nutmeg, ginger, and cloves notes to evoke traditional pumpkin pie flavor. Measure carefully to avoid overpowering the custard, and stir thoroughly to distribute the spices evenly.
- 1 teaspoon salt Fine and crystalline salt enhances and balances the sweetness while rounding out flavors across both crust and filling components. Dissolve into the wet ingredients to ensure even seasoning throughout the bars.
- 24 ounces evaporated milk (2×12 ounce cans) Rich evaporated milk adds concentrated creaminess and body to the custard, producing a smooth, silky texture when combined with pumpkin and eggs. Use the specified canned evaporated milk for consistent fat content and to avoid thinning the filling.
Instructions
- Preheat the oven to 425°F. Line a 9×13-inch baking dish with parchment paper hanging off the sides to make it easy to lift out.: When you first set the oven to 425°F , you will notice the air start to warm and the oven light flickers as it climbs in temperature, signaling readiness. This higher initial heat helps the shortbread base start to set quickly, creating a slightly firmer bottom that supports the custard. A parchment lined 9×13-inch baking dish makes removing the bars simple after chilling because you can lift the whole slab out. A common mistake is not positioning the parchment with enough overhang, which makes extraction tricky, so be generous with the paper. If your oven runs hot, watch the first five minutes closely so the crust does not brown too rapidly.
- Add the butter to a large bowl and blend it until smooth using an electric mixer or stand mixer set at medium speed for about 30 seconds. Add the icing sugar and continue mixing until well incorporated. Scrape down the sides of the bowl and combine thoroughly. Add flour and mix at low speed until well blended. The mixture will be crumbled and soft.: Right after you begin creaming the butter , you will feel it soften and the texture turn glossy, which indicates it is ready to take the icing sugar . As you add the icing sugar the aroma becomes lightly sweet and the mixture will lighten slightly in color. Scraping the bowl ensures no pockets of unmixed butter remain, which would create uneven texture in the shortbread. When the flour goes in, mixing at low speed keeps gluten development minimal so the crust stays tender rather than chewy. The resulting crumbly, soft mixture should hold together when pressed. Avoid overmixing after adding flour , because that can make the crust tough; if you see a rubbery texture, stop immediately. If your butter was too cold, the mixture will not cream properly, resulting in dry crumbs, so allow it to soften at room temperature first.
- Pat the shortbread crumbs into the prepared baking dish.: As you press the crumbs into the lined pan, you will sense the texture shift from loose to compact, and the surface should look uniformly pressed with no gaps or holes. Use your fingertips or the bottom of a measuring cup to apply even pressure, which helps ensure the crust bakes to an even thickness and supports the filling uniformly. If you press too hard the crust may become overly dense and lose its tender bite, while pressing too lightly can cause it to crumble when sliced. Aim for a firm, even layer that holds together when tapped. A good visual cue is a smooth top without visible loose crumbs.
- In a large mixing bowl add the pumpkin, eggs, salt, pumpkin pie spice, brown sugar and mix until well combined. Add the evaporated milk and continue mixing until well incorporated.: When combining the pumpkin with the eggs and brown sugar , you will notice the mixture become glossy and homogenous, the spices releasing a warm aroma that signals the flavor foundation. The eggs are the binder here, so thorough mixing ensures an even set; any streaks of unmixed egg could create spots of different textures. Adding evaporated milk thins the filling to a pourable consistency but still keeps the custard rich. If the batter seems too thick it may not spread evenly over the crust, while if it is too thin you risk a runny set. A common mistake is rushing and under mixing, which leaves lumps of pumpkin or uneven spice pockets, so stir until smooth and give the mixture a final scrape to incorporate anything clinging to the bowl.
- Pour the pumpkin mixture over the shortbread crust in the prepared baking dish.: As you pour, the filling should glide over the crust and settle into an even layer; watch for any air pockets that can be smoothed out with a spatula. The contrast of the pale crust and the deeper orange filling is visually satisfying. Spreading too aggressively can disturb the crust, so pour slowly and use a gentle motion to level the surface. If you see the filling pooling unevenly, lightly tap the pan on the counter to help it settle. Avoid overworking the surface because that can introduce air bubbles which may cause fissures when baking.
- Transfer the baking dish to the oven and bake for 15 minutes. Lower the heat to 350°F and continue baking for another 50 to 55 minutes or until the filling is set.: The initial 15 minutes at 425°F gives the filling a quick burst of heat that starts to set the edges, while reducing to 350°F allows the center to cook gently until it firms. During baking you will notice the aroma deepen and the filling take on a slightly darker, matte finish as it sets. To test doneness, gently shake the pan; the center should have a slight jiggle but not be liquid. Overbaking will dry out the custard and create cracks, while underbaking will leave a soupy center. If the top begins to brown too much, tent loosely with foil to prevent overcoloring. Also be mindful that ovens vary, so check at the earlier end of the time range.
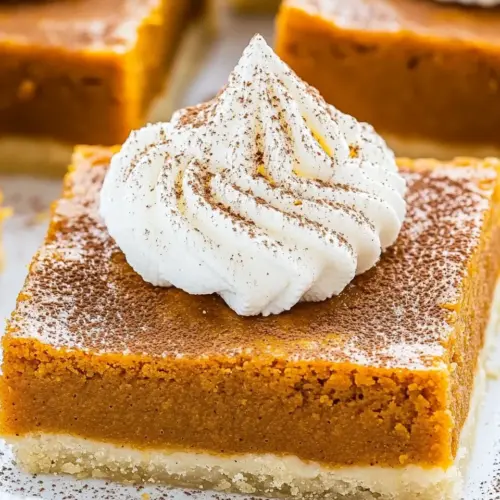
- Cool completely then refrigerate for 2 hours. Use the parchment paper to lift out the pie, then cut into squares. Top with whipped cream and serve.: Cooling brings the most satisfying part, when the custard firms and the flavors meld; you will notice the scent settle into a deeper, spiced profile. Refrigerating for at least 2 hours ensures clean slices and a creamy mouthfeel. Using the parchment overhang makes lifting the entire slab effortless, and clean cuts are achieved with a sharp knife wiped between slices. Serving slightly chilled gives a pleasant contrast to room temperature toppings. A frequent error is cutting while warm, which causes messy edges, so resist the urge to slice early. If you plan to top with whipped cream, store it separately until just before serving to keep textures ideal.
Notes
- Adjust sweetness — If you prefer a less sweet bar, reduce the brown sugar by up to one quarter and taste the filling before adding the evaporated milk to ensure balance.
- Spice variance — Use slightly more or less pumpkin pie spice to emphasize warmth or subtlety, stirring and tasting as you go because each blend varies in intensity.
- Crust texture — For a crumblier shortbread, chill the pressed crust for 10 to 15 minutes before baking to help it hold its shape under the filling.
- Make ahead — Bake a day in advance and refrigerate; the flavors deepen and the bars slice cleaner after chilling, making them ideal for entertaining.
- Freezing tips — Freeze cooled, uncut bars wrapped tightly for up to three months, and thaw in the fridge before serving, adding whipped cream last minute.