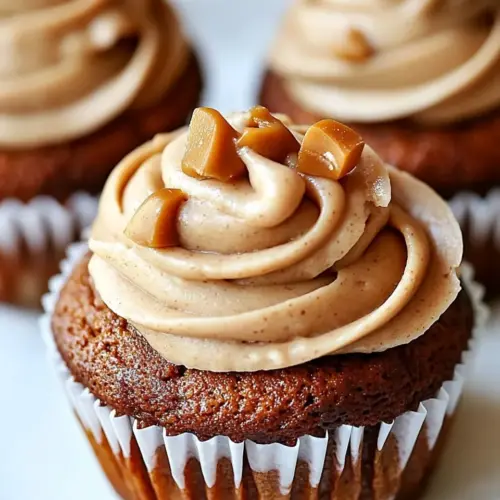
Pumpkin Cupcakes with Butterscotch Frosting
Pumpkin Cupcakes with Butterscotch Frosting are tender, spiced cupcakes topped with a glossy, buttery caramel style frosting. The pairing is creamy, comforting, and easy to produce in a standard muffin tin, making it ideal for fall gatherings and easy weeknight treats. Each bite offers warm spice and rich butterscotch, a persuasive reason to bake a batch now.
Equipment
- Electric Mixer
- Muffin Tin
- Wire Rack
- Saucepan
- Mixing Bowl
Ingredients
- 1 Standard Duncan Hines Signature Spice Cake Mix Provides a spiced cake base mix that simplifies preparation and ensures consistent texture and flavor; contains leavening and seasoning to create classic pumpkin cupcakes; saves time compared to making a spice cake from scratch.
- 1 1/3 cup canned pumpkin puree Adds moistness and concentrated pumpkin flavor while contributing fiber and a dense, tender crumb; helps bind the batter and complements the spice mix for seasonal taste; balances sweetness with natural earthiness.
- 1/2 cup Vegetable oil Contributes fat for tenderness and moist mouthfeel while helping incorporate and suspend dry ingredients; promotes a softer crumb and slows staleness; helps the batter spread evenly during baking.
- 15.1 oz . package vanilla instant pudding mix Offers instant structure and added creaminess to the batter, enhancing stability and producing a more custardy texture; introduces vanilla sweetness to complement spices; helps thicken and set the cupcake interior.
- 3 eggs Provides structure and lift through protein and moisture, aiding in rise and binding of ingredients; contributes richness and a slightly custardy texture when combined with pumpkin; helps create a stable batter.
- 1 teaspoon cinnamon Imparts warm aromatic spice that deepens the pumpkin flavor and enhances overall warmth; pairs with other spices in the cake mix to accentuate autumnal notes; a small amount is effective at building complexity.
- 1/2 cup water Adjusts batter consistency for proper mixing and helps dissolve dry components for even hydration; contributes to desired batter thickness and aids in proper rising; a neutral liquid to balance wet-to-dry ratios.
- 1/2 cup butter Serves as the primary fat for the frosting, creating a smooth, spreadable base and rich mouthfeel when creamed; provides structure and stability as it cools; also helps carry the butterscotch flavors.
- 1 cup brown sugar, packed Delivers deep caramel-like sweetness and moisture to the frosting while adding slight molasses complexity; helps create chewiness and rich flavor when cooked with butter; balances richness with a hint of acidity from molasses.
- 1/3 cup heavy cream Introduces creaminess and fluidity to the butterscotch frosting while enriching mouthfeel and helping dissolve sugars; contributes to a glossy, silky texture when combined with butter and sugar; helps control firmness.
- 1/2 teaspoon vanilla Adds aromatic sweetness and rounds the butterscotch flavor; enhances other ingredients and elevates overall depth without altering texture; a small amount lifts the final frosting flavor profile.
- 1/2 teaspoon cinnamon Enhances warm spice profile in both cake and frosting by echoing the cinnamon used earlier; adds aromatic consistency across components and reinforces autumnal character; small quantity builds layered spiciness.
- 1/4 teaspoons salt Balances sweetness and enhances overall flavor perception by cutting through richness in the frosting; aids in controlling sweetness intensity and brightening flavors; a pinch improves balance and prevents cloying taste.
- 3 cups powdered sugar, sifted Provides fine, stable sweetness and structure to the frosting while ensuring smooth texture when sifted; dissolves into fats to create a powdered, creamy consistency; controls firmness and sweetness level.
- 1 -2 tablespoons milk plus more as needed Adjusts frosting consistency and spreadability while allowing fine control over thickness; provides slight dilution for a smoother finish and makes frosting easier to pipe or spread; additional milk can be added to achieve desired texture.
- sea salt Offers a final touch of savory contrast to balance sweetness and enhance flavor complexity; used sparingly on top to accentuate the butterscotch and pumpkin notes and provide a pleasant finish.
Instructions
- Add all of the Cupcake ingredients to the bowl of your electric mixer and beat on low speed until just moistened (to prevent air bubbles) then increase speed to medium and beat for two minutes, scraping down the sides of your bowl as needed.: The moment you first stir the batter you will notice the scent of cinnamon and pumpkin begin to rise, a soft perfume that tells you the flavors are marrying. Use a spatula to scrape the sides after mixing at medium speed so no pockets of dry mix remain, which would lead to uneven texture. The low to medium start keeps the batter from trapping excessive air, avoiding large tunnels or collapsed tops; you want a smooth, cohesive batter. A common mistake is overbeating on high, which can make cupcakes tough, so keep to the speed guidance and watch for a uniform, slightly glossy batter. If your batter seems too stiff, check you measured the pumpkin and oil correctly before adding more liquid.
- Divide batter evenly among 24 greased muffin cups (about two-thirds full) and bake at 350 degrees F for 18-22 minutes or until a tester inserted in center comes out clean. Cool cupcakes in pans on wire racks for 10 minutes; remove to wire racks to cool completely.: When portioning the batter take note of how it flows from the scoop, it should fill the cup smoothly without lumps. As the cupcakes bake you will see the tops rise and set, and the kitchen will fill with the aroma of spice; the edges may pull slightly from the tin when they are nearing done. Using a tester prevents overbaking; insert it in the center and if it comes out clean or with a few moist crumbs, they are ready. A common pitfall is filling cups too full, which causes domed, cracked tops and spills, so aim for about two thirds. If the tops brown too quickly, tent with foil and continue baking.
- Meanwhile, prepare frosting by melting butter over medium low heat. Stir in brown sugar and bring to a boil, stirring constantly. Stir in heavy cream, cinnamon, vanilla and salt and return to a boil. Boil for 30 seconds, stirring constantly then remove pan from heat and cool until lukewarm, about 20 minutes.: That ten minute rest lets the crumb stabilize, so the cupcakes will not crumble when you remove them. When you transfer them to the wire rack you'll feel the difference in weight and firmness, and the steam rising will carry that warm pumpkin aroma. Cooling fully before frosting is essential because warm cupcakes will melt the frosting into an oily glaze. A troubleshooting tip is to lift one gently from the pan to test; if it tilts or is very soft, give it a few more minutes. Do not refrigerate hastily, as condensation can make the tops soggy.
- Transfer butterscotch to the bowl of your electric mixer and add 1 tablespoon milk and powdered sugar and beat until combined. Add 1 more tablespoon milk and beat until smooth, adding additional milk a little at a time if needed to reach desired consistency (additional milk will depend on how much your butterscotch has thickened as its cooled – I use 2 tablespoons milk total). Note this frosting is smooth and silky, not light and fluffy.: As the butter begins to liquefy you will hear a gentle sizzle and see a golden sheen form. This low heat approach prevents burning while allowing the butter to reach the right temperature for dissolving the brown sugar. Stir frequently with a wooden spoon so the heat distributes evenly. If the butter browns too quickly, lower the heat; a burnt butter taste will carry through the frosting and cannot be masked. I always keep the pan on a burner set to medium low and stay with it, since the next steps move quickly.
- Frost cooled cupcakes and sprinkle with sea salt.: Once the brown sugar meets the butter the mixture will darken and smell intensely caramel like, a sign that flavor compounds are developing. Bring to a gentle boil while stirring so the sugar dissolves and the mixture becomes smooth and glossy. This constant motion prevents scorching, which can create bitter notes. If you see any graininess, keep stirring and slightly raise the heat very briefly to ensure the sugar fully dissolves, then lower again. Avoid letting the pot sit unattended, as the sugar can stick and burn along the edges.
- Stir in heavy cream, cinnamon, vanilla and salt and return to a boil: When you add the cream the mixture will hiss and steam, and the color will lighten slightly as it becomes saucier. The cream brings a rich silkiness while the cinnamon and vanilla tether the butterscotch to the cupcakes' spice profile. Salt sharpens the sweetness and balances the caramel tones. Let it come to a brief boil to ensure integration, stirring so the texture is uniform. One mistake is pouring cold cream into very hot sugar too fast, which can cause splattering; warm the cream slightly or add it slowly to prevent this.
- Boil for 30 seconds, stirring constantly then remove pan from heat and cool until lukewarm, about 20 minutes: That brief boil helps thicken and concentrate the sauce, giving it body without overcooking. After removing from heat you will see steam lessen and the aroma deepen as it cools. Waiting until lukewarm is important before whipping with powdered sugar, or else the sugar will melt and produce a thin glaze instead of a spreadable frosting. A typical error is rushing this step, which leads to runny frosting, so set a timer and be patient while it cools.
- Transfer butterscotch to the bowl of your electric mixer and add 1 tablespoon milk and powdered sugar and beat until combined: When you start beating you will notice the sauce lighten slightly and take on a thicker texture. The powdered sugar helps the frosting hold shape, while the milk loosens it to a workable consistency. Beat just until combined to keep the frosting smooth rather than overly aerated. If the mix appears too stiff, add a touch more milk, one small splash at a time. Avoid adding too much milk at once, which can make the frosting too thin and weepy on the cupcakes.
- Add 1 more tablespoon milk and beat until smooth, adding additional milk a little at a time if needed to reach desired consistency: This measured approach ensures a glossy, silky frosting rather than a heavy paste. As you beat, the frosting should become spreadable, and you will see faint ribbons form when the beater lifts, indicating a good texture for piping or smoothing. My usual finish is about 2 tablespoons total, but this depends on how much the butterscotch thickened while cooling. A common troubleshooting point is adding too much liquid; if the frosting thins too far, a short chill can help firm it before rewhipping.
- Note this frosting is smooth and silky, not light and fluffy: Expect a dense yet silky mouthfeel that clings to the cupcake rather than puffing up. This makes it excellent for spreading into neat swirls and for pairing with a sprinkle of salt. Because it is not whipped to incorporate air, it holds shape well and has a luxurious, almost sauce like finish. If you prefer a lighter texture, try using half the powdered sugar and chilling briefly, but be aware the character will change.
- Frost cooled cupcakes and sprinkle with sea salt: When you frost, you will feel the frosting glide over the top, leaving a glossy sheen, and the aroma of brown sugar and butter will be prominent. A quick sprinkle of sea salt on each cupcake brightens the flavor and gives a little crunch contrast to the silkiness. If you plan to transport the cupcakes, allow the frosting to set slightly so it does not smear. The main mistake to avoid is frosting still warm cupcakes, as the topping will melt and lose its texture, so always confirm they are fully cooled before decorating.
Notes
- Stabilize your batter: Let your ingredients come to room temperature when possible; cold eggs or cold pumpkin can alter how the batter emulsifies and bakes.
- Use a cookie scoop for even cups: A small scoop helps portion the batter uniformly so every cupcake bakes at the same rate and you avoid under or over baked results.
- Test for doneness smartly: Insert a tester near the edge and the center to make sure there are no under baked pockets, since instant pudding can retain moisture longer in spots.
- Warm the cream slightly: If you warm the heavy cream a touch before adding to hot sugar, you reduce splatter and help everything combine more smoothly.
- Chill if too thin: If your frosting becomes too loose, pop it in the fridge for five to ten minutes then rewhip; it will firm up without losing gloss.
- Store properly: Keep frosted cupcakes in a single layer in an airtight container at room temperature for up to two days, or refrigerate if your house is very warm.