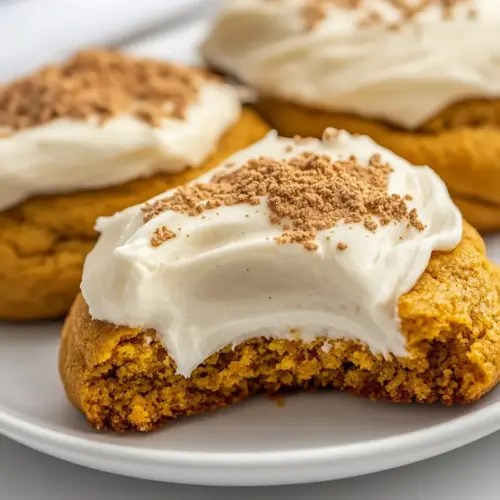
Pumpkin Cookies with Cream Cheese Frosting
Pumpkin Cookies with Cream Cheese Frosting deliver soft, spiced cookies topped with a tangy, creamy frosting that is both comforting and festive. They are moist, aromatic, and easy to make for fall gatherings or an easy weeknight dessert. The tender crumb and balanced sweetness make them a crowd pleaser, so bake a batch to share with friends and family.
Equipment
- Mixing Bowl
- Stand mixer or handheld mixer
- Silicone spatula
- Cookie Scoop
- Baking Sheet
- Parchment Paper
Ingredients
- 2 1/4 cups all-purpose flour Combine to provide structure and a tender crumb; sift or whisk to remove lumps and ensure even mixing with leaveners for consistent cookie texture.
- 2 1/2 teaspoons pumpkin pie spice Enhance warm, aromatic notes throughout the dough; blend thoroughly with dry ingredients so pumpkin spice is evenly distributed and complements the pumpkin puree.
- 1 teaspoon baking powder Lightly aerate and help cookies rise; incorporate with the flour and other leaveners to create a balanced lift without creating large holes.
- 1/2 teaspoon baking soda React with acidic components to create lift and tender texture; dissolve evenly into the dry mix to prevent metallic pockets and ensure proper spread.
- 1/2 teaspoon salt Balance and enhance overall flavors while controlling fermentation and gluten development; evenly mix into dry ingredients to avoid salty hotspots.
- 1/2 teaspoon ground cinnamon Accentuate warm spice characteristics and deepen aromatic complexity; combine with pumpkin pie spice to heighten cinnamon notes in the cookie.
- 1/2 cups salted sweet cream butter (softened) Contribute richness, moisture, and tender mouthfeel; cream with sugars to incorporate air for a light cookie structure while providing buttery flavor.
- 1/2 cup vegetable oil Provide fat for tenderness and moistness while promoting spread; mix with butter and sugars to achieve a cohesive dough with soft texture.
- 1 1/4 cup granulated sugar Add sweetness and help create a tender, slightly crisp edge; cream with fats to dissolve crystals and incorporate air for a lighter cookie.
- 1/2 cup light brown sugar (packed) Introduce deeper, caramel-like sweetness and moisture; pack and cream with other sugars to help retain chewiness and enhance flavor complexity.
- 15 ounces pumpkin puree Deliver moistness, iconic pumpkin flavor, and color; fold into batter to add density and natural sweetness while contributing to the cookie's soft interior.
- 2 eggs Bind ingredients, add richness, and assist leavening through structure formation; beat with sugars and fats to create a smooth, cohesive dough.
- 2 teaspoons vanilla extract Provide floral and sweet aromatic complexity; stir into wet ingredients to enhance overall flavor without overpowering pumpkin spices.
- 8 ounces cream cheese (softened) Bring tang, creaminess, and stability to the frosting; beat until smooth to create a rich base that balances the cookies' sweetness.
- 1/2 cups salted sweet cream (softened) Add additional creamy, slightly salty richness and spreadability to frosting; soften and whip with cream cheese for a smooth consistency.
- 3 cups powdered sugar Sweeten and thicken the frosting while contributing a silky texture; gradually add and beat to reach desired frosting consistency and sweetness level.
- 2 tablespoons milk Adjust frosting consistency and provide a touch of dairy softness; stir in sparingly to achieve a spreadable, pipeable frosting texture.
- 2 teaspoons clear vanilla (flavoring) Intensify vanilla aroma without cloudiness or added color in frosting; incorporate small amounts to round out flavors and lift sweetness.
- 1/2 teaspoon pumpkin pie spice (optional garnish) Garnish with additional spice aroma and visual appeal; lightly dust or sprinkle atop frosted cookies to reinforce pumpkin pie flavors.
Instructions
- Preheat the oven to 350°F. Line a baking sheet with parchment paper and set it aside.: As the oven warms, you will notice a clean warmth spreading in the kitchen and your mind begins to shift into baking mode, which is one of my favorite pre baking rituals. The smell is subtle at this stage, but the sound of the oven fan or click of the dial cues you that heat is building, and that steady heat is essential so cookies bake evenly. If the oven is not fully preheated, cookies can spread too quickly and lose their domed top, so resist the urge to open the door repeatedly. A common mistake is placing cold dough into an oven that is not up to temperature, which leads to uneven texture, so always wait until the thermometer or oven indicator shows readiness.
- In a medium-sized mixing bowl, whisk together the flour, pumpkin pie spice, baking powder, baking soda, salt, and ground cinnamon. Set it aside.: As you whisk the dry mix, the scent of the spices will bloom, giving off a cozy, spiced aroma that hints at the final cookie. The visual cue here is a uniform pale tan mixture speckled with darker spice flecks, which indicates even distribution and prevents pockets of leavening. Why we do this is simple, it ensures consistent lift and even spice in every bite, and prevents over mixing later. Troubleshooting tip, if you spot lumps of flour, press them through a fine mesh or sift for a finer texture. Avoid over vigorously beating the dry mix into the wet, since that can develop gluten and make the cookies tough.
- Using a stand mixer, or a medium-sized mixing bowl and a handheld mixer on medium-high speed, cream together the softened butter and vegetable oil for 1 minute.: The creaming step introduces air and helps create a tender crumb, and you will see the mixture lighten in color and become glossy, which is a reliable visual cue. The combined fat textures also create a silkiness you can almost hear as the mixer hums steadily, and this is key for a balanced mouthfeel where cookies remain moist but not greasy. If the butter is too cold it will not aerate well, so it s important it is softened but not melting. If you over cream, the mixture can become too soft, causing excess spread in the oven.
- Lower the mixer speed to low, add the granulated sugar and brown sugar, and increase the mixer speed to medium-high. Mix for another 1 minute. Using a silicone spatula, scrape down the sides of the mixing bowl.: Adding sugars in this way helps dissolve them into the fat, creating a smoother batter that yields better texture and even browning. You will notice a slightly grainy texture initially that fades as the sugars incorporate, producing a rich, glossy batter. Scraping the bowl prevents unmixed pockets of sugar or butter, which could create inconsistent pockets of sweetness in the cookies. A common error is skipping the scrape, which can leave dense pockets and uneven bake, so always scrape thoroughly.
- Lower the mixer speed to low, add in the pumpkin puree, increase the speed to medium and mix just until the pumpkin is completely incorporated. Scrape down the sides of the bowl.: When the pumpkin joins the fats and sugars, the aroma deepens and the batter will take on a smooth, velvety texture and a warm orange tone. This step adds moisture and body while the short mixing time prevents overworking the batter. You should see a uniformly colored batter with no streaks of wet or dry ingredients, which signals readiness to move on. Watch out for excess liquid, if your pumpkin is unusually watery the dough may be too loose, and you can briefly chill the dough to firm it before scooping.
- Lower the mixer speed to low, add in the vanilla extract and the eggs, 1 at a time, mixing well after each egg.: Adding eggs slowly ensures they emulsify into the batter, creating a smooth, cohesive dough. The batter will sound slightly heavier in the bowl as it becomes more fluid, and you will see it gloss over as the eggs incorporate, which helps with structure and color. This technique prevents curdling and ensures even distribution of moisture. Avoid dumping both eggs at once, or the batter might separate and require extra mixing, which can toughen the cookies.
- Keeping the mixer speed on low, slowly add in the flour mixture. Mix just until all ingredients are well incorporated.: Adding the dry ingredients gently helps protect the tender texture by limiting gluten development, and you will notice the batter firming to a scoopable consistency with a slightly sticky feel. The visual cue is the disappearance of streaks of flour, leaving a uniform dough. If you overmix, the cookies will become dense, so stop as soon as the dry ingredients are combined. A typical mistake is continuing to mix to smoothness, which can lead to toughness; aim for just incorporated.
- Using a 1 to 1 1/2 tablespoon cookie scoop, scoop out the cookie dough onto the prepared baking sheet. Space the dough 2 inches apart.: Scooping ensures uniform size so cookies bake at the same rate, and spacing prevents them from merging as they spread. When you press the scoop into the dough you will feel slight resistance, and the dough should hold its shape on the scoop before landing on the sheet. The dough will look slightly glossy and moist, indicating proper hydration. If cookies flatten out too much while scooping, chill the dough briefly. A common pitfall is placing scoops too close together which results in a single large sheet of cookie.
- Bake for 12 to 15 minutes. Allow the cookies to completely cool before frosting.: In the oven you may hear a faint whisper as steam escapes, and the aroma of spices becomes more pronounced. Look for a gentle golden rim forming while the centers remain soft, that is the sign of doneness rather than deep browning. Letting them cool fully prevents the frosting from melting into the cookie, preserving the clean frosting profile. If you under bake, cookies may collapse when cooled, so err on the side of the shorter end then watch the edges; if overbaked they will be dry, so avoid extended baking beyond the window.
- Using a stand mixer, or a medium-size mixing bowl and a handheld mixer on medium-high speed, cream together the softened cream cheese, clear vanilla flavoring, and butter for 1 to 1 1/2 minutes. Scrape down the sides of the bowl with a silicone spatula.: This step creates the foundation of a glossy, aerated frosting; you will notice the mixture lighten and soften in texture, developing a silky sheen. Properly softened cream cheese prevents lumps and yields a smooth mouthfeel, and scraping ensures any pockets of unmixed cheese are eliminated. Temperature matters here, too cold and the frosting will be lumpy, too warm and it will be too soft to hold shape. A typical mistake is not softening the cream cheese first, requiring extra mixing that can warm and thin the frosting excessively.
- Lower the mixer speed to low, and slowly add in the powdered sugar. Increase the mixer speed to medium-high and continue mixing for another 1 to 1 1/2 minutes.: As the powdered sugar blends in, the frosting will thicken and become bright white and smooth, with a creamy gloss. Adding the sugar slowly prevents a dusty cloud and helps it dissolve uniformly for a stable consistency. Mixing at higher speed briefly aerates the frosting, making it light and spreadable, but avoid excessive beating which can introduce too much air and make the frosting unstable. If the frosting seems grainy, a short rest at room temperature helps the sugar hydrate properly.
- Lower the mixer speed to medium and slowly add the milk. Mix just until the frosting is smooth.: Milk helps you reach the ideal spreadable texture, and you will see the frosting relax into a silky ribbon that falls from the spoon. Adjusting with milk lets you control firmness, whether you want a dollop that holds shape or a softer spread that smooths to the edges. If you add too much milk, the frosting can run, so add a little at a time. A common error is over thinning, which makes the frosting slide off the cookie; correct by adding more powdered sugar to thicken.
- Once the cookies have completely cooled, spoon 1 tablespoon (or more if you wish) of frosting onto each cookie, smoothing out to the edges. If you wish, you can gently dust the tops of the cookie with the pumpkin pie spice.: When you frost cooled cookies, you will feel a satisfying contrast between the soft cookie base and the creamy frosting, and the visual of a smooth dome or spread is very pleasing. The optional dusting of pumpkin pie spice adds a fragrant finish and a hint of texture. Frosting warm cookies causes melting and a loss of definition, so patience here results in a cleaner presentation. A frequent mistake is frosting too soon, which leads to runny tops, so allow complete cooling for best results.
Notes
- Change Size Thoughtfully — If you want larger cookies, use 2 to 3 tablespoons per cookie, increase the bake time slightly and watch for the golden rim as your doneness cue; larger cookies will remain soft in the center but need a bit more oven time.
- Make Sandwich Cookies — Try piping the frosting between two cooled cookies for a delightful sandwich, pressing gently so the filling reaches the edges, which creates an elegant presentation and doubles the creamy bite in each mouthful.
- Adjust Frosting Consistency — If your frosting seems too thin, add small amounts of powdered sugar until it thickens; if too stiff, add milk one teaspoon at a time to reach a spreadable texture that won t slide off the cookie.
- Transport Tips — Arrange cookies in a single layer with parchment between layers to keep the frosting intact during travel, and chill briefly to firm the frosting before stacking for safer transit.
- Storage Guidance — Store in an airtight container in the refrigerator for up to three days to keep the frosting fresh, or freeze unfrosted cookies and add frosting after thawing for best texture retention.