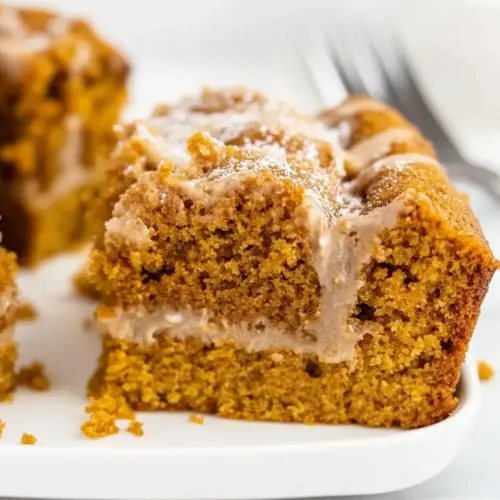
Pumpkin Coffee Cake
Pumpkin Coffee Cake delivers a moist, spiced crumb with a crunchy streusel topping and a silky glaze. Creamy pumpkin and warm spices create a cozy, comforting bake, ideal for easy weekend breakfasts or holiday gatherings. This cake is pantry friendly and forgiving, making it a go to when you want an effortless, crowd pleasing dessert or snack.
Equipment
- 9×9-inch glass baking dish
- Mixing Bowls
- Pastry blender
Ingredients
- 2 cups all-purpose flour Provide structure and bulk to the cake batter, forming the crumb when combined with liquids and leaveners. Use measured, sifted flour for even texture and to prevent dense spots. Handle gently once added to avoid overdeveloping gluten and producing a tough cake.
- 1 tablespoon pumpkin pie spice Impart warm autumn spice and aromatic depth, blending cinnamon, ginger, nutmeg, and cloves into the cake. Add to dry ingredients to ensure even distribution and consistent flavor throughout the batter. Balance its intensity with sugar and pumpkin to avoid overpowering the cake.
- 1 teaspoon cinnamon Offer a focused warm, sweet-spicy note that complements the pumpkin and other spices. Mix with the other dry spices to ensure an even cinnamon presence in both batter and topping. Adjust slightly if a milder or stronger cinnamon profile is desired.
- 1 teaspoon baking soda Provide chemical leavening that reacts with acidic components to help the cake rise and become light. Combine with baking powder and other leaveners in the dry mix for a controlled lift. Ensure it is fresh for optimal rising power and avoid clumping.
- 1/2 teaspoons salt Enhance overall flavor by balancing sweetness and heightening other ingredients, while supporting chemical reactions in the batter. Dissolve evenly among the dry ingredients to avoid pockets of salt. Use accurate measurement because too much can suppress rising and flavor.
- 2 teaspoons baking powder Contribute additional leavening power to create a tender, airy crumb and consistent rise alongside baking soda. Incorporate with dry ingredients to get uniform distribution and predictable lift. Freshness matters; expired baking powder can lead to flat results.
- 2 large eggs Bind the batter, add moisture, and contribute to structure and richness through proteins and fats. Beat until just combined to incorporate air and promote tender crumb without overmixing. Use large eggs at room temperature for better emulsification and even baking.
- 1/3 cup vegetable oil Add moisture and fat for tenderness while keeping the texture lighter than butter, contributing to a moist crumb. Whisk with sugars and eggs to form a smooth emulsion that improves batter cohesion. Measure carefully and mix gently to maintain the right balance of fat.
- 3/4 cup packed light brown sugar Provide deep, caramel-like sweetness and added moisture from its molasses content, enhancing the cake's flavor complexity. Cream with oil and eggs to help integrate flavors and prevent graininess. Pack firmly into the cup measure for accurate sweetness levels.
- 1 cup pure pumpkin puree Deliver concentrated pumpkin flavor, moisture, and natural sweetness, creating the cake's signature profile and tender crumb. Choose pure pumpkin puree (not pie filling) to avoid added sugars or spices altering the recipe. Fold in gently to preserve air incorporated during mixing.
- 1 teaspoon vanilla extract Introduce a sweet, floral vanilla warmth that rounds out flavors and enhances other ingredients' perception. Add with wet ingredients to distribute evenly and prevent localized flavor pockets. Use pure vanilla extract for best flavor clarity and aroma.
- 1/2 cup whole milk Supply richness and dilute the batter slightly to achieve the desired consistency while contributing to tenderness. Use whole milk for added fat which improves mouthfeel and browning during baking. Warm slightly to room temperature to help fats emulsify smoothly into the batter.
- 1/2 cup all-purpose flour Serve as additional dry structure for the streusel or topping, adding mild chewiness and body to the crumbly layer. Combine with butter and spices to create a balanced, textural contrast on top of the cake. Measure precisely to maintain the topping's intended consistency.
- 1 teaspoon baking powder Act as extra leavening specifically for the topping or small batter portions to lighten texture and prevent dense pockets. Mix thoroughly with the smaller flour portion to ensure even rising in the topping. Check freshness to maintain effective lift.
- 1/4 cup packed light brown sugar Contribute concentrated sweetness and a hint of molasses to the topping, deepening its flavor and helping create a slightly sticky, caramelized finish. Pack into the measuring cup for correct sweetness level and to maintain topping consistency. Combine with butter to form crumbly clusters.
- 1 teaspoon ground cinnamon Add warm spice to the topping, reinforcing the cake's cinnamon notes and harmonizing with pumpkin pie spice. Blend into dry topping ingredients so the spice distributes evenly and avoids clumps. Adjust amount for a subtle or pronounced cinnamon presence.
- 1/4 cup salted butter (cold) Provide cold fat that, when cut into flour, creates flaky, tender crumbs and a buttery flavor for the streusel. Keep butter cold to form pea-sized pieces that bake into distinct crumbly pockets. Work quickly to prevent melting and overworking the mixture.
- 1 tablespoon milk (or heavy cream) Loosen and slightly enrich the streusel or glaze, helping bind dry ingredients together for a smoother texture. Use milk or heavy cream depending on desired richness and consistency in the topping. Add gradually to achieve the right crumbly or pourable state.
- 1/2 cup powdered sugar Offer a silky sweetness and finishing touch when sifted into a glaze, balancing flavors and adding visual appeal. Combine with milk to create a smooth drizzle that hardens slightly on cooling. Sift before use to prevent lumps and ensure an even, glossy finish.
- 1 to 2 tablespoons milk (or cream) Adjust glaze consistency and add a touch of creaminess so the powdered sugar reaches a pourable texture suitable for drizzling. Use one to two tablespoons to fine-tune thickness depending on humidity and desired coating. Stir until completely smooth for a glossy, uniform finish.
- 1/4 teaspoon ground cinnamon Provide a subtle warm spice accent to the glaze or topping, echoing the cake's spice profile and adding aromatic lift. Sprinkle or stir in to taste for a cohesive spice experience across cake and finish. Use sparingly to avoid overwhelming the icing's sweetness.
Instructions
- Preheat the oven to 350°F.: The warmed oven smell should begin to gently rise, signaling that the air is even and ready for the batter. A properly preheated oven ensures even rise and consistent texture, so wait until it reaches temperature before you bake. One typical mistake is putting the batter in too soon, which can lead to uneven cooking, so use an oven thermometer if your oven runs cool or hot.
- Spray a 9×9-inch glass baking dish with non-stick cooking spray and set aside.: As you prepare the batter, the glossy sheen of the sprayed dish shows it is ready to accept batter without sticking. Glass heats a bit differently than metal, often producing a slightly browner edge, which is desirable here. Forgetting to prepare the pan is a common error that may cause the cake to stick and break when removed, so keep this step tidy.
- In a medium mixing bowl, whisk together the flour, pumpkin pie spice, cinnamon, baking soda, salt, and baking powder.: The dry mix should smell fragrant and uniform, with no visible pockets of baking powder or soda. Thorough mixing disperses leavening and spices so the cake rises evenly and the spice hits every bite. A frequent issue is uneven distribution, which causes pockets of spice or uneven rise, so whisk until homogenous.
- In a separate bowl, mix together the eggs, oil, brown sugar, pumpkin puree, vanilla extract, and milk.: As you whisk, the wet mixture will take on a smooth, slightly glossy texture, and the sugar should begin to dissolve into the pumpkin . This emulsion carries moisture and fat through the batter, creating tenderness and flavor. Overbeating can incorporate too much air and alter the crumb, so mix just until blended.
- Fold the wet ingredients into the dry ingredients and stir gently to combine.: At this stage you should see a uniform batter that is thick but pourable, with no streaks of flour. Gentle folding preserves the tender structure, preventing a tough cake. Overmixing is the main pitfall here, it develops gluten and yields a dense texture, so stop as soon as the last streaks disappear.
- Spread the batter into the prepared baking dish.: Use a spatula to smooth the surface so it bakes evenly, and notice how the batter settles into the corners with a satiny sheen. Even thickness prevents thin edges from overbrowning. Rushing this step can create low and high spots that bake unevenly, so take a moment to level it carefully.
- In another medium bowl, whisk together the flour, baking powder, brown sugar, and cinnamon.: The streusel base should look sandy and aromatic, with the sweet molasses notes of the brown sugar mingling with the warm spice. This dry mix forms the crunchy topping that contrasts with the tender cake. Not mixing well can leave clumps that don’t brown evenly, so combine thoroughly.
- Cut the butter into small pieces and use a pastry blender or fork to mix the butter into the flour mixture, just until the butter is pea-sized.: You should hear a soft crumbling and see small, irregular bits of butter coated in flour. Those pea sized pieces are what bake into little pockets of crunchy richness. If the butter melts during this step, the streusel will become greasy and won’t form the desired texture, so work quickly and keep the butter cold.
- Stir in 1 tablespoon of milk or cream until the streusel clumps together just slightly. Sprinkle the streusel over the prepared cake batter.: The streusel should form loose clumps that can be scattered over the batter, creating peaks and valleys that brown attractively. This contrast gives you both crunchy and tender bites after baking. If you add too much liquid the streusel will lose structure and sink into the batter, so add only a tablespoon and adjust sparingly.
- Bake coffee cake for 40 to 45 minutes. The coffee cake is done when a toothpick inserted into the center comes out with just a few moist crumbs on it.: As it bakes you will notice the kitchen fill with spice and the top turning golden brown, with the streusel crisping and the edges pulling away slightly from the pan. A toothpick inserted into the center should come out with just a few moist crumbs, which indicates the interior is cooked but still tender. Leaving it too long dries the cake, while taking it out too early can leave a gummy center, so check at the lower end of the time range.
- Allow the coffee cake to cool before adding the glaze.: Cooling lets the crumb set so the glaze won’t sink into the cake and make it soggy, and the streusel firms up as it cools, retaining its texture. Patience here preserves the look and mouthfeel that make the cake special. Glazing too soon can create a runny, overly soaked surface, so wait until the cake is warm but not hot.
- Whisk together glaze ingredients in a small bowl. Adjust the amount of milk added to make a nice, thick glaze that can be drizzled. Drizzle over the pumpkin coffee cake.: The glaze should be glossy and pour slowly from a spoon, creating ribbons over the streusel and settling into crevices for a finished look. It adds a balance of sweetness and smooth texture to each bite. If the glaze is too thin it will pool and run off, so start with less milk and thin it gradually until it reaches the right consistency.
- Cut into pieces and serve.: The final slice should show a tender, moist interior with a contrast of crunchy streusel on top and a delicate sheen from the glaze. Serve slightly warm or at room temperature so the flavors are fully present. Cutting too early may cause the cake to crumble or the glaze to smear, so allow the cake to rest briefly for the cleanest slices.
Notes
- Swap the milk: Use a slightly richer option like light cream for a silkier crumb, adjusting only a little to avoid thinning the batter too much.
- Streusel mix variation: Add a small handful of chopped nuts to the streusel for extra crunch, but toast them lightly first so they stay crisp after baking.
- Spice intensity: Increase or decrease the pumpkin pie spice by a quarter teaspoon to suit your taste, tasting the dry mix first to gauge potency.
- Presentation tweak: Dust with a light sprinkle of extra cinnamon after glazing to add an aromatic top note that complements the glaze.
- Make ahead: You can bake the cake a day ahead and add the glaze just before serving to preserve the freshest texture.