Pumpkin Cinnamon Roll Cookies
Pumpkin Cinnamon Roll Cookies bring warm spices and tender pumpkin together in an easy, crowd pleasing cookie. Soft centers, a cinnamon sugar crust, and a creamy cream cheese swirl deliver a cozy fall experience that makes a great treat for gatherings or an easy weeknight dessert. Make a batch to enjoy seasonal flavors with minimal fuss.
Equipment
- Sheet pan (152 x 102)
- Parchment paper or silicon baking mat
- Cooling rack
- Resealable plastic bag or piping bag
Ingredients
- 16 tablespoons unsalted butter, melted Melted for easy incorporation, provides the primary fat and moisture to create tender, rich cookies and promote even baking. Contributes to flavor depth and helps dissolve sugars, aiding caramelization and browning. Use fully melted and slightly cooled butter to ensure uniform texture in the dough.
- 2/3 cup granulated sugar Granulated and crystalline, supplies straightforward sweetness and helps the dough structure by dissolving into the wet ingredients for proper creaming and spread. Encourages slight crisp edges through caramelization while balancing deeper sugars. Measure accurately to maintain intended texture and sweetness.
- 2/3 cup light brown sugar, firmly packed Firmly packed and molasses-rich, offers deep caramel notes and retains moisture for a chewier cookie texture while complementing warm spices. Adds density and complexity to the flavor profile and prevents the cookies from drying out. Adjust packing gently for consistent sweetness and texture.
- 6 tablespoons canned pumpkin, I recommend Libby's Canned and smooth, contributes concentrated pumpkin flavor and moisture that tenderizes the crumb while providing the signature autumnal profile. Helps bind ingredients and works with spices to create classic pumpkin notes without thinning the dough. Prefer stable canned pumpkin for consistent results.
- 1/2 tablespoon vanilla extract Fragrant and concentrated, delivers sweet vanilla aroma that enhances the perception of sweetness and balances spicy and earthy flavors. Boosts overall flavor complexity and harmonizes the pumpkin and brown sugar notes. Add with wet ingredients for even distribution.
- 2 -3/4 cups flour, see note 1 Dry and structural, forms the bulk of the cookie by providing gluten and starch that give body and chew when combined with wet ingredients. Balances moisture and influences spread, chewiness, and thickness depending on exact measurement and handling. Sift or measure as instructed to maintain desired texture.
- 1 -1/2 teaspoons cornstarch Fine and thickening, contributes light tenderness by softening the protein network and slightly thickening the dough for a delicate bite. Helps stabilize the cookie structure and can improve overall mouthfeel when combined with the flour. Stir into dry ingredients for even distribution.
- 1/2 teaspoon salt Fine and savory, provides essential saltiness that heightens sweetness and balances the spices while strengthening dough structure. Controls flavor perception and enhances overall taste complexity. Dissolve into dry mix to ensure even seasoning.
- 1 teaspoon baking soda Leavening and reactive, creates lift by reacting with acidic components to produce carbon dioxide, helping cookies spread and gaining slight lift. Regulates texture and lightness when balanced with other ingredients. Mix thoroughly with dry ingredients for consistent rise.
- 1 teaspoon ground cinnamon Warm and aromatic, contributes classic cinnamon flavor that complements pumpkin and brown sugar for a cozy, spiced profile. Enhances aroma and provides a familiar sweet-spicy backbone. Blend into the dry spice mix for even flavor distribution.
- 1/4 teaspoon nutmeg Pungent and slightly sweet, adds warm, earthy nutmeg notes that deepen the overall pumpkin-spice character and add aromatic complexity. Works in small amounts to avoid overpowering other spices. Combine with other spices to create balanced seasoning.
- 1/4 teaspoon ground cloves Sharp and intense, provides a clove-like warmth and depth that reinforces the autumn spice blend and adds a hint of savory complexity. Use sparingly to avoid bitterness while enhancing the cookie's spiced identity. Mix thoroughly with other spices.
- 1/2 teaspoon allspice Aromatic and complex, supplies allspice's peppery-clove-cinnamon profile to enrich the spice blend and harmonize with pumpkin. Adds layered warmth that complements cinnamon and nutmeg for a rounded spiced flavor. Integrate into the dry spice mix.
- 1 -1/2 teaspoons pumpkin pie spice Balanced and aromatic, offers a ready-made pumpkin pie spice blend to deliver cinnamon, nutmeg, cloves, and other warm notes for classic seasonal flavor. Simplifies seasoning while ensuring consistent spice proportions across batches. Incorporate into dry ingredients to flavor the dough evenly.
- 1/3 cup granulated sugar Granulated and used for the filling, adds sweetness and slight texture contrast to the cinnamon-sugar swirl component that mimics roll filling within each cookie. Caramelizes slightly during baking to create soft, sweet pockets inside the cookie. Mix with spices for the filling layer.
- 2 teaspoons pumpkin pie spice Warm and sweet, intensifies the filling with concentrated pumpkin pie spice to echo the dough's flavors and produce a cohesive, spiced cinnamon roll effect. Enhances aromatic impact and ties the filling to the cookie base. Blend into the granulated filling sugar for even coverage.
- 1 teaspoon ground cinnamon Fragrant and grounding, provides an additional cinnamon boost in the filling to emphasize classic cinnamon roll flavors and complement the pumpkin spice. Balances sweetness and warmth within the swirl portion for unmistakable cinnamon notes. Combine with the sugar and spices for the filling.
- 4 ounces cream cheese, at room temperature Softened and tangy, brings creamy richness and slight acidity to the frosting that balances sweetness while adding a silky texture. Helps stabilize the glaze and enhances flavor complexity when whipped with butter and sugar. Ensure room temperature to avoid lumps.
- 4 tablespoons unsalted butter, at room temperature Soft and spreadable, contributes butterfat and flavor to the frosting for richness, smooth texture, and mouthfeel. Helps create a stable emulsion with the cream cheese and powdered sugar for a glossy, pipeable finish. Use at room temperature to achieve a creamy consistency.
- 1/2 teaspoon vanilla bean paste or 1 teaspoon pure vanilla extract Pungent and aromatic, supplies concentrated vanilla flavor that deepens the frosting's profile and complements the cream cheese tang and pumpkin spices. Enhances sweetness perception and rounds out the glaze. Use paste for flecks or extract for clean vanilla notes.
- 1/2 teaspoon pumpkin pie spice Warm and spiced, adds a touch of pumpkin pie spice to the frosting to echo the cookie's flavors and provide continuity between dough and glaze. Boosts aromatic warmth and balances the cream cheese's tanginess. Fold into the frosting evenly for consistent taste.
- 1/8 teaspoon salt Tiny and savory, supplies a hint of salt to the frosting that brightens and balances the sweet powdered sugar and rich dairy components. Amplifies flavors and prevents the glaze from tasting flat. Dissolve fully into the frosting for even seasoning.
- 2 cups powdered sugar Fine and sweet, creates the primary body of the frosting by providing bulk sweetness and a smooth, pipeable consistency when sifted and combined with dairy. Balances tangy cream cheese and enriches mouthfeel for a classic creamy glaze. Sift if lumpy and mix until smooth.
Instructions
- Place melted butter in a large bowl and let cool to room temperature (if not then the cookies will be greasy). Then add granulated sugar and brown sugar. Whisk until smooth, then add pumpkin and vanilla and whisk again to combine.: The aroma of warm butter fades as it cools and the batter will come together with a glossy sheen once the butter is not hot. You'll notice the surface go from shimmering to a matte finish, which tells you it is safe to add sugars and wet ingredients. If you add sugars to very warm butter the sugars can melt and cause greasy cookies, which is why cooling is essential. One common mistake is skipping the cooling and ending up with a batter that is too loose, so be patient. When you whisk the cooled mixture with the granulated sugar and light brown sugar it should feel smooth and slightly thick, and when you add the pumpkin and vanilla the scent will shift to a cozy, spiced note. Visually, the sugars will dissolve into the butter leaving no gritty texture, and you will hear no extra sound changes beyond a gentle whisking. This step matters because it lays the foundation for uniform cookies that bake evenly without excessive spread.
- In another bowl, stir together flour (see note 1), cornstarch, salt, baking soda, cinnamon, nutmeg, cloves, allspice, and pumpkin pie spice. Stir to combine.: As you mix these dry elements the dry spice aroma will bloom, giving you an early preview of the finished cookie scent. The flour provides structure while the cornstarch makes the final crumb tender. Use a whisk or spatula to break up any clumps so the leavening is evenly distributed, which prevents weird tunnels or uneven lift in the cookies. A frequent misstep is adding wet ingredients to lumpy dry mix, which causes streaks or pockets of unmixed flour; make sure the dry mix is uniform with no visible streaks. The visual cue to look for is an even, pale tan mixture flecked with spice particles, and the texture should be light and powdery. This precise mixing ensures each cookie bakes with consistent texture and spice balance.
- Add dry ingredients to the wet ingredients and stir until just combined (don't overmix).: Once combined you will notice the dough transform from a loose batter into a soft, slightly tacky dough that holds shape but still yields to gentle pressure. After adding the dry mix, stir until you no longer see white streaks, taking care not to overmix; overworked dough will develop a tougher texture. The smell will become richer as the spices integrate with the pumpkin and sugars, and visually the dough should be cohesive and slightly glossy from the butter. A common mistake here is over mixing which can produce dense cookies; stop as soon as combined. The why is simple, gentle mixing keeps the crumb tender, and the result is a beautifully soft cookie after baking.
- Roll dough into tall, somewhat-cylindrical balls, each 2 tablespoons in size (45 grams). In a small bowl, mix Cinnamon-Sugar Coating ingredients and roll dough balls in the mixture to coat the balls.: As you shape the dough you will feel its soft elasticity, and the dough balls should look smooth on the surface. The small mound format encourages even baking and a rounded top. In a separate bowl, mix the cinnamon sugar coating so it is aromatic and evenly blended, then roll each dough ball in the coating until thoroughly covered. The coating will give a slightly crisp edge and a caramelized surface when baked. A common error is making inconsistent sized balls, which yields uneven baking times, so weigh or measure each portion to match the 2 tablespoon size. Tactilely, you should notice the sugary coating stick slightly, creating a textured crust that will brown in the oven to give you that classic cinnamon roll cookie appearance and mouthfeel.
- Cover cookie balls with plastic wrap and place in the fridge for 1 hour. When they have almost finished chilling, preheat the oven to 325℉.: Chilling firms up the dough, which helps control spread in the oven and lets the flavors meld. You will notice the dough becoming more solid and easier to handle after chilling. Preheat the oven to 325 6F as they near the end of their rest so the oven is up to temperature when you bake. A common mistake is skipping the chill to save time, leading to flat cookies, so do not rush this step. Chilling also gives the coating a chance to set slightly on the surface so it crisps rather than dissolving during bake. The visual cue is a firm, cool dough that is no longer tacky to the touch.
- Place dough balls on a sheet pan lined with parchment paper or a silicon baking mat (I only add 6 cookie balls at a time) and bake for 10–14 minutes. Slightly underbake for soft cookies.: Arrange them with enough space to allow for slight spreading, about two to three inches apart, and bake for 10 to 14 minutes. You will hear very little sound as they bake, but you will smell the spices intensifying and a toasty note from the edges when they are close to done. Slight underbaking yields a softer center, so pull them when the edges are set and the centers still look slightly glossy. A frequent mistake is baking at too high a temperature which causes overly browned edges and an underdone middle, so trust the oven temperature and visual cues. The cookies will firm up as they cool, so err on the side of a touch of softness if you prefer tender cookies.
- Once done, immediately press cookie edges slightly inward with the back of a spoon. Cool on the sheet for 5 minutes, then transfer to a cooling rack.: Pressing the warm cookies gives them a crinkled top and a small well for the frosting to sit in. The residual heat will make the surface malleable, and a gentle press creates a pleasing shape and texture contrast. If you wait too long the cookie surface hardens and will not take the imprint easily, which is a common oversight. You should see an immediate indentation that holds slightly, and the aroma will be at its most inviting with a mix of toasted sugar and spices. Transfer to a cooling rack after five minutes so air circulates and the bottoms do not become soggy.
- Beat room-temperature butter and cream cheese until completely smooth. Add pumpkin pie spice, vanilla, and salt, then add powdered sugar and beat until smooth. It may seem like you need more liquid, but just keep beating; it will come together!: The frosting stage yields a velvety texture and tangy aroma from the cream cheese . Beat until lump free, then add pumpkin pie spice, vanilla, and salt, and incorporate the powdered sugar until smooth. The mixture may look dry briefly, but persistent beating brings it together into a glossy, pipeable frosting. A typical mistake is using cold cream cheese which creates lumps, so ensure it is at room temperature. Visually the frosting should be uniform and spreadable, and the scent will be sweet with a hint of spice. This step matters because a smooth frosting gives a professional finish and pleasant mouthfeel.
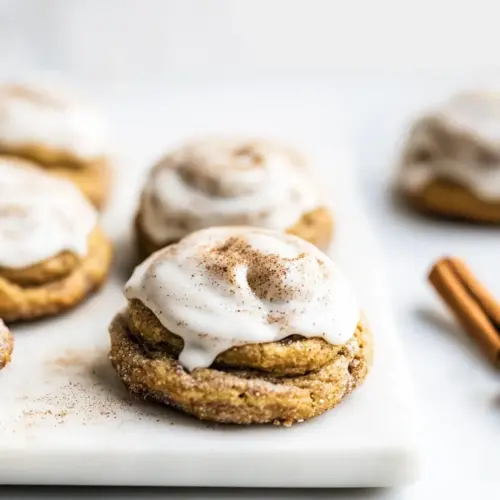
- Transfer frosting to a resealable plastic bag or piping bag and cut off the tip. Frost each cooled cookie by piping the frosting in a swirl on top. Sprinkle with leftover cinnamon-sugar mixture.: When piping the frosting you will hear a soft squeeze and see a steady swirl form on the cooled cookie tops. The tactile feedback through the bag helps you control the amount, and the frosting should hold its shape rather than run. If the frosting seems too thick, allow it to sit a few minutes at room temperature or beat briefly to loosen slightly, but avoid thinning with liquid. A common error is frosting warm cookies which causes runoff, so ensure cookies are fully cooled. Finish by sprinkling leftover cinnamon sugar mixture for a final aromatic and visual flourish, creating a speckled, inviting top.
Notes
- Measure flour correctly, spoon and level your flour instead of scooping directly from the bag to avoid packing too much, which can make the cookies dry and dense.
- Chill for control, chilling the dough for one hour firms it up and prevents excessive spreading, yielding a higher, softer cookie center that holds the cinnamon sugar coating.
- Room temperature dairy, always use room temperature cream cheese and butter for a lump free frosting; cold ingredients create grit and an uneven texture.
- Freeze dough balls, for convenience freeze the shaped dough on a tray then transfer to an airtight container; bake from frozen with an extra minute or two added to the baking time.
- Watch your oven, ovens vary, so begin checking at the earlier end of the bake time; edges should be set and centers slightly glossy when you pull them for soft cookies.