Pumpkin Cheesecake Cookies
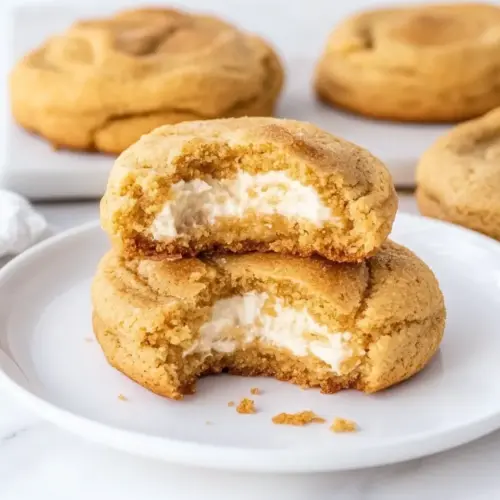
Pumpkin Cheesecake Cookies deliver a creamy, surprising center inside a tender, spiced cookie shell. This cozy treat is pumpkin forward, lightly spiced, and perfect for fall gatherings or an easy weeknight dessert. They are both comforting and elegant, offering a delightful texture contrast that makes them irresistible to bake again and again.
Equipment
- Mixing Bowls
- Electric Mixer
- Cookie Scoop
- Baking Sheet
- Parchment Paper
- Wire Rack
Ingredients
- 1 (8-ounce) package cream cheese, at room temperature Soften and incorporate to create a rich, tangy cheesecake-style filling; soften to room temperature for easy beating and a smooth texture. Adds creaminess and moisture that balances the pumpkin and spices in each cookie. Beat until light to help leavening and achieve a tender interior.
- 1/2 cup powdered sugar Sweeten and stabilize the cheesecake filling with a fine, silky texture; powdered sugar dissolves quickly for a smooth, lump-free batter. Contributes controlled sweetness without adding graininess and helps set the cream cheese mixture. Use measured amount to keep filling firm but not overly sweet.
- 1 1/2 teaspoons vanilla extract Enhance overall flavor with warm floral-vanilla notes that complement pumpkin spice; add to both dough and filling as directed. Provides aromatic depth and rounds out sugar flavors while masking any egginess from dairy. Use pure extract for the cleanest flavor profile.
- 1/2 cup canned pumpkin Moisten and provide classic autumn pumpkin flavor while contributing natural sugars and fiber; canned pumpkin adds uniform texture and ease. Helps create tender crumbs and pairs with spices to define the cookie’s seasonal character. Ensure strained pumpkin for consistent moisture levels.
- 1 3/4 cups all purpose flour Build structure and bulk for the cookie dough; all-purpose flour gives balance between tenderness and chewiness. Absorbs moisture from butter, sugars, and pumpkin to form a cohesive dough that holds shape while baking. Measure by spooning and leveling for accurate texture.
- 1 tablespoon pumpkin pie spice, divided Season and perfume the cookies with warm, aromatic spice blend; dividing the spice allows control over dough and filling intensity. Adds cinnamon, nutmeg, cloves, and ginger notes that make the recipe distinctly pumpkin-pie-like. Adjust quantity slightly if using homemade spice blend.
- 1/2 teaspoon baking soda Provide mild chemical leavening to give cookies lift and a tender crumb; baking soda reacts with acidic ingredients like cream cheese and pumpkin. Helps spread control and contributes to lightness in texture when combined with creamed butter and sugars. Use fresh baking soda for best rise.
- 1/4 teaspoon salt Balance and enhance flavors while controlling sweetness perception; salt tightens the dough and brightens the other ingredients. Small amount prevents blandness and strengthens the overall flavor profile. Dissolve evenly into dry ingredients for uniform seasoning.
- 3/4 cup butter, softened Cream and aerate the dough while contributing fat for rich mouthfeel and browning; softened butter should be at room temperature for optimal creaming. Helps trap air with sugar to produce a tender, slightly crisp edge and soft center. Use unsalted or adjust salt accordingly.
- 3/4 cup packed brown sugar Add deep, molasses-like sweetness and moisture that contributes chewiness and caramel notes; packed brown sugar helps keep cookies soft. Provides both flavor complexity and hygroscopic properties that extend freshness. Cream well with butter to create a smooth base for the dough.
- 1/2 cup white sugar, divided Provide straightforward crystalline sweetness and assist in creaming for texture; dividing allows part to be creamed with butter and part used for topping or balance. White sugar contributes to spread and crispness depending on proportion used. Measure carefully to maintain intended sweetness level.
Instructions
- Line a cookie sheet with parchment paper, and set aside.: The scent of warm baking should be anticipated, but before that, create a reliable workspace by lining your baking sheet with parchment paper to prevent sticking and promote even browning. You will notice how the paper makes removal effortless, and it cuts down on cleanup. Why this matters, because cookies that stick will tear and lose their shape when transferred. A common mistake is skipping the paper or using waxed sheets that can melt, which causes uneven baking and frustrating sticking.
- In a medium bowl, beat cream cheese, powdered sugar, and 1/2 teaspoon vanilla until smooth and well combined.: Right away your focus is on texture and aroma, not time. As the cream cheese whips with the powdered sugar , it should become glossy and silky, and you will smell a light vanilla lift. Smoothness is crucial so the frozen centers do not have lumps that can tear the dough. A typical slip up is underbeating, which leaves a gritty filling, or overbeating, which can warm the mixture too much and make it difficult to freeze firm.
- Scoop cream cheese using a small cookie scoop (about 2 teaspoons) onto the tray (there should be about 18 scoops). Freeze for 1 hour.: You will hear a quiet click as each rounded scoop drops onto the tray, and they should look neat and uniform. Freezing until solid firms the centers so they stay intact in the hot oven. The reason we freeze is that cold filling creates a temperature contrast, reducing the risk of leakage and ensuring a creamy interior after baking. Common mistakes include using too large a scoop or skipping the freeze step, which often results in oozing and misshapen cookies.
- Preheat the oven to 375°F.: As the oven comes to life you will start to sense readiness in the kitchen, the air warming and the racks radiating heat. Proper preheating ensures the cookies begin to set on contact, creating structure around the frozen filling. If your oven is not fully preheated, cookies may spread too much before setting, producing a flatter profile than intended.
- Pour the pumpkin onto a plate and blot out all excess moisture until there is no extra moisture. Set aside.: When you work with pumpkin , you must manage moisture carefully. Blotting reduces excess water, which otherwise makes the dough too loose and yields cakey or flat cookies. You will feel the puree change from wet to a denser texture as you press it between towels. The why is simple, moisture control preserves the desired cookie crumb. A common mistake is skipping blotting and assuming canned puree is ready to use, which often wrecks the dough consistency.
- In a medium bowl, mix flour, two teaspoons pumpkin pie spice, baking soda, and salt.: The dry mix should smell warmly spiced and look uniformly flecked with spice, signaling even distribution. Sifting or whisking helps avoid pockets of baking soda or salt that could create odd flavor bursts. This combination sets the foundation for texture and flavor, so even mixing is important. Mistakes include under-mixing, which yields uneven spice pockets, or overmeasuring flour, which will make the dough dense.
- In a large bowl, beat butter on high until smooth. Add brown sugar and 1/4 cup white sugar. Beat until combined well.: The sound of the mixer changes as the butter and brown sugar come together, from clumping to a creamy, fluffy stage. This aeration traps tiny air pockets that contribute to a tender bite. You want smoothness and no visible granules of sugar. Be careful not to overheat the butter, because warm butter will produce greasy, spreading cookies. A frequent error is skipping creaming, which reduces volume and yields denser cookies.
- Pour the pumpkin into the butter and sugar mixture and the remaining vanilla. Beat until mixed well.: As you incorporate the blotted pumpkin , the batter will blush a warm color and release a soft pumpkin aroma. This step is about marrying moisture and fat so the dough is cohesive. Proper mixing gives even distribution of flavor and prevents streaks of pumpkin. Avoid overmixing, which can create a gummy texture; if you see the mixture getting overly elastic, stop.
- Pour the dry ingredients into the wet ingredients and mix with a wooden spoon until combined.: The dough will transform from loose batter to a soft, manageable mass, and you should see tiny pockets of spice throughout. Using a wooden spoon gives you control and prevents overbeating, which can toughen the gluten. The why here is to preserve tenderness while ensuring everything is evenly distributed. A common mistake is using a mixer on high, which can make the dough too dense and warm.
- In a small bowl, mix the remaining 1/4 cup white sugar and 1 teaspoon pumpkin pie spice.: This aromatic coating provides a slightly crisp, spiced exterior that contrasts with the creamy center. The sugar will glimmer with spice specks, and the scent will be bright and inviting. This finishing touch elevates texture and visual appeal. Many forget this coating or apply it too sparsely, which reduces the signature spiced shell.
- Scoop pumpkin dough with a medium scoop and pat each ball into a 2 1/2 to 3-inch circle in your palm. Add a frozen ball of cream cheese to the middle, and press the dough around the filling. Roll into a ball and then roll into the sugar and pumpkin pie spice mixture.: At this stage you will feel the coolness of the frozen filling transfer slightly to the dough, which is good, because it helps the dough adhere without warming. Work quickly so the dough does not become sticky. The goal is a smooth seal with no exposed filling, so sealing edges carefully prevents leaks. A typical error is not fully enclosing the filling, leading to cheesecake escaping during baking.
- Place on the prepared baking sheet and repeat with the remaining dough.: Arrange cookies with some space to allow slight spreading, and notice the uniform shapes as you place them. Consistency at this step promotes even baking times and results. If cookies are placed too close, they can merge and ruin the presentation, so maintain spacing.
- Bake for 12 minutes (keep remaining dough balls with the cream cheese inside chilled while baking).: As the oven works, you will smell warming spices and see the edges set while centers remain soft. The baking time is tuned so the cookie bakes through without the filling melting out. Keeping remaining filled dough chilled prevents premature softening and leakage, so work in batches if needed. Overbaking will dry the cookies out, while underbaking leaves dough raw, so watch for slight golden edges.
- Let cool on a baking sheet for 5 minutes before removing to a wire rack to cool completely.: Cooling on the sheet lets the cookies finish setting, and the brief wait prevents tearing when you transfer them. Once moved to a rack, air circulates and the exterior maintains texture while the filling stabilizes. Rushing this step can cause the centers to push out or the cookie surface to crack, so give them those five calm minutes.
Notes
- Room Temperature and Cold Strategy: The butter and cream cheese should be at room temperature when creaming to achieve a smooth, airy mixture, but the filled centers must be cold when baked to prevent oozing and excessive spreading.
- Blotting Matters: Do not skip blotting the pumpkin. Place the puree on a paper towel, press another towel on top, and repeat until the surface is no longer wet. This step preserves dough consistency and prevents a cakey texture.
- Seal Completely: When wrapping the frozen filling, use your fingers to press and roll the dough until you feel no seams. A fully sealed ball prevents leaks during the hot baking process.
- Work in Chilled Batches: If your kitchen is warm, keep unbaked balls on a tray in the refrigerator while baking, because warm dough spreads more and loses definition in the oven.
- Uniform Scoops: Use consistent scoops for both filling and dough so each cookie bakes evenly. A small cookie scoop for the filling and a medium one for dough produce reliable proportions and uniform final cookies.