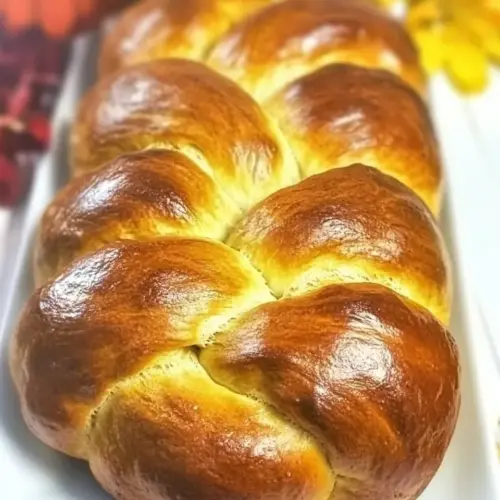
Pumpkin Challah Bread
Pumpkin Challah Bread is a soft, slightly sweet braided loaf that combines creamy **pumpkin** and a tender enriched dough for a cozy, seasonal bake. The golden crust and fine crumb make it an excellent choice for breakfast toast or festive tables, and it’s an easy weeknight baking project with impressive results. Try it for a warm fall gathering or when you want something special from simple pantry staples.
Equipment
- Mixing Bowl
- Stand mixer
- Paddle attachment
- Baking Sheet
- Parchment Paper
- Whisk
Ingredients
- 1 package active dry yeast (I prefer Red Star brand) Activate yeast by dissolving in warm water and sugar to create a foamy starter that leavens the dough; ensure water is around 110º for optimal yeast activity. Use active dry yeast to provide the primary rising power and develop the bread's airy crumb over time. Monitor for bubbling within 5–10 minutes to confirm yeast viability.
- 1/2 cup lukewarm water, divided (approximately 110º) Provide lukewarm water to hydrate yeast and help dissolve sugars while controlling dough temperature for proper fermentation. Divide the water as specified to mix with yeast first and then adjust dough consistency later. Maintain approximately 110º for initial activation but keep remaining water lukewarm to avoid killing yeast.
- 1 tablespoon plus 1 1/2 teaspoons sugar Sweeten and feed the yeast while contributing to the bread's subtle caramelized flavor and crust color; sugar also tenderizes the crumb by retaining moisture. Measure precisely to balance sweetness without hindering yeast performance. Combine with warm water to kick-start fermentation effectively.
- 2 tablespoons whisked egg (half of one large egg) Bind and enrich the dough using whisked egg to add moisture, color, and a bit of structure; a small amount helps with dough elasticity and final sheen. Incorporate early to ensure even distribution throughout the mixture. Use half a large egg whisked until homogeneous before measuring.
- 3 egg yolks Enrich the dough with concentrated egg yolks to add richness, tender crumb, and deep golden color while increasing fat and emulsifiers for a silkier texture. Mix yolks thoroughly into wet ingredients to ensure consistent richness and improved structure. Yolks also aid in browning during baking.
- 2 tablespoons honey Sweeten and add flavor complexity while contributing to tenderness and slight chewiness; honey also helps retain moisture and enhances crust browning. Stir into the wet mixture so it disperses evenly, supporting yeast activity and overall taste. Use as a natural sweetener that complements pumpkin.
- 1 tablespoon vegetable oil Moisturize and tenderize the crumb while providing a neutral fat that helps with the dough's elasticity and handling; oil also extends shelf life by inhibiting staling. Mix with other wet ingredients to ensure even fat distribution. Choose a neutral vegetable oil to avoid altering the flavor profile.
- 1 teaspoon salt Season and strengthen the dough by tightening gluten structure and balancing sweetness; salt also controls yeast fermentation rate and enhances overall flavor. Dissolve into dry ingredients or distribute evenly to prevent direct contact with yeast during initial mixing. Adjust precisely to maintain proper taste.
- 1/4 cup brown sugar Add deep molasses-like sweetness and moisture while contributing to caramelized flavors and a slightly chewy texture; brown sugar also darkens the crust and complements pumpkin. Combine with other sugars and liquids to dissolve fully and infuse the dough. Use packed for consistent measurement.
- 1 cup canned pumpkin Contribute moisture, flavor, and tender crumb with a smooth, pumpkin-rich puree that provides both taste and color; pumpkin also adds natural sugars and fiber which affect dough hydration. Mix thoroughly with wet ingredients to ensure even distribution and prevent pockets of dense puree. Use canned pumpkin for consistent texture and flavor.
- 3 1/2 - 4 1/2 cups all-purpose flour Provide bulk, structure, and gluten development as the primary dry ingredient that forms the dough; adjust the quantity to achieve proper dough hydration and consistency. Add gradually while mixing to avoid over-flouring, aiming for a slightly tacky but manageable dough. Use all-purpose flour within the specified range to fine-tune texture.
Instructions
- Pour 1/4 cup of the lukewarm water (about 110 degrees) into a large mixing bowl or the bowl of your stand mixer. Add the yeast and 1 1/2 teaspoons of sugar to the bowl, and stir to dissolve.: You will notice a mild yeasty perfume as the granules dissolve, and the water should feel warm, not hot, to the touch. This gentle warmth tells the yeast it can wake up and start producing carbon dioxide, which leavens your loaf. A common mistake is using water that is too hot, which can kill the yeast and stop any rise, so always test on your wrist. If your yeast mixture does not look cloudy or slightly foamy after ten minutes, discard and start over with fresher yeast to avoid a dense loaf.
- Wait 10 minutes. The yeast should bubble. Add the remaining 1/4 cup lukewarm water to the bowl along with the rest of the sugar, egg, egg yolks, honey, oil, and salt and whisk to combine.: After waiting, you should see tiny bubbles and a foamy surface indicating an active starter; it will smell bright and yeasty. When you add the rest of the liquids and sweeteners, whisking brings the ingredients into an even emulsion so the fat and proteins incorporate uniformly. If the mixture separates or looks curdled, keep whisking; room temperature ingredients blend more smoothly. Avoid adding very cold eggs or cold pumpkin straight from the fridge, as that can slow fermentation and extend rising time.
- Mix in the brown sugar and pumpkin puree. Using the paddle attachment of your stand mixer, begin to add the flour slowly till the dough is smooth and elastic, not sticky.: The addition of **pumpkin** changes the dough’s hydration and color, turning it a warm orange and giving a slightly denser feel. As you slowly add **all purpose flour**, watch the texture transform from wet batter to a tacky but workable dough. The dough should pull away cleanly from the bowl sides and form a cohesive mass. If you add flour too quickly, the dough can become dry and tight, which will yield a denser crumb, so go gradually and pause to check texture frequently.
- Mix on low for a couple of minutes to knead the dough. You can also do this by hand by mixing in the flour with a wooden spoon, then kneading by hand.: Kneading develops gluten so the loaf can hold gas and rise properly; you will feel the dough become smoother and more elastic under the paddle or your hands. The sound shifts to a quieter, more cohesive mass as the gluten network forms. If your dough tears easily, it needs more kneading. Conversely, over-kneading can make a loaf tight and tough, so aim for a supple, slightly tacky texture that bounces back when pressed.
- Grease a mixing bowl, then add the ball of dough. Twist it around to grease the bottom of the dough, then flip the dough over and cover with a damp towel.: Coating the dough with oil prevents it from drying out during the first rise and makes it easier to handle later. The dough should sit in a warm, draft free spot until it approximately doubles in size, feeling pillowy when lightly pressed. A common misstep is leaving the dough uncovered which forms a dry skin that impedes proper rising, so be sure to cover it snugly with a damp towel or plastic wrap.
- Place in your unheated oven and add a pan of hot water to one of the shelves. Let the dough rise for 2 hours, punching down at the 1-hour mark.: The steam from the hot water creates a warm humid environment that promotes even fermentation; the dough will slowly expand and become airy. Punching down at midrise redistributes yeast and evens out the temperature so the second half of the rise is more consistent. If you skip the punch down, the dough can overproof unevenly, resulting in a collapsed braid when baked.
- Punch the dough down into the bowl a few times, then turn the dough out onto your floured work surface. Knead in some flour if the dough is sticky.: When you turn out the dough, you should feel a bouncy resilience and a gentle yeasty smell. Lightly dusting your work surface prevents sticking while preserving dough hydration. Resist the urge to add large amounts of flour; if you overdo it the loaf becomes dry. If the dough is very sticky, chill it briefly for easier handling instead of dumping in more flour.
- Divide the dough into thirds and roll each into a long snake. Braid as desired. I have attached a video on my blog on how to make a more complicated 6-strand blog.: Rolling into ropes gives you control over thickness and final loaf shape; aim for even ropes so the braid bakes uniformly. The motion should be gentle yet firm, smoothing each strand so it holds its shape. One frequent error is making strands of different lengths, which leads to an uneven braid; take time to measure visually and adjust before you start braiding.
- Place the braided bread on a parchment-lined baking sheet. Make the egg wash by whisking together the egg and water. Brush the loaf with the egg wash and let rest as you preheat the oven to 350º.: Brushing with the egg wash gives the crust a glossy, deep golden finish and enhances browning. You will see the braid relax and the strands settle as it rests; this short final proof encourages oven spring. If your oven is too hot initially, the crust may set before the loaf has fully expanded, so allow the oven to reach a steady 350º before baking.
- Bake for 35-40 minutes total but turn the pan at the halfway mark. If the loaf is browning too quickly, tent with foil. Remove to a cooling rack when the bread is done (will sound hollow when you rap on the loaf).: During baking the kitchen fills with a warm pumpkin aroma and the crust deepens to a golden brown; you may also hear subtle crackles as the crust sets. Rotating the pan ensures even heat exposure and uniform color. If the top browns too fast, loosely tent with foil to protect it while the interior finishes baking. A hollow sound when tapped indicates the loaf is fully baked, while a dense thunk often means it needs more time.
- Slice and serve when cool.: Letting the loaf cool allows internal steam to redistribute, setting the crumb and making cleaner slices. The aroma will still be inviting as you cut, but slicing too soon can compress the crumb and make the texture gummy. Patience here improves presentation and mouthfeel, so wait until the bread reaches warm room temperature before slicing.
Notes
- Proof your yeast properly Before mixing the full dough, make sure the yeast becomes foamy within ten minutes; a non reactive yeast will not leaven the bread properly and leads to a dense result.
- Adjust flour gradually Add **all purpose flour** slowly while mixing until the dough is smooth and elastic, not sticky, to avoid ending up with an overly dry loaf.
- Keep liquids at room temperature Cold ingredients slow fermentation, while hot ones can kill yeast; aim for about 110º for initial water to wake the yeast without damaging it.
- Use a humid proofing environment Placing the dough in an unheated oven with a pan of hot water creates warmth and moisture, which helps the dough rise consistently.
- Rotate the pan while baking Turning the sheet at the halfway mark promotes even browning and prevents hot spots from overbrowning one side of the loaf.