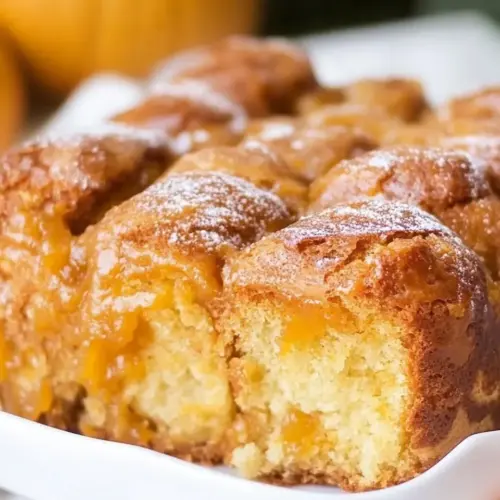
Pumpkin Bubble Bread
Pumpkin Bubble Bread is a tender, pull apart loaf with a creamy glaze and warm spice. The pumpkin enriched dough is soft, slightly chewy, and studded with caramelized sugar coating that adds delightful texture. Perfect for easy weekend brunch or a crowd pleasing holiday table, this easy fall bake brings cozy aromas and irresistible slices you will want to make again and again.
Equipment
- Stand mixer
- Dough Hook
- 8×4-inch loaf pan
- Measuring Cup
- Microwave-safe Bowl
Ingredients
- 1/2 cup whole milk Warm gently to activate yeast and add moisture to the dough; provides tenderness and helps dissolve sugar and yeast for proper fermentation. Helps achieve a softer crumb and improves dough elasticity during mixing and rising. Use at lukewarm temperature to avoid killing the yeast and ensure even distribution throughout the batter.
- 1 envelope active dry yeast (2 1/4 tsp) Bloom in warm liquid to initiate fermentation and leaven the dough; provides the necessary carbon dioxide for rise and airy texture. Adds subtle flavor complexity from fermentation while ensuring dough expansion during the first proof. Sprinkle evenly into the warm milk and sugar to activate thoroughly before combining with dry ingredients.
- 1/4 cup brown sugar Dissolve into the liquid to sweeten the dough and feed the yeast; contributes to browning and caramel notes in the final bread. Balances pumpkin and spices while enhancing tenderness by attracting and retaining moisture. Measure accurately to control sweetness and fermentation rate for consistent results.
- 3/4 cup pumpkin puree Fold into the dough for moisture, color, and pumpkin flavor; contributes to a soft, tender crumb and autumnal aroma. Adds density and natural sugars that aid in browning and overall richness of the bread. Use pure pumpkin puree (not pumpkin pie filling) for best texture and balanced flavor.
- 2 tbsp unsalted butter Melt or soften to incorporate fat and richness into the dough; contributes to tenderness, flavor, and improved mouthfeel. Helps create a slightly richer crumb and assists in browning the exterior during baking. Soften to room temperature or melt as directed for even integration into the mixture.
- 1 tsp salt Enhance overall flavor and strengthen gluten network balance; regulates yeast activity and improves dough structure. Helps control fermentation pace and brings out the natural flavors of pumpkin and spices. Dissolve thoroughly to ensure even seasoning throughout the bread.
- 1/4 tsp cinnamon Add warm spice note to complement pumpkin and other seasonings; offers subtle aromatic depth to the dough or filling. Works with cinnamon and pumpkin pie spice to create a cohesive autumnal profile without overpowering the bread. Use measured amount to maintain balance in the overall spice blend.
- 2 3/4 cup all-purpose flour Provide the main structure and bulk of the dough through gluten formation; absorbs liquids and allows proper kneading and rise. Establishes the framework that traps gas from yeast, resulting in an airy, chewable crumb. Sift or measure properly to ensure consistent hydration and texture.
- 1 cup sugar Sweeten the filling or glaze while contributing to caramelization and color; balances spices and pumpkin flavor for a pleasant sweetness. Assists in creating a tender, slightly sticky interior when used between dough layers. Adjust quantity only if altering overall sweetness profile of the recipe.
- 2 tsp cinnamon Offer a pronounced warm spice flavor when mixed into the filling or dough; enhances the seasonal profile alongside pumpkin and cinnamon. Deepens aroma and pairs well with both brown sugar and pumpkin puree for a classic combination. Use precisely to avoid overpowering the other flavors.
- 1 tsp pumpkin pie spice Blend multiple warming spices for complex flavor and aroma; complements cinnamon and pumpkin to create a classic pie-like profile. Adds notes of nutmeg, cloves, and ginger that round out the sweetness and richness of the bread. Use sparingly to maintain a balanced spice intensity.
- 3 tbsp butter melted Combine melted butter for brushing or layering to add moisture and richness; helps create laminated or pull-apart texture in the bubble bread. Encourages browning and adds a glossy finish to the surface when baked. Ensure melted butter is warm but not hot to avoid affecting yeast activity when applied early.
- 4 oz cream cheese room temperature Soften to a spreadable consistency to create a creamy, tangy filling or frosting; contributes richness and slight acidity for balance. Adds luxurious mouthfeel and contrasts with the sweet glaze and spiced bread components. Ensure room temperature for easy blending with sugars and butter.
- 1/4 cup butter room temperature Soften for creaming into a smooth, spreadable filling or frosting; provides richness and stabilizes the glaze with a buttery base. Works with cream cheese and powdered sugar to create a balanced, tender topping for the bread. Keep at room temperature to blend evenly without lumps.
- 1 cup powdered sugar Whisk into frosting for sweetness and smooth texture while balancing tangy components; dissolves easily to create a silky glaze or filling. Helps thicken and stabilize the cream cheese glaze for a consistent spreadable consistency. Sift if necessary to avoid lumps and achieve a polished finish.
- 1/2 tsp vanilla extract Add aromatic vanilla to enhance and round out flavors; brings floral, sweet notes that complement pumpkin and sugar. Small amounts significantly boost perceived sweetness and overall flavor complexity of the glaze or filling. Stir in toward the end of mixing to preserve its delicate aroma.
- 1 -2 tbsp whole milk (depending on how thick or thin you like it) Adjust glaze consistency to desired thickness for drizzling or spreading; provides additional moisture and helps achieve a smooth finish. Allows customization between a pourable glaze or a firmer spread depending on preference and temperature. Add gradually to reach the preferred texture without thinning the glaze excessively.
Instructions
- To make the dough, in a 2 cup glass measuring cup or microwave safe bowl, combine the whole milk and butter. Microwave on high for 45 seconds or until the butter has melted. Allow the mixture to return to 110 degrees. Sprinkle in the yeast and 1/2 tbsp of the brown sugar. Let the mixture sit for 5-7 minutes or until bubbly.: You will notice a warm milky steam and a faint yeasty aroma as the whole milk and butter heat, and when the yeast blooms small bubbles form on the surface showing active fermentation. This gentle warming is crucial because temperatures above 120 degrees can kill the yeast , while cooler temps will slow activation, leading to a sluggish rise; one common mistake is overheating, so always test the liquid on your wrist for a warm, not hot, feel. The bubbling stage gives you confidence that fermentation will produce lift during proofing, and it also imparts a subtle fermented note that deepens the final flavor profile. If the yeast does not bubble within the time window, it is better to start again with fresh yeast than to push a failed dough further.
- Meanwhile, combine 1 cup of the flour, the remaining sugar, the pumpkin puree, salt and cinnamon in the bowl of a stand mixer fitted with the paddle attachment. Mix on low while gradually adding the liquid ingredients and the remaining flour. Once a soft dough forms switch to the dough hook and knead for 6-8 minutes. Place the ball of dough into a well buttered bowl covered with plastic wrap. Allow to rise until doubled.: At first the mixture will look shaggy and glossy because the pumpkin puree introduces moisture and color, and as you add the warmed liquid the dough will transform into a cohesive mass that feels slightly tacky but springy. Using the paddle initially helps distribute wet ingredients evenly, then the dough hook develops gluten during the 6 to 8 minutes of kneading creating that elastic structure you can feel when you pull a portion and it stretches without tearing. You want to see a smooth surface and a slight windowpane if you stretch a small piece, which means the gluten network is established; under kneading leaves a dense crumb later, while over kneading can produce a tough texture, so watch for elasticity and stop when the dough resists tearing. After placing in a well buttered bowl the dough should look noticeably puffed and airy when doubled, and that visual check is your cue that the yeast has done its work.
- Meanwhile, combine the filling (granulated sugar, cinnamon and pumpkin pie spice). Remove the dough and roll into balls approximately 1.5 tbsp in size (they don’t have to be perfect). Dip into the melted butter, then roll into the sugar/spice mixture. Place the balls into a lightly greased 8×4-inch loaf pan. Cover with plastic wrap and allow to rise for 1 hour. Remove the plastic wrap and place in the oven, bake at 350 degrees for 25-35 minutes or until golden brown on top and set in the center.: You will hear a soft pat as you roll the dough into small 1.5 tablespoon pearls and feel the tacky surface become glossy when dipped in the melted butter . Rolling them in the sugar and spice coating creates a granular exterior that will caramelize slightly during baking, giving crunchy sweet pockets against the tender interior. Arrange the balls snugly in the loaf pan so they touch, which encourages them to rise together and form that pull apart loaf; a common error is spacing them too far apart which yields separate rolls instead of a cohesive bubble bread. During the one hour second proof the balls should look pillowy and increase in size, and when you press a fingertip gently into one you should see the indentation slowly spring back as a sign of readiness.
- While the bread cools, beat the glaze together and drizzle over the warm bread.: While baking you will notice the kitchen filling with warm spice and pumpkin aroma, and the top will slowly take on a golden hue that signals caramelization of the sugars and the Maillard reaction at the surface. The internal structure sets as the proteins coagulate and starches firm, so a center that jiggles means it needs more time; insert a thin skewer into the middle to check for minimal dough residue. Avoid opening the oven repeatedly during the early stages because that can drop the temperature and hinder oven spring, which causes a denser loaf. If the top browns too quickly, tent with foil to prevent overbrowning while allowing the interior to finish baking. The finished loaf should sound slightly hollow when tapped on the top and feel springy to the touch.
- While the bread cools, beat the glaze together and drizzle over the warm bread: As the loaf cools to warm temperature the glaze made of softened cream cheese , room temperature butter , powdered sugar , vanilla extract , and a touch of whole milk will spread into the crevices, offering a creamy tang that balances the sweetness and highlights the spice. You should aim for a glaze that is pourable but not overly runny so it clings to the tops of the bubbles; a common mistake is making it too thin which causes it to pool and disappear into the loaf. Use a spoon or small ladle to drizzle, working from the center outward, and allow the glaze to set slightly before slicing so it forms a shiny, cohesive finish. The contrast between the warm bread and the cool cream cheese glaze is part of the charm and elevates the overall mouthfeel.
Notes
- Swap glaze thickness — If you prefer a thicker glaze, reduce the whole milk to a teaspoon at a time until it reaches a spreadable consistency, which gives a creamier finish that clings to the bubbles.
- Adjust spice intensity — To amplify the fall spices, add an extra pinch of pumpkin pie spice to the filling mix, which deepens the aromatic profile without changing the dough behavior.
- Butter treatment — For a richer exterior, brush the top with an extra tablespoon of melted butter halfway through baking, which enhances browning and adds flavor contrast.
- Sweetness control — If you want less sweetness, decrease the coating sugar by a quarter, preserving the pull apart texture while making the loaf more balanced for breakfast.
- Make ahead — You can prepare the dough and refrigerate after the first rise overnight, then bring to room temperature and continue; this slow fermentation will deepen flavor and fit a busy schedule.