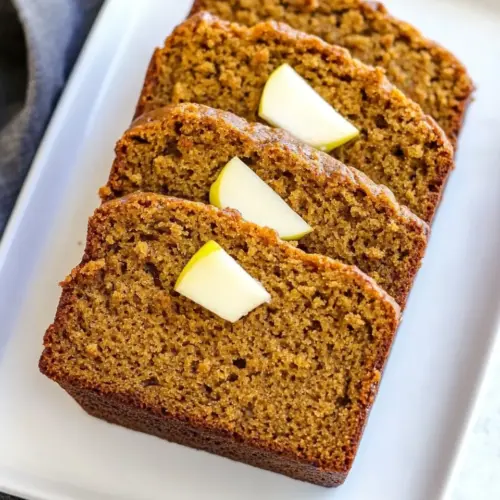
Pumpkin Bread with Apples
Pumpkin Bread with Apples blends creamy pumpkin and tart apple into a tender, spiced loaf that feels like autumn in every slice. This easy, crowd pleasing quick bread pairs warm spices and pantry staples for a moist, flavorful result, perfect for breakfast, snack time, or holiday gatherings. Make it to enjoy simple seasonal comfort and a loaf that travels well to potlucks.
Equipment
- Loaf Pan
- Wire Rack
- Mixing Bowl
- Whisk
Ingredients
- 3 cups flour Provide structure and bulk to the batter, forming the framework that holds the bread together. Combine with liquids and leaveners to create the crumb and determine texture. Sift or whisk to ensure even distribution before mixing into wet ingredients.
- 2 teaspoons ground cinnamon Add warm, aromatic spice that complements pumpkin and apples, enhancing overall flavor depth. Balance sweetness and impart a classic fall character to the bread. Measure carefully to avoid overpowering the other spices.
- 1/2 teaspoon allspice Offer a sweet, slightly peppery warmth that layers with cinnamon for complexity. Act as a supporting spice to round out the spice blend without dominating. Use sparingly to maintain subtlety in the flavor profile.
- 1/2 teaspoon cloves Provide a pungent, warm note that enhances the autumnal spice mix and contrasts sweet elements. Help create aromatic complexity and a lingering finish in each bite. Crushed or ground form disperses evenly through the batter.
- 2 teaspoons baking soda Produce carbon dioxide when reacting with acidic components, helping the bread rise and become tender. Coordinate with beating and mixing techniques to trap air for a lighter crumb. Distribute evenly through the dry ingredients for consistent lift.
- 3/4 teaspoons salt Control seasoning balance, enhancing other flavors and moderating sweetness while strengthening gluten development slightly. Help accentuate the aroma of spices and pumpkin without being perceptible on its own. Dissolve fully to avoid pockets of salt.
- 2 1/4 cups sugar Provide primary sweetness and contribute to moistness and browning during baking through caramelization. Affect texture and shelf life by drawing and retaining moisture in the crumb. Adjust quantity cautiously if preferring less sweetness.
- 1 can (15-ounce) pumpkin puree (not pumpkin pie filling) Supply moisture, rich pumpkin flavor, and dense, fibrous texture that defines the loaf. Add natural color and pair with spices to create characteristic seasonal taste. Ensure puree is not substituted with pie filling to avoid extra sugar and spices.
- 4 large eggs, lightly beaten Bind ingredients, add richness, and help with leavening by trapping air when beaten. Contribute to structure and tender crumb while improving moisture and mouthfeel. Beat lightly to incorporate but avoid overmixing to preserve loft.
- 3/4 cup vegetable oil Introduce fat that tenderizes the crumb, increases moistness, and aids in browning for a pleasant crust. Carry and amplify flavor while contributing to a soft loaf texture. Mix with eggs and sugar to form a smooth emulsion before adding dry ingredients.
- A large Granny Smith apple, peeled, cored and diced into small cubes Provide crisp, tart bites and fresh texture contrast to the soft, spiced bread. Add natural sweetness and moisture as small cubes release juices during baking while contributing occasional texture variation. Peel, core, and dice uniformly for even distribution throughout the loaf.
Instructions
- Preheat oven to 350°.: You will notice the oven warming and the air in the kitchen becoming cozy, a small signal that baking is under way. Proper preheating ensures the loaf begins to rise immediately, creating an even crumb and a well formed crust. If you skip preheating, the batter can sit too long and the structure may collapse, so wait until the oven registers the full heat. I set my rack in the center so heat circulates evenly, and I listen for the oven fan or click as a cue that it is ready.
- Grease and flour two 9 x 5-inch loaf pans.: The pans should feel slick after greasing, and a light dusting of flour prevents sticking while promoting a thin, golden crust. This step matters because it helps you remove intact loaves for nice presentation. A common mistake is to miss the corners, which can cause one end to cling, so be thorough and tap out excess flour . I prefer to rub the oil in with a paper towel to reach all edges before flouring.
- Combine flour, cinnamon, allspice, cloves, baking soda, and salt in a large bowl.: When you sift or whisk these dry ingredients, there is a light, spicy aroma that hints at the final loaf. Combining thoroughly distributes the leavening and spices so every bite tastes consistent. If you do not mix well, the loaf can have pockets of baking soda or uneven spice, creating off flavors. I use a whisk and sweep the bottom to ensure no clumps of flour remain, and I inhale the spice mix for a reassuring scent before moving on.
- Combine sugar, pumpkin, eggs, and vegetable oil in a large bowl and whisk or beat until just blended.: As you whisk, the mixture darkens and becomes glossy, with the pumpkin giving a thick, silky texture. Blending just until combined prevents overmixing, which can toughen the crumb. A common error is to whisk excessively; stop when you see an even color and no streaks of egg . I scrape the bowl sides to incorporate any trapped ingredients so the batter is uniform.
- Add pumpkin mixture to flour mixture; stir just until moistened.: At this stage you will see the batter come together with ribbons of spice and pumpkin folding through. Stirring until just moistened keeps the crumb tender and avoids developing gluten. Overmixing will result in a denser loaf, so I use a rubber spatula and fold gently until no dry flour streaks remain. If the batter seems too stiff, check that measurements were accurate, because excess flour tightens texture.
- Fold in apples.: The small cubes of apple will disappear into the batter, leaving little pockets of juice and crispness. Folding gently prevents breaking the pieces down, which preserves texture and visual interest. If you stir too vigorously, the apple can turn mushy and change the moisture balance, so be delicate. I fold with a few deliberate strokes until the fruit is evenly dispersed.
- Divide the batter equally into the prepared loaf pans.: Filling the pans evenly means both loaves bake at the same rate and finish together, giving uniform crust color. You should see batter levels that look balanced; if one pan is much fuller it will take longer to bake. Use a scale or a large scoop to portion evenly, and tap the pans gently on the counter to release air bubbles and settle the batter.
- Mix the streusel topping in a separate bowl with a fork, and sprinkle evenly over the batter.: When the streusel is applied, you will notice a crumbly texture that creates a crisp, sweet finish as it bakes. The contrast of crunchy topping and soft loaf adds depth to each slice. Be careful not to press the streusel into the batter, which can cause it to sink; instead scatter it lightly so it bakes on top. If you skip this, the loaf will still be lovely, but it loses that textural flourish.
- Bake for one hour or until a toothpick inserted in the center comes out clean.: As the loaves bake, aroma will fill the kitchen and the tops will turn a warm golden brown. The one hour guideline is a target, but ovens vary, so use the toothpick test to confirm doneness. Stick a thin wooden pick into the center; if it emerges with moist crumbs but not wet batter, the loaf is ready. A common pitfall is removing the loaf too early, which yields a gummy center, so err on the side of giving a few extra minutes if needed.
- Cool in pans on wire racks for 10 minutes; then remove to wire racks to cool completely.: In the immediate cooling stage you may hear a faint settling sound as the crumb finishes setting. Letting the loaves rest in the pans prevents them from breaking when transferred, and the final cooling on racks stops residual heat so the crust holds. Removing too soon can cause the loaf to tear, and letting it cool completely improves slicing. I leave them ten minutes, run a knife around the edges, then invert carefully onto racks for full cooling.
Notes
- Boost the spice: Add a touch more cinnamon or a pinch more allspice for deeper warmth, but increase spices gradually to avoid overpowering the pumpkin.
- Apple texture: Choose a tart Granny Smith apple for bright contrast, and dice it small so it stays tender but not mushy inside the loaf.
- Moisture control: If your batter seems dry, verify measurements and consider adding a tablespoon of oil, because small adjustments can rescue the crumb without changing flavor.
- Topping crunch: For extra texture, toss the streusel with a teaspoon of sugar before sprinkling so it caramelizes into a crisp crust as it bakes.
- Make ahead: Bake a day early and store loosely covered at room temperature to let flavors meld, which often improves the overall taste by the next day.