Puff Pastry Pumpkins
Puff Pastry Pumpkins are flaky, creamy, and festive, combining golden layers of pastry with a spiced pumpkin whipped filling. This easy seasonal treat is perfect for fall gatherings and makes a charming addition to any brunch or party spread, delivering crisp texture and cozy flavors in every bite. Make them for a crowd and watch guests go back for seconds.
Equipment
- Baking Sheet
- Electric Mixer
- Pumpkin cookie cutter
- Mixing Bowl
Ingredients
- 2 sheets puff pastry Provide a flaky, buttery base that puffs up into layers when baked; supports fillings and shapes the pumpkin form. Chill and handle gently to maintain its lamination and achieve a golden, crisp exterior.
- 1/2 cup whipping cream Whip until soft peaks form to create a light, airy cream that adds richness and smoothness to the filling. Fold gently into other components to lend body and a silky mouthfeel without overpowering the pastry.
- 1/4 cup pumpkin puree Contribute concentrated pumpkin flavor and creamy texture that defines the seasonal taste profile; adds moisture and natural color to the filling. Combine evenly with spices and sweeteners to ensure consistent flavor in each bite.
- 1/2 teaspoon vanilla extract Add warm, floral aroma and subtle sweetness that enhances the dessert’s flavor complexity; balances the earthiness of pumpkin. Use sparingly to avoid overpowering the delicate creaminess and maintain a harmonious profile.
- 2 tablespoons powdered sugar Sweeten and slightly thicken the filling while dissolving smoothly into cream or puree; helps achieve a pleasant sweetness level and light texture. Sift beforehand to prevent clumps and ensure an even, silky consistency.
- 1/4 teaspoon pumpkin pie spice Introduce warm, aromatic notes like cinnamon, nutmeg, and cloves to establish classic pumpkin spice character. Sprinkle carefully to avoid dominance and to complement the pumpkin and vanilla for a balanced flavor.
Instructions
- Preheat oven to 400.: As the oven warms, you will notice the ambient kitchen heat and a faint electrical hum while positions settle, which signals readiness. Getting the oven to 400 degrees is crucial because puff pastry relies on rapid oven spring to create distinct flaky layers, producing the light, airy texture you want. If the oven is not fully preheated, the pastry may spread rather than rise, yielding a denser result. A common mistake is putting pastry into an oven that registers warm but has not stabilized; wait for the indicator or use an oven thermometer for accuracy. The air should feel dry and the rack positioned in the center to allow even browning. When the temperature is right, the pastry will quickly begin to blister and separate into golden sheets.
- Unfold the puff pastry and cut into pumpkins using a pumpkin cookie cutter.: As you unfold each sheet, you will hear a soft rustling and notice the chilled, slightly tacky surface of the dough. Working on a lightly floured surface or parchment, press the pumpkin cookie cutter firmly and lift to reveal clean, shaped pieces, which should hold their edges crisply. This shaping step matters for presentation and even baking, because uniform pieces bake at a similar rate and puff consistently. Avoid stretching the dough when transferring, since that can distort the shape and cause uneven puffing. If the pastry feels sticky, chill it briefly to firm up so the cuts stay sharp.
- Place the pumpkins on a baking sheet and bake for 10-12 minutes, until golden brown.: As the pastries bake, listen for a very light crackling as layers separate, and watch them transform from pale to a rich golden tone. The visual cue of even golden color around the edges indicates proper caramelization of the butter layers inside the puff pastry , which adds flavor and crispness. If you open the oven too often, you will lose heat and compromise the rise, so resist peeking until the final few minutes. A frequent error is underbaking, which leaves the interior doughy; ensure the undersides are also golden by checking the bottoms briefly with a spatula.
- While the pumpkins are baking, place the remaining ingredients in a large bowl and beat with an electric mixer, or in the bowl of a stand mixer, until thoroughly combined and fluffy, about 5 minutes.: As you whip the whipping cream with the pumpkin puree , powdered sugar , vanilla extract , and pumpkin pie spice , you will hear the mixer hum and see the mixture thicken and lighten in color. The texture should become airy and hold soft peaks, giving a mousse like cream that will contrast nicely with the crisp pastry shell. This emulsification traps air, which makes the filling lift gently when spread. Overbeating will deflate the cream and create a buttery texture, so stop when it reaches the desired fluffiness. A common mistake is adding the sugar too fast, which can cause graininess; sifted powdered sugar and gradual incorporation prevent that issue.
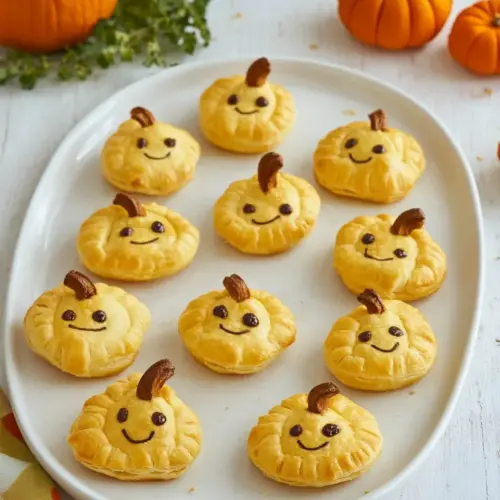
- Remove the pumpkins from the oven, allow to cool slightly, then slice in half. Top one half with the pumpkin mixture, place the other pumpkin half on top and decorate with chocolate chips for eyes as desired.: Fresh from the oven the little pastry pumpkins will smell toasty and buttery, and the tops will glisten. Let them cool just until you can handle them safely, as cutting while too hot might compress layers and release steam that softens the interior. Slicing in half reveals the airy pockets inside, which is your sign of success. A trap to avoid is slicing with a blunt knife which can smash the layers rather than cleanly separating them; use a serrated or sharp paring knife for precision.
- Top one half with the pumpkin mixture, place the other pumpkin half on top and decorate with chocolate chips for eyes as desired: When you spoon the filling onto the bottom halves, you will feel the creamy weight of pumpkin puree mixture settle into the hollow pockets, and the contrast of textures becomes apparent. Press the top halves lightly to create a little sandwich, and add playful chocolate chip eyes for personality. This finishing step is about balance, so avoid overfilling which can cause the pastries to slip or become soggy. A common error is filling while the pastry is too warm, which can melt the cream and alter texture; ensure a slight cooling period first.
Notes
- Make smaller or larger pumpkins by using different sized cookie cutters to suit appetizers, desserts, or party platters.
- Adjust sweetness by adding or reducing the amount of powdered sugar so the filling matches your taste and pairs well with other desserts.
- Stabilize the filling for make ahead service by chilling the whipped filling briefly before assembly to keep it from spreading.
- Use fresh spices to elevate flavor by toasting and grinding your own pumpkin pie spice for a brighter aromatic punch.
- Prep ahead by baking the shaped pastry shells earlier in the day and assembling just before serving to preserve crispness.
- Play with decorations such as using seeds or small candies for faces instead of chocolate chips to change the look for different events.