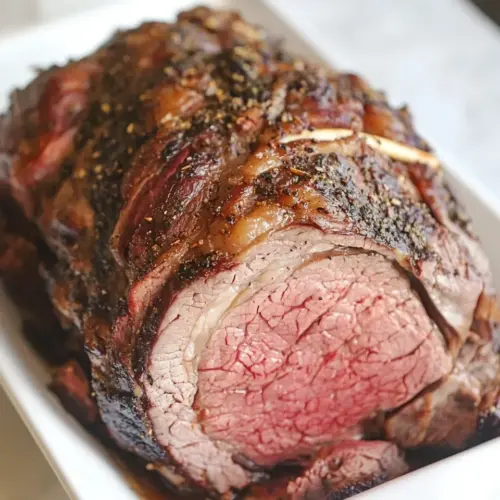
Prime Rib
Prime Rib is a show stopping, tender roast with a crisp herb crust and succulent interior. The combination of garlic, rosemary, and thyme creates an aromatic, savory profile that pairs perfectly with simple sides, making it an ideal easy weeknight dinner or celebratory main to impress guests.
Equipment
- Oven
- Instant read thermometer
- Cutting Board
- Sharp carving knife
Ingredients
- 6 pounds standing rib roast Provide a rich, beefy base and deliver the primary meat for the roast; use a well-marbled standing rib roast to ensure tenderness and deep flavor when slow-roasted. Trim minimal fat to preserve juiciness and position the bones for even cooking and presentation. Allow the roast to come to room temperature before searing for best results.
- 3 cloves fresh garlic minced Add aromatic pungency and enhance savory depth by mincing fresh garlic and rubbing it into the meat surface; garlic helps create a flavorful crust when browned. Distribute evenly under a herb paste or in slits to infuse the interior with gentle garlic notes during roasting.
- 6 sprigs fresh rosemary stems removed, about 1 tablespoon chopped Introduce fragrant, piney herbaceousness by chopping rosemary stems removed to finely release oils; rosemary pairs with beef to cut richness and add complexity. Mix into the herb butter or oil to infuse the roast during searing and resting for a balanced herbal aroma.
- 10 sprigs fresh thyme leaves about 1 tablespoon chopped Contribute bright, lemony herbal notes by stripping thyme leaves and chopping; thyme offers subtle freshness that complements the beef without overpowering. Blend into the rub or butter so the leaves release their aromatic oils through the cooking process.
- 4 tablespoons olive oil Provide a medium for herb and garlic paste and help promote browning by using olive oil; it aids in heat transfer for an even crust while carrying herb flavors onto the meat surface. Choose a good quality extra virgin olive oil for flavor, but avoid overheating to prevent bitterness.
- 4 tablespoons butter very soft Bring richness and help form a golden, flavorful crust when spread very soft over the roast; butter adds tenderness and a silky mouthfeel to the finished beef. Soften enough to combine easily with herbs and garlic so the compound butter adheres during roasting.
- 2 tablespoons kosher salt or 1 tablespoon table salt Season deeply and enhance natural beef flavors with kosher salt (or table salt in lesser quantity); salt draws moisture to the surface to create a savory crust and helps proteins break down slightly for tenderness. Apply evenly well ahead of cooking to allow for proper penetration and seasoning.
- 1 tablespoon ground black pepper Add sharp, warming spice and finish the seasoning profile with freshly ground black pepper; it provides a subtle heat and aromatic lift to contrast the beef's richness. Grind just before use for maximum fragrance and distribute evenly over the roast for consistent flavor.
Instructions
- Remove standing rib roast from refrigerator and bring to room temperature, 2-3 hours.: The surface of the meat will lose its chill and the cold spot in the center will shrink, which helps the roast cook more evenly from edge to center, producing a consistent pink throughout. You will notice the fat softening and the roast losing its chill when you press it, it should feel closer to room temperature, not cold. A common mistake is skipping this step, which causes the outer layers to overcook while the center stays underdone; patience here pays off. If your kitchen is cool, plan the timing so the roast sits covered at room temperature for the full two to three hours.
- Preheat oven to 450 degrees F.: A very hot oven at the start creates a beautiful Maillard crust, sending savory aromas through the kitchen as proteins and sugars brown. You should see the oven temperature stabilize and the heating elements glow, and the initial blast of heat will seal the surface of the roast. Avoid opening the oven frequently in this stage, because the temperature drop will weaken the crusting action. A frequent error is preheating to a lower temperature then trying to rush the sear, which results in a paler crust.
- Chop garlic, rosemary and thyme together until finely minced.: When you make a fine mince, the herbs and garlic release more oils and perfume, which meld into the butter for an even flavor coating. You will smell a bright herbal tang and see the mixture become a green flecked paste. If pieces are too large they can char, so aim for a uniform mince. One mistake is leaving woody bits of rosemary intact, which can be unpleasant to bite into.
- Stir garlic and herbs together with olive oil and butter to create a paste.: The paste should be smooth enough to spread, the butter emulsifying with the olive oil and herbs to carry flavor deep into the crust as it roasts. You will feel the texture change to a spreadable consistency and smell the savory blend of fats and herbs. This step matters because a cohesive paste adheres well to the roast and browns uniformly, otherwise the topping can slide off. Be careful not to overheat butter when softening, you want it pliable, not melted into oil.
- Sprinkle salt and pepper all over roast. (You may need more or less salt and pepper, depending how large your roast is.): The salt and black pepper give fundamental seasoning and build the crust. You should see a light, even layer of salt crystals on the surface, and the pepper will add tiny dark flecks across the fat cap and meat. Proper seasoning at this stage ensures the interior is well flavored after cooking; insufficient salt yields a flat tasting slice. A common oversight is under seasoning the sides and bottom, so rotate and season all surfaces evenly.
- Spread garlic and herb butter all over roast in a thin, even layer.: When the paste is applied evenly, the roast will brown consistently and the aromatics will infuse the surface. Visually you want full coverage with a thin sheen, no clumps. This technique promotes a balanced crust and prevents burned spots from herb piles. Avoid piling too thickly, which can result in herbs burning and tasting bitter.
- Bake 15 minutes at 450 degrees. Then reduce oven temperature to 325 degrees F and cook 15-20 minutes per pound for medium rare. Use a thermometer to check for desired doneness.: That first high heat step triggers the crust formation, you will notice a sizzling, and then after lowering the temperature the roast will cook steadily, producing a rosy center. Smell will shift from sharp herb notes to deeper roasted beef aromas, and juices may begin to collect at the surface. The thermometer is the decisive tool, aiming for the target internal temperature for medium rare, and avoiding the guesswork that creates overcooked meat. A typical mistake is relying on clock time alone, instead of checking temperature, which can yield inconsistent results due to roast shape and oven variation.
- Remove from oven, cover prime rib with foil gently for 30 minutes to rest.: Resting allows the muscle fibers to relax and juices to redistribute, you will see the surface settle and the roast become easier to slice. The interior will continue to carry residual heat, so the final temperature can tick up slightly during this time. Resting is why the roast stays juicy and slices cleanly; skipping or shortening rest time causes juices to pour out and slices to be dryer. Common error is tenting too tightly and trapping steam, which can soften the crust, so tent gently.
- Carve off the bone and serve.: Carving separates the bones and reveals the evenly cooked interior, and you will see a deep crust giving way to tender, pink slices. The sound of the knife sliding through the meat and the visual of layered textures is part of the reward. Proper carving maximizes presentation and lets each guest enjoy the ideal portion. A mistake to avoid is sawing at the meat aggressively, which can tear slices; use smooth, confident strokes and let the knife do the work.
Notes
- Room temperature matters: Allowing the roast to sit for two to three hours ensures even cooking and a uniform color through the center.
- Thermometer is non negotiable: I always use an instant read thermometer, it prevents guesswork and keeps the roast at the doneness I intend.
- Herb paste consistency: Make the paste spreadable by softening butter and mixing thoroughly with oil and herbs so it adheres without sliding off.
- High heat start: The initial oven burst at high heat creates the Maillard crust that gives the roast its savory aroma and browned surface.
- Gentle tent for resting: Loosely tent the roast with foil for thirty minutes so it rests without steaming the crust, preserving texture.
- Even seasoning: Rotate and season all sides of the roast so each slice has balanced salt and pepper, not just the top.