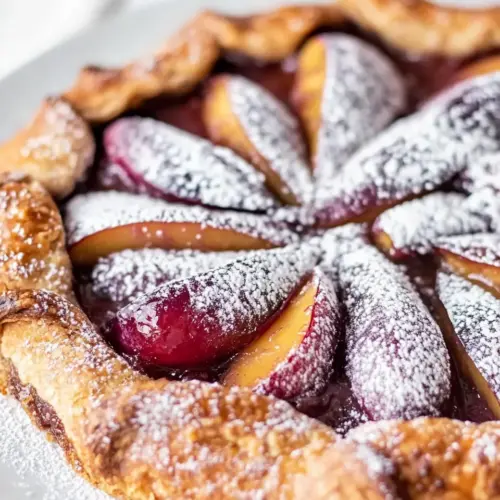
Plum Galette
Plum Galette is a rustic, fruity pastry with a flaky, buttery crust and caramelized plum filling. This easy to make, crowd pleasing dessert balances sweet and tart notes with a whisper of cinnamon and a golden, glossy finish. Perfect for an easy weeknight dinner dessert or leisurely weekend brunch, it rewards simple technique with delicious results and invites second helpings.
Equipment
- Food Processor
- Mixing Bowl
- Rolling Pin
- Baking Sheet
- Parchment Paper
Ingredients
- 1 1/4 cups all-purpose flour Combine to form the structure of the dough by providing gluten and bulk; measure accurately for proper texture and balance in the crust. Sift or whisk briefly to aerate and ensure even mixing with other dry ingredients before cutting in the fat. Provides the necessary framework that browns and crisps during baking.
- 2 tablespoons sugar Add to provide subtle sweetness and help tenderize the dough; adjust level slightly to suit ripe fruit sweetness. Sprinkle into the flour mixture so it distributes evenly and contributes to caramelization on the crust edge. Enhances overall flavor without overpowering the plums.
- 1/4 teaspoons salt Season to enhance overall flavor and balance the sweetness of the filling and crust; use the precise small measure for best results. Dissolve into the dry ingredients to ensure even seasoning throughout the dough. Helps bring out depth and contrast in both crust and fruit.
- 8 tablespoons unsalted butter (cold, (1 stick), cut into pieces and chill again) Cut and chill to create flaky layers by releasing small pockets of steam during baking; keep very cold until incorporated. Work quickly to distribute pieces into the flour until pea-sized bits remain for optimal flakiness. Provides richness and contributes to browning and mouthfeel.
- 1/4 cups sour cream Moisten the dough and add slight tang for flavor; combine with the fats to bring the flour together without overworking. Chill if necessary to firm before rolling to prevent the butter from melting and ruining flakiness. Balances richness and adds a tender crumb to the crust.
- 1/4 cup ice water Hydrate the dough to bind the dry ingredients while controlling the final consistency; add gradually to avoid a sticky pastry. Use ice-cold water to maintain cold butter pieces and ensure a flaky texture. Adjust slightly to achieve a cohesive but not overworked dough.
- 1/4 teaspoon cinnamon (ground) Warm the filling with a subtle spice note that complements the fruit; measure carefully to avoid overpowering the plums. Stir into the sugar mixture or toss with fruit so the spice infuses evenly during baking. Enhances aroma and adds depth to the fruit filling.
- 1/3 cup brown sugar (or coconut palm sugar) Sweeten and add caramel-like depth to the filling; choose brown sugar or a substitute to complement the plums' tartness. Mix with the fruit so it dissolves and thickens slightly as the juices are released while baking. Helps create a glossy, flavorful filling and moderate syrup.
- 1 pound plums (firm-but-ripe, pitted and cut into eighths) Provide the main fruit component with texture and natural juiciness; pit and cut into even eighths for uniform cooking. Toss with sugar and spices so the fruit releases juices that will meld into the filling during baking. Offers seasonal flavor, color, and body to the galette.
- 1 large egg yolk (mixed with 1 tablespoon of water) Brush to give the crust a glossy, golden finish and help toppings adhere; mix yolk with water for an even glaze. Apply gently around the edges and over the dough before baking for an attractive appearance and slight additional browning. Also helps any sprinkled sugar stick.
- powdered sugar (for sprinkling, optional) Dust lightly to add visual appeal and a touch of sweetness after baking; use sparingly for a delicate finish. Sift over the cooled galette just before serving so it melts slightly into the warm crust and fruit. Optional but classic for presentation.
Instructions
- In a food processor, add the 1 1/4 cups of flour, sugar, the salt and pulse to combine. Add the butter and pulse until the mixture resembles coarse meal. Add sour cream and the ice water and pulse until the dough just barely comes together. Gather the dough and pat it into a disk. Wrap the dough in plastic and refrigerate until chilled, about 30 minutes.: You will first notice the dry scents of flour and sugar coming together, faint and comforting. Pulsing quickly combines them without warming the mixture, which is important because heat will soften the butter . The little noisy bursts of the processor are normal, and you should stop before a fine powder forms. If you overprocess the mixture it can lead to a tougher crust because of excess gluten development. A common mistake is running the processor too long so the mixture feels warm to the touch, which signals the butter is losing its coldness. If that happens, chill the bowl briefly before continuing.
- Preheat the oven to 425℉. Line a baking sheet with parchment paper.: As you add the cold, cubed butter , the texture should change to small, pea sized bits that glint slightly. This visual cue tells you the butter is properly distributed and will create steam pockets while baking. You might hear rapid pulses and see bits of butter the size of peas, that is exactly right. Avoid overworking to the point where the mixture resembles a paste, because that will remove the flakes from the final crust. If the butter seems too soft, pop the bowl into the refrigerator for five to ten minutes and then continue.
- Working on a lightly floured surface, roll out the disk of dough to a 12-inch round; transfer to the baking sheet.: The mixture will feel slightly tacky and hold if you pinch it, but it should not be wet or sticky. The cold sour cream and ice water bind the dough while maintaining coolness, which helps the crust stay flaky. When you squeeze a small handful it should cling without oozing moisture. Overmixing at this stage produces a dense crust, so pulse just enough for cohesion. If your dough separates or falls apart, add another teaspoon of ice water and pulse gently.
- In a bowl stir the brown sugar with the cinnamon together.: Touching the dough gives you immediate feedback, it should be cool and slightly firm. Patting it into a flat disk ensures even chilling and easier rolling later. If the dough feels warm, the butter may have softened too much; return it to the refrigerator until firm. A common error is rolling a warm dough which will stick and tear, so chilling is not optional for a neat crust.
- Arrange the plums in the center of the dough, leaving a 1 1/2-inch border all around. Sprinkle with the sugar mix evenly over the plums. Fold the edge of the dough up and over the plums. Brush the rim with the egg wash and sprinkle with additional brown sugar if preferred.: Chilling lets the butter firm up and the flour hydrate, which reduces shrinkage during baking. You will feel the dough go from pliable to slightly firm after resting. If you skip this step you risk a loose, shrinking crust that loses structure. If you are short on time you can rest it in the freezer for about 15 minutes, but watch it closely to avoid freezing solid.
- Bake the galette for about 45 minutes, or until the crust is golden and the fruit is tender and bubbling. Let the galette cool on the baking sheet for 30 minutes, sprinkle with some powdered sugar, then cut into wedges and serve.: The oven will radiate dry heat and the initial high temperature encourages a brisk rise and browning. The scent shift from kitchen to bakery begins here, with a warm, toasty smell as the oven comes up to temperature. Using parchment prevents the filling from sticking and helps with even browning. A common oversight is putting the galette into an oven that has not fully reached temperature, which can yield a soggy bottom rather than a crisp crust.
- Working on a lightly floured surface, roll out the disk of dough to a 12-inch round; transfer to the baking sheet: Rolling should produce a slightly imperfect round that is about twelve inches across. You will see layers and a powdered dusting of flour to prevent sticking. Keep the dough moving and rotate as you roll to maintain an even thickness. If you press too hard you will compress the layers and get a dense crust, so use gentle, even pressure. If the edge cracks, simply press it back together with your fingers and keep a light dusting of flour handy.
- In a bowl stir the brown sugar with the cinnamon together: The dry aroma of cinnamon releases as you mix it with the brown sugar , and the combination will smell warmly spiced. This mixture creates the caramelizing element for the fruit, so get an even blend to avoid clumps. If the cinnamon is unevenly distributed you may get pockets of spice that overwhelm a bite, so whisk until uniform.
- Arrange the plums in the center of the dough, leaving a 1 1/2-inch border all around. Sprinkle with the sugar mix evenly over the plums. Fold the edge of the dough up and over the plums. Brush the rim with the egg wash and sprinkle with additional brown sugar if preferred: When you layer the plums they should overlap slightly and create a textured, jewel like center. As the oven heat hits them their juices will begin to glisten and smell fruity and caramel like. Folding the edge up creates a rustic frame that contains juices while exposing the fruit top to direct heat, encouraging caramelization. Brushing the rim with the egg yolk wash adds a glossy, deeply golden finish. A common slip is piling the fruit too high which traps steam and prevents proper caramelization, so keep a single generous layer.
- Bake the galette for about 45 minutes, or until the crust is golden and the fruit is tender and bubbling. Let the galette cool on the baking sheet for 30 minutes, sprinkle with some powdered sugar, then cut into wedges and serve: In the oven you will hear faint bubbling and smell the sugar caramelizing, with the crust taking on an even, warm brown. The sound of gentle bubbling signals that the juices are thickening and the plums are tender. Letting it cool on the sheet allows the filling to set so slices hold shape instead of running. A mistake is slicing too soon, which yields a messy plate, so be patient and wait until the fruit has settled before cutting.
Notes
- Chill time matters: If you are short on time, freeze the dough for about 15 minutes instead of refrigerating for 30 minutes to firm up the butter quickly, but do not let it freeze solid as that makes rolling difficult.
- Sugar swaps: If you prefer a different sweetener, brown sugar can be swapped for coconut palm sugar as listed, which gives a slightly different caramel note and a hint of complexity to the filling.
- Make ahead: The dough can be made a day in advance and kept wrapped in the refrigerator, which lets you assemble the galette the next day for fresher fruit flavor and less active prep time.
- Adjust fruit thickness: Slice plums thinner for faster softening and thicker for more texture. Thicker slices may need an extra five to ten minutes in the oven to fully tenderize.
- Egg wash alternatives: The egg yolk wash provides color and shine; if you avoid eggs, brush with a thin coat of milk for a softer golden hue, though the recipe notes forbid certain substitutions so stick to the ingredient list provided.