Pita Chips Recipe
Pita Chips Recipe delivers crispy, golden chips with minimal ingredients. These easy, savory snacks are perfect for dipping, offering crunchy texture and bright seasoning, ideal for an easy weeknight snack or party appetizer. Try the air fryer for extra crispness or the oven for larger batches, a quick reason to make them today.
Equipment
- Sheet pan (15" x 10")
- Air Fryer
Ingredients
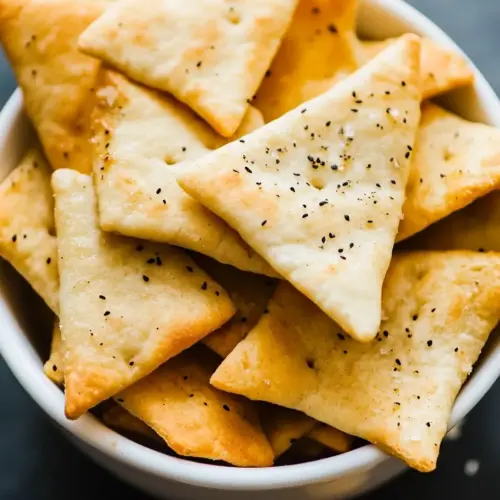
- 4 pita Cut into wedges and crisp when baked, providing the sturdy base for flavorful chips; perfect for tearing and dipping into spreads like hummus. Use fresh pitas to ensure a light, airy texture and even browning in the oven. Adjust thickness by halving or quartering depending on desired chip size.
- 3 tablespoons olive oil Coat evenly over pita wedges to promote golden browning and deliver a rich, savory mouthfeel. Use high-quality extra virgin olive oil for its flavor and smoke point benefits during roasting. Olive oil also helps dry seasonings adhere to the chips for consistent taste.
- 1/2 teaspoons salt Sprinkle lightly to enhance overall flavor balance and highlight other seasonings without overpowering. Use measured amounts to avoid making the chips too salty, allowing the natural wheat taste to come through. Salt also aids in drawing out moisture for crisper results.
- 1/2 teaspoon pepper Season generously to add a subtle heat and depth that complements salt and garlic; helps create a balanced savory profile. Toast pepper briefly while baking to mellow its sharpness and integrate with the other spices. Adjust amount to suit heat preference.
- 1/2 teaspoon garlic powder optional Dust sparingly to introduce a warm, aromatic garlic note that pairs well with olive oil and hummus; optional for those who prefer milder flavor. Use more or less depending on garlicky preference, remembering it intensifies when baked. Can be omitted for a plain, simple chip.
- Hummus for serving Serve alongside finished chips to provide a creamy, contrasting dip that enhances flavor and texture; offers a classic pairing for pita chips. Choose plain or flavored hummus to vary taste profiles and create a satisfying appetizer or snack. Spoon into a shallow bowl to allow easy dipping.
Instructions
- If using the oven, preheat to 400°F. For thick pitas, cut them into 8 triangles by cutting in half, then into quarters, and finally into eighths. For thin pitas, use pocket pitas. Gently separate each into 2 pieces, then cut each piece into 8 triangles, resulting in a total of 16 triangles.: The room fills with a warm, toasty scent as the oven comes up to temperature; this preheating ensures immediate browning when the pieces hit the pan which helps form crisp edges. You should hear the faint settling of metal racks and notice the oven light warming the air. A common mistake is skipping the preheat, which can lead to uneven color and a chewy center. Aim for a steady, even heat source and give the oven time to stabilize.
- In a large bowl, add the pita triangles. Drizzle with oil and add the seasonings. Toss well to coat (using your hands works best).: The act of slicing releases a faint yeasty aroma, and when you stack and quarter the rounds you can see the interior crumb separate into distinct layers, which helps them crisp differently than thin pitas. Use a sharp knife to get clean edges which brown more evenly. Avoid tearing the bread roughly, as ragged edges can brown too quickly and create burnt tips while the center stays soft.
- Baking Method: Line a large sheet pan with parchment paper or a silicone baking mat. Add pitas in an even layer (none overlapping) and bake at 400°F: Thick pitas: Bake for 5 minutes, then flip. Bake 5 more minutes, flip again, and bake 2–4 more minutes or until crisp (they will crisp up more as they cool). Thin pitas: Bake for 5 minutes, flip, then bake for 3–5 more minutes or until crisp (they will crisp up more as they cool).: Pocket pitas separate easily into two flat layers, and when cut into triangles they produce thin chips that toast quickly. As they heat they will crisp from the edges inward, so watch the color closely. A mistake people make is assuming thin pitas need the same time as thick ones, which can burn them; reduce time slightly and check early.
- Air Fry Method: Add a single layer of pita triangles to the air fryer basket. Air fry at 320°F: Thick pitas: Air fry for 5 minutes, flip, and air fry for 5 more minutes or until crisp (they will crisp up more as they cool). Thin pitas: Air fry for 4 minutes, flip, and air fry for 3 more minutes or until crisp (they will crisp up more as they cool). See note 2.: Separating pockets exposes more surface area to oil and heat, and cutting into uniform triangles ensures consistent cooking. You will notice the shapes take on a more defined geometry which helps them lay flat on the tray. Be cautious not to stack triangles on top of each other, as overcrowding prevents crisping and promotes steaming, leading to soft chips.
- Cool completely (they’ll crisp up more as they sit). Enjoy with your favorite sauces or dips—my favorite is hummus!: Placing the triangles in a roomy bowl lets you toss them without crushing, and you can feel the pieces move as you coat them. This tactile step helps you judge whether they are evenly coated. Avoid using a bowl that is too small, because squeezing to coat can create uneven oil distribution and result in some soggy pieces.
- Drizzle with oil and add the seasonings: As you pour olive oil over the triangles, notice the sheen that forms and how the salt and pepper cling to the surface. The oil acts as a conductor of heat and flavor, so even coverage is crucial. A common error is adding too much oil, which will make the chips heavy and slow to crisp; use just enough to lightly coat.
- Toss well to coat (using your hands works best): Tossing lets you feel for complete coverage and ensures each corner gets seasoned. Your hands help separate any pieces that might stick together and let you feel if any bits are over oiled. Wear a kitchen towel or use clean hands to protect fingers from residual oil. Avoid rough tossing that breaks fragile pieces into crumbs before they cook.
- Baking Method: Line a large sheet pan with parchment paper or a silicone baking mat : Lining the sheet pan prevents sticking and promotes even heat transfer. You will notice less browning on the underside if you use a reflective pan without lining, so parchment helps create uniform crisping. A frequent mistake is crowding the pan; overlapping pieces will steam instead of toast, leaving them limp rather than crunchy.
- Add pitas in an even layer (none overlapping) and bake at 400°F: When arranged in a single layer the pitas brown evenly and you will hear tiny, faint crackle sounds as they dehydrate. Look for a light golden hue around the edges as a visual cue. If you stack or overlap, airflow is restricted and chips remain soft in places, so be patient and give them space to breathe.
- Thick pitas: Bake for 5 minutes, then flip : After the first interval you should see the edges begin to color, and flipping promotes even browning on both sides. The smell will intensify into a toasty bread aroma. One pitfall here is flipping too aggressively which can shatter partially crisped pieces; use a thin spatula and gentle motion to turn them.
- Bake 5 more minutes, flip again, and bake 2 to 4 more minutes or until crisp (they will crisp up more as they cool): The final rounds of baking deepen color and crunch. Look for a uniform golden tone and a firm texture when pressed lightly. Avoid overbaking; chips can go from golden to burnt quickly, so check early and rely on visual cues rather than exact times alone.
- Thin pitas: Bake for 5 minutes, flip, then bake for 3 to 5 more minutes or until crisp (they will crisp up more as they cool) : Thin chips toast faster and will show crisping at the edges first. The sound of slight snapping when you bend a cooled piece is a good indicator they are done. A mistake is leaving them in too long because the thinness makes them fast to over brown.
- Air Fry Method: Add a single layer of pita triangles to the air fryer basket : Air fryers circulate hot air vigorously, producing immediate surface browning and a pronounced crunchy texture. Arrange pieces in a single layer for even airflow; you will often hear a light whisper of air and notice rapid color change. Avoid stacking, as crowded baskets reduce crisping and create uneven results.
- Air fry at 320°F: Thick pitas: Air fry for 5 minutes, flip, and air fry for 5 more minutes or until crisp (they will crisp up more as they cool) : The moderate temperature allows the centers to dry without burning the edges, and you will smell a rich toasted aroma. Flip carefully to maintain shape, and avoid running the fryer too full which leads to steaming and soft chips.
- Thin pitas: Air fry for 4 minutes, flip, and air fry for 3 more minutes or until crisp (they will crisp up more as they cool) : Thin chips require slightly less time, and you should check them early for the first signs of color. Overcooking is the main risk; monitor closely because air fryer models vary and can brown faster than expected.
- See note 2: Because pitas vary in thickness and ovens and air fryers differ, rely on color and texture as your guide. I frequently open the oven a minute or two early to check progress, using sight and touch to decide. The typical misstep is rigidly following times without adapting to your specific equipment and bread.
- Cool completely (they ll crisp up more as they sit): Cooling lets residual steam escape and the chips set into a crisp finish; place them on a wire rack if possible to avoid trapped moisture. You will feel the temperature drop and hear a faint brittle crackle as they cool. Storing warm chips seals in steam and makes them soggy, so resist the urge to pack them away right away.
- Enjoy with your favorite sauces or dips my favorite is hummus!: Serve the chips at room temperature with a bowl of Hummus for serving , and watch guests double dip. The contrast of creamy dip and crunchy chip is immensely satisfying. A common oversight is serving chips too long after cooking in humid conditions; they may lose crispness, so plan to serve shortly after cooling or refresh briefly in the oven before plating.
Notes
- Use pocket pitas for thin chips: Pocket pitas separate into thinner layers which toast faster, giving a light and delicate crunch that is perfect for delicate dips.
- Choose thick pitas for heartier chips: Thicker rounds make substantial, crunchy chips that hold up to heavier dips like chunky spreads or layered dips.
- Air fryer for small batches: The air fryer yields a superior texture in small quantities; do not crowd the basket, and air fry in single layers for even results.
- Scale down for single servings: If you do not want multiple batches, cut the recipe and only work with one pita at a time to avoid repeated heating cycles.
- Season lightly and taste: Start with the stated amounts of salt and pepper, then taste a cooled chip and adjust seasonings in future batches to suit your preference.
- Store in a dry place: Chips stay crisp longer in low humidity; keep them in an airtight container at room temperature and avoid refrigeration which can soften them.