Pickle Brined Chicken Tenders
Pickle Brined Chicken Tenders deliver crispy texture and tangy, juicy chicken in an easy weeknight dinner. The bright dill pickle juice tenderizes while the seasoned breadcrumbs and panko create a golden crust. Quick to finish in an air fryer or oven, this recipe is a crowd pleaser and a dependable go to when you want something flavorful and satisfying.
Equipment
- Air Fryer
- Mixing Bowls
- Paper towels
- Measuring Cups
Ingredients
- 12 chicken tenders (1.25 pounds total) Marinate and tenderize the chicken tenders to add moisture and flavor; these 12 tenders (about 1.25 pounds) provide the main protein and are portioned for quick cooking. Ensure even size for consistent brining and crisping, and pat dry before breading to help coatings adhere. Handle gently to avoid tearing the meat and maintain a uniform cook time.
- 1 1/4 cups dill pickle juice, plus more if needed Flavor and tenderize the chicken by submerging in 1 1/4 cups dill pickle juice, which imparts tangy acidity and helps break down proteins for juicier tenders. Add more pickle juice if needed to fully cover the meat, and refrigerate while brining so flavors penetrate safely. Use the brine time recommended in the recipe to avoid over-marinating.
- 1 large egg Bind coatings and contribute to a richer texture by whisking in one large egg, which helps the bread crumbs adhere and creates a cohesive crust when cooked. Beat briefly to combine yolk and white thoroughly, and mix with the separated egg white for an even coating dip. Keep chilled until ready to bread to maintain food safety.
- 1 large egg white Increase adhesive properties and lighten the coating using one large egg white, which adds protein for superior crisping and helps the breading stick evenly to the tenders. Whisk the white until slightly frothy if combining with the whole egg, ensuring a smooth egg wash. Reserve in a shallow dish for efficient dredging of each piece.
- 1/2 teaspoon Kosher salt Season and enhance flavor balance with 1/2 teaspoon Kosher salt, which seasons the meat and helps draw out moisture during brining for better texture. Sprinkle evenly into the egg wash or onto the tenders before breading to distribute salt throughout. Adjust according to dietary needs but maintain enough to lift flavors.
- freshly ground black pepper Season with freshly ground black pepper to provide mild heat and aromatic complexity; grind just before use for optimal flavor and aroma. Season sparingly and taste as you go, keeping the pepper balanced with the tang from the pickle brine. Apply to the egg wash or directly to the meat to incorporate into the crust.
- 1/2 cup seasoned bread crumbs (regular or gluten-free) Create a flavorful base layer for the crust using 1/2 cup seasoned bread crumbs, which add body, texture, and seasoning to the exterior of the tenders. Choose regular or gluten-free varieties to match dietary preferences and combine with panko for varied crunch. Press crumbs gently onto egg-coated tenders to ensure full coverage.
- 1/2 cup seasoned panko bread crumbs (regular or gluten-free) Add extra crunch and a lighter, flakier texture with 1/2 cup seasoned panko bread crumbs, which provide crispness and an airy crust when cooked. Use regular or gluten-free panko as preferred, and mix with the regular bread crumbs for a balanced coating. Layer panko over the initial crumb base for maximum texture contrast.
- olive oil spray Promote even browning and reduce sticking by applying olive oil spray before baking or air-frying; the spray distributes a fine, controlled coating of oil. Lightly mist the breaded tenders to help achieve a golden, crispy exterior without excess grease. Reapply sparingly during cooking if needed to maintain crust color.
Instructions
- Place the chicken in a shallow bowl and cover with the pickle juice (enough to cover completely). Cover and marinate for 8 hours in the refrigerator.: The scent of the dill pickle juice will be noticeably acidic when you first open the jar, and as the chicken soaks it will take on a muted vinegary aroma that blends with the meat, not overpowering it. I like using a non react ive shallow container so the brine touches each piece evenly, and I turn the tenders once or twice during the marinating period to ensure uniform exposure. The why is simple, the brine uses acid and salt to break down some muscle fibers, which helps the meat retain moisture during cooking. For troubleshooting, don’t skip patting the tenders completely dry after draining, because excess liquid prevents the coating from adhering; a common mistake is leaving them damp which leads to a soggy crust rather than a crisp one.
- Drain the chicken and pat completely dry with paper towels (discard the marinade).: When you unwrap the container, you may notice the brine glistening on the surface, and using clean paper towels to press away every drop gives the coating something to cling to. Dry meat also browns better because moisture slows the Maillard reaction. I press firmly but gently so the tenders keep their shape. If any bit feels tacky after drying, give it another quick pat. Watch out for over handling, since too much handling can compress the meat and change its texture; handle with care.
- In a medium bowl, beat together the whole egg, egg white, salt and pepper to taste. In a shallow bowl, combine both kinds of bread crumbs.: As you whisk the mixture, it should become homogenous and slightly frothy, with the specks of black pepper evenly distributed. This mixture is your adhesive layer, and it adds a touch of richness while helping breadcrumbs to bond. I use a fork or small whisk and taste a tiny dab to check seasoning, remembering the brine contributed salt earlier. If you under season here, the exterior can taste flat; however avoid over salting because the brine already adds a baseline of saltiness.
- Working with one piece at a time, dip the chicken in the egg mixture, then into the bread crumbs, gently pressing to adhere. Shake off any excess bread crumbs and place on a work surface. Generously spray both sides of the chicken with the olive oil spray.: When you stir the regular seasoned bread crumbs with the seasoned panko bread crumbs , you should notice a pleasing contrast in texture and particle size. This blend gives you both a sturdy shell and an airy crispiness, and the seasoned crumbs lend background flavor so the exterior is not bland. Mix them just enough to distribute evenly, and keep the bowl wide enough to dredge comfortably. If the crumb mix is too compacted, it will clump on the chicken ; fluff it with a fork to keep it loose.
- Preheat your air fryer to 400°F.: As you dip each tender, the tactile sensation is key you should feel the egg coat the surface like a glaze and the crumbs adhere in a single even layer. Gently press crumbs so they stick, but avoid pressing so hard that the coating becomes paste like. After shaking off excess crumbs, place the tenders on your work surface with a small gap between them, and spray both sides with olive oil spray to kickstart browning. The oil spray helps the surface sizzle in the air fryer , creating that sought after crunch. A common misstep is overcrowding the tray, which traps steam and softens the crust.
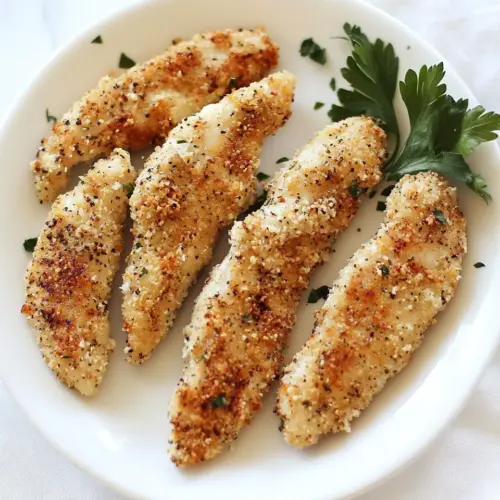
- Working in batches, arrange a single layer of the chicken in the air fryer basket. Cook for 10 to 12 minutes, flipping halfway, until cooked through, crispy and golden. (For a toaster oven style air fryer, the temperature remains the same; cook for about 10 minutes). Serve immediately.: Preheating is often overlooked, yet it makes a big difference because the hot environment immediately starts to crisp the coating, sealing in juices and promoting an even golden color. You should hear the fan settle and see the temperature stabilize before adding food. If the air fryer is not hot enough, the tenders cook through but the crust can be pale and limp. For troubleshooting, wait the full preheat cycle and avoid opening the basket repeatedly during cooking.
- ALTERNATELY, IF YOU ARE COOKING THIS IN THE OVEN: Bake at 425°F in the lower third of the oven for 8 to 10 minutes, flip then 6 minutes more.: When you place each tender in the basket, space them so air can circulate on all sides; you may hear a gentle sizzle once they hit the hot surface. Cook for 10 to 12 minutes, flipping halfway, until the exterior is crispy and golden and the chicken registers done. The aroma will shift from pickley to roasted, and the crust should feel firm to the touch. If the pieces are uneven in size, they will finish at different times, so group similar sizes in a batch. Avoid stacking or crowding, as that leads to steaming instead of crisping.
- For toaster oven style air fryer the temperature remains the same cook for about 10 minutes: In a toaster oven style unit you may notice the heat source is closer to the food, which accelerates browning, so keep a close eye near the end of the cook time and listen for the crispy sound. The visual cue is a deep golden tone with tiny blistered spots on the crust. If the crust seems to brown too quickly, reduce the final minutes slightly to ensure the interior reaches the proper doneness without burning the exterior. A frequent error is assuming all air fryers perform identically they do not, so adjust slightly based on your appliance.
- ALTERNATELY IF YOU ARE COOKING THIS IN THE OVEN Bake at 425°F in the lower third of the oven for 8 to 10 minutes flip then 6 minutes more: When baking, placing the rack in the lower third helps the underside brown while the top crisps during the second half of cooking. The oven will produce a more even ambient heat, and you should watch for a steady deepening of color and a faint aroma of roasted crumbs. Flip at the specified time to develop color on both sides, and test a tender to ensure it is cooked through and juices run clear. Oven variability can cause slight timing differences, so use a thermometer if uncertain. A common pitfall is leaving the tenders too long which dries them out, so stick to the flip and check routine.
Notes
- Brine time matters: Giving the chicken up to 8 hours in the dill pickle juice yields the best balance of flavor and tenderness, but avoid much longer, as the acid can alter the texture unfavorably.
- Dry thoroughly: After draining, press tenders dry with paper towels so the egg and crumbs adhere properly, which prevents a soggy coating and promotes browning.
- Mix crumbs for texture: Combining seasoned bread crumbs and seasoned panko bread crumbs gives you both bite and lightness, a combination I always reach for.
- Light oil spray helps crisp: A generous mist of olive oil spray on both sides encourages a golden crust in the air fryer while keeping the method low fat compared to deep frying.
- Work in batches: Maintain a single layer in the basket or tray to ensure even heat circulation, and keep cooked pieces warm in a low oven if you’re doing multiple batches.