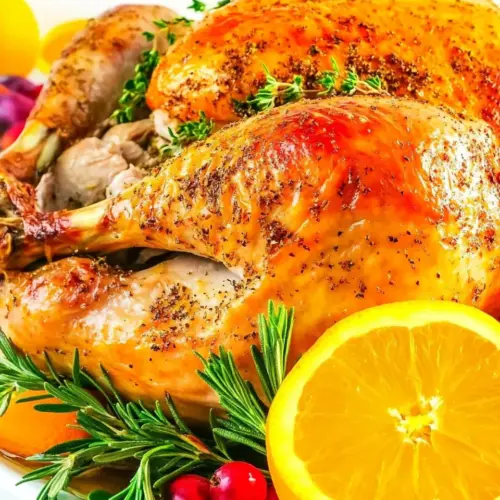
Perfect Oven Roasted Turkey
Perfect Oven Roasted Turkey is a juicy, crispy holiday classic with bright citrus and fragrant herbs that elevate a simple roast into a show stopping main. This easy to follow method yields reliably tender meat and a golden, crackly skin, making it a perfect easy weeknight dinner upgrade or a centerpiece for Thanksgiving. Try it for consistent, crowd pleasing results.
Equipment
- Roasting Pan
- Meat Thermometer
- Kitchen string
- Aluminum Foil
Ingredients
- 12 -15 lb turkey Weigh and prepare; provides the main protein and centerpiece for the meal, requiring proper thawing and trussing for even roasting. Ensure cavity cleaned and patted dry to promote browning and crisp skin, and allow resting time after roasting to redistribute juices. Season generously inside and out to flavor both breast and dark meat thoroughly.
- 1 teaspoons ea salt Season generously; adds essential saltiness to enhance natural turkey flavor and aid in moisture retention through mild cure effects. Sprinkle evenly over skin and inside the cavity before roasting to penetrate the meat during cook time. Combine with other seasonings for balanced overall taste.
- 1/4 teaspoon ground pepper Season lightly; contributes pungent heat and aromatic depth that complements herbs and citrus in the rub. Sprinkle sparingly to avoid overpowering delicate turkey meat, especially white meat which can be more sensitive to strong flavors. Use in combination with other pepper sources listed for complexity.
- 1 cup unsalted butter softened Cream and baste; provides fat for a flavorful herb butter that bastes the skin for browning and keeps meat moist during roasting. Soften to room temperature for easy mixing with herbs, citrus zest, and garlic, then rub under and over the skin to deliver concentrated flavor. Melted butter also helps achieve crisp, golden skin.
- 2 tablespoons olive oil Sear and flavor; supplies heartier, fruity oil to loosen butter blend and promote even application on the bird. Use in rubs or to coat the roasting pan to prevent sticking and encourage browning. Can be combined with butter to balance smoke point and flavor profile.
- Juice from 1 lemon Brighten and tenderize; fresh lemon juice cuts through richness and adds acidity to lift the overall flavor profile of the turkey. Squeeze into herb butter or cavity to impart subtle citrus notes and help balance fat. Fresh juice also assists in lightly brining or flavoring the meat surface.
- Zest from 1 lemon Zest aromatize; concentrates bright citrus oils that intensify the lemon character without adding extra liquid that could prevent browning. Fold into softened butter or herb mixture to distribute fragrant citrus flavor under the skin and over the breast. Zest integrates seamlessly with garlic and herbs.
- Zest from 1 orange Zest enhance; orange zest supplies sweet citrus top notes that complement lemon and herbs for a more complex citrus profile. Mix into butter or rub to add aromatic sweetness and a slightly floral tone to the turkey's outer seasoning. Use sparingly to avoid overwhelming savory components.
- 6 cloves garlic, large minced Mince and infuse; fresh minced garlic introduces savory, aromatic depth that permeates butter and rubs for a robust roasted flavor. Mix thoroughly into softened butter or oil to distribute evenly under and over the skin as well as inside the cavity. Cooking mellows raw pungency into a sweeter, roasted garlic character.
- 1/4 cup freshly chopped parsley Chop and freshen; freshly chopped parsley adds green, slightly peppery herbaceousness that brightens the overall seasoning mix. Fold into butter or sprinkle over the turkey after resting to provide color contrast and fresh flavor. Fresh parsley also harmonizes with other Mediterranean herbs.
- 1 tablespoon fresh rosemary chopped Chop aromatics; finely chopped rosemary gives pine-like, savory notes ideal for pairing with poultry and citrus. Integrate into butter or tuck sprigs in the cavity or under the skin to infuse long, slow-roasted depth. Use conservatively as rosemary can dominate if overused.
- 1 tablespoon fresh oregano chopped Chop herbaceous; fresh oregano introduces warm, slightly bitter Mediterranean tones that enhance roasted turkey complexity. Mix into the compound butter for an earthy lift, and consider adding sprigs to the cavity for subtle aroma during roasting. Fresh oregano softens with heat into a mild, savory flavor.
- 1 tablespoon fresh thyme chopped Chop flavor; fresh thyme brings subtle lemony and minty undertones that marry well with citrus and garlic in the rub. Incorporate into butter or scatter inside the cavity to infuse evenly as the turkey roasts. Thyme's small leaves distribute easily and withstand long cooking times.
- 2 tablespoons fresh parsley chopped Chop garnish; additional fresh parsley provides finishing freshness and verdant color, ideal for mixing into the herb butter or sprinkling over the carved turkey. Use this quantity to balance flavors and add a brighter herbal note at service. Fresh parsley also helps cut through rich, buttery elements.
- 1 tablespoon smoked paprika Dust and color; smoked paprika delivers mild smoky sweetness and a warm red hue that enhances visual appeal and depth of flavor on the skin. Blend into herb butter to contribute subtle smokiness without using an actual smoker, pairing well with garlic and citrus. Use thoughtfully to avoid overpowering the poultry.
- 1/2 tablespoon ea salt Season lightly; provides additional controlled salting to the rub for balanced seasoning when combined with the primary salt measurement. Apply with attention to avoid over-salting, especially if brining or using salted butter elsewhere. Helps create layers of seasoning at different stages.
- 1/2 teaspoon ground black pepper Season lightly; adds fine black pepper for aromatic heat and a subtle bite that complements the other spices and herbs in the seasoning mix. Sprinkle evenly over skin and cavity for consistent peppery notes throughout the meat. Adjust amount based on personal heat preference.
- 1 large onion quartered – do not peel Aromatics for cavity; a large quartered onion adds moisture and savory aromatics when placed inside the turkey cavity during roasting. Keep the peel on to provide structure and additional flavor compounds without introducing excess liquid. Works alongside citrus and herb sprigs to perfume the meat internally.
- 6 garlic cloves smashed Smashed to release; whole smashed garlic cloves deliver mellow roasted garlic aroma from within the cavity and add depth without intense raw garlic heat. Place them inside the bird or around in the roasting pan to infuse savory notes into meat and pan juices. Crushing helps release more aromatic oils during cooking.
- 5 sprigs fresh rosemary Aromatic sprigs; fresh rosemary sprigs stuffed into the cavity or set around the turkey add concentrated piney fragrance that slowly infuses the meat as it roasts. Use whole sprigs to avoid excessive leaf loss and to make removal easier after cooking. Complement with other cavity aromatics for layered scent.
- 5 sprigs fresh oregano Aromatic sprigs; fresh oregano sprigs contribute warm, herbaceous scent inside the cavity and on the roasting pan to deepen savory complexity. Place whole sprigs in the cavity or tuck under the skin to impart gentle oregano character during the long roast. Fresh sprigs are preferable to dried for subtle perfuming.
- 1 lemon quartered Citrus aromatic; quartered lemon placed in the cavity releases flavorful steam and citrus oils that subtly perfume the meat while roasting. Use halves or quarters to maintain shape and allow easy removal after cooking. Lemon in the cavity pairs especially well with zest and fresh herbs.
- 1 orange quartered Citrus aromatic; quartered orange adds sweet, fragrant citrus vapor to the cavity and roasting environment, providing a brighter, slightly sweet counterpoint to savory herbs. Position alongside lemon and aromatic herbs to achieve a balanced citrus-herb profile. Remove before carving.
- Foil Shield and tent; foil is used to tent the turkey during resting or to cover parts of the bird that brown too quickly during roasting. Employ heavy-duty foil to prevent tearing and to help control browning while allowing the interior to finish cooking. Also useful for covering leftovers for storage.
- Kitchen string Secure and truss; kitchen string ties legs and wings to promote compact shape and even cooking while preventing wing tips from burning. Use to truss the turkey for uniform roast and better presentation when carving. Ensure string is heat-resistant and trimmed before serving.
- Large – heavy roasting pan Contain and roast; a large heavy roasting pan provides sturdy support, catches juices for gravy-making, and helps distribute heat for even roasting. Choose a pan with adequate size to hold the turkey comfortably and allow air circulation. A rimmed pan is also useful for placing a rack and collecting drippings.
- Meat thermometer Monitor doneness; a meat thermometer accurately measures internal temperature to ensure safe cooking and prevent overcooking. Probe the thickest parts of the thigh and breast to check for target doneness and remove promptly once reached. Use to verify the turkey reaches the recommended safe temperature.
Instructions
- Brine the turkey according to the package directions or read the blog post on how to dry-brine your turkey. Plan at least one day for this step.: The air in the kitchen fills with a salty, faintly sweet scent as you prepare the brine, and the bird feels firmer after absorbing the solution; this helps the meat retain moisture during the long roast, which is why I recommend allowing at least one day for the step. Common mistakes include underestimating brine time or using too much salt, which can overseason the meat. If your brine is too salty, dilute with water and extend the soaking slightly. While brining, you will notice the skin tightening slightly, and that tactile firmness is a good sign the solution is working. For dry brining, rub the salt onto the skin and let the turkey rest uncovered in the fridge, the skin will dry and the flavor will deepen. Avoid leaving the bird at room temperature during brining, as that increases bacterial risk.
- When ready to cook, pat the turkey dry and season the cavity generously with one teaspoon of sea salt and a quarter teaspoon of ground pepper.: The moment you pat the bird dry you will see surface moisture lift away and the skin becomes matte and ready to accept flavors; dryness on the surface promotes browning. I always press a clean towel gently to remove dampness, then sprinkle the measured salt and pepper into the cavity so the interior flesh seasons from within. A common error is skipping the drying step, which can cause the skin to steam rather than brown, resulting in a pale final appearance. The cavity should smell faintly of salt and pepper, not overwhelming, and you can feel the seasoning distributed evenly when you rub it lightly with your fingers.
- In a medium bowl, combine all the ingredients listed in this section. Stir until smooth.: As you stir the softened butter , citrus zests, minced garlic , and chopped herbs the aroma will bloom into a bright, herbaceous perfume; the mixture should be smooth and spreadable. I use a rubber spatula to scrape the bowl and ensure the zests and herbs are evenly suspended in the butter . If the blend is too cold and lumpy, let it warm slightly to room temperature or gently press with the back of a spoon to integrate. Avoid overheating the butter , which can melt and separate the mixture. The ideal texture is creamy and cohesive so you can easily work it beneath the skin.
- Gently push your fingers under the turkey skin, lifting and separating the skin from the turkey breast. Separate as much skin as possible; don't rush, and be careful not to tear the skin.: You will feel a pliable layer between skin and meat as you create a pocket that can hold the herb compound; move slowly so the skin separates without tearing. The sound is soft, a light suction and then a smooth glide as your fingers travel, and visually you will see the pale skin lift away from the pink breast. One frequent mistake is forcing the skin and creating holes, which lets the butter leak out during roasting; if that happens, patch with a small piece of foil or work the butter around the tear. The goal is to create an even space to distribute fat so the breast roasts from the inside as well as the out.
- Stuff 2/3 of the butter mixture under the skin and use the remaining to massage it on top of the skin all over the turkey.: As you press the herb butter into place the bird will take on a glossy sheen, and you will smell citrus and herbs right away; massaging the remainder on top creates an extra barrier for browning. I use gloved hands to ease the compound under the skin and then smooth the exterior so the seasoning adheres. A common slip is overstuffing causing uneven pockets, so distribute gently and evenly. The tactile feedback is important here, you should feel the layer glide and then settle beneath the skin, not bunch up in one spot.
- Drizzle the turkey with olive oil and generously season with sea salt and ground black pepper for a crispier skin.: As the oil and salt hit the skin, you will notice a wet sheen that helps the heat create a crunchy crust; the grains of salt will catch light and promise extra texture. I spread the oil with my hands or a pastry brush to ensure even coverage, and then apply the final salt and pepper, keeping in mind that the bird has internal seasoning from brining. A typical error is skimping on oil which results in uneven browning. The skin should feel slick but not dripping, and the surface seasoning should look evenly scattered.
- Stuff the turkey with all the ingredients listed in this section.: As you tuck the quartered citrus, onion, smashed garlic , and herb sprigs into the cavity the aromas will combine into a fragrant steam bath that perfumes the meat during roasting. The weight and shape will feel fuller, and the cavity should be comfortably filled without bulging the breast skin. Overpacking can prevent even heat circulation, so avoid cramming. You will notice a faint citrus scent from the cavity, and that internal steam helps keep dark meat tender during long cooking.
- Cross the turkey legs and tie them together with kitchen twine.: Securing the legs compacts the bird so it cooks more uniformly and presents neatly when carved; the motion is simple and creates a tight, symmetrical shape. The twine should be knotted firmly but not so tight it tears the skin. A common oversight is failing to tuck wing tips under the body, which can char earlier; tuck them snugly to protect them. When done properly the bird will sit level in the pan and the surface tension will help concentrate browning on the breast and legs equally.
- Preheat the oven to 425 degrees. Place the oven rack in the lower part of your oven so the turkey fits in.: When the oven reaches this initial high temperature you will sense the heat on your face opening the door, and that aggressive start creates rapid Maillard reactions on the skin. Place the rack lower so the bird fits, and ensure the oven is fully heated before inserting the turkey to get an immediate sear. A common problem is placing the turkey in a not fully preheated oven, which delays browning and can extend cooking time. The sound of the oven fan settling and the stable temperature readout are cues that it is ready.
- Place an oven-safe meat thermometer into the bird, just beneath the drumstick.: As you insert the probe, you will feel slight resistance before it seats near the thickest part of the thigh; this position gives the most reliable read for doneness. The thermometer prevents guesswork and keeps you from overcooking, because the internal temperature tells you when to remove the bird. A mistake is placing the probe too close to bone which gives a falsely high reading. Confirm the probe is away from bone and pointing to the center of the meat for accurate tracking.
- Roast uncovered in the preheated oven for 30 minutes.: During this searing phase the kitchen will fill with toasty, caramelized aromas as skin begins to brown and render; you should see a golden color developing and hear a gentle hiss as fat renders. This period jump starts crisping and locks in surface flavor for the long roast. A common slip is leaving the bird uncovered for too long in some ovens which can overbrown, so watch progress and be ready to tent if necessary. Visual cues of even golden tone across the breast indicate success.
- Take the turkey out of the oven and baste it with the juices from the pan.: When you lift the bird the pan will offer shallow pools of fat and juices that smell deeply roasted; spooning them over the surface adds layers of flavor and moisture. I tilt the pan carefully and use a bulb baster or large spoon, coating the breast and legs. Avoid excessive basting which can lower oven temperature and extend cook time. The sound is quiet, a soft slosh, and the visual is glossy skin that looks freshly lacquered.
- Reduce the oven to 325 degrees F, cover the turkey with foil, and bake for another 2 1/2 – 3 hours or until the temperature in the breast reaches 160 degrees F.: In this longer phase the fat renders more thoroughly and the meat becomes tender; the oven will hum at a lower pitch and the aroma will move from sharp to deeply savory. Covering with foil prevents overbrowning while allowing the interior to cook through evenly. A frequent mistake is removing foil too early which can dry out the outer breast, so keep it tented until the final stages. Trust the thermometer rather than clock time alone, because bird size and oven variance change durations.
- Uncover, baste again, and let it brown. You can also use the broil function to make the skin crispier. Be careful not to burn the bird.: The final browning gives you that appetizing, crackly skin and intensified roasted flavor; you'll notice a richer, deeper color as the surface sugars caramelize. If your oven has a broil function you can use it sparingly to add crispness, but watch closely to prevent burning. A common error is broiling too long which creates bitter, charred spots. The sound is a quiet popping of rendered fat and the scent turns almost nutty as the skin crisps.
- Remove the turkey from the oven, cover it loosely with foil, and let it rest for at least 30 minutes.: Resting is where the juices relax and redistribute, and when you tent the bird the steam maintains warmth while letting proteins settle; the meat will feel firmer to the touch after resting. Cutting too soon causes flavorful juices to run out, resulting in drier slices, so patience here pays off. The skin will soften slightly but retain crispness, and the overall aroma mellows. Use this time to prepare accompaniments and gather carving tools.
- Transfer the bird to a serving plate and decorate it with fall veggies, fruits, and fresh herbs. Serve and enjoy!: The final presentation brings the sensory arc to a close, with vibrant citrus and herb notes complementing golden skin; choose seasonal produce for color and texture contrast. Arrange plums, roasted roots, or fresh herb sprigs to echo the flavors inside, and transfer carefully to preserve the juices. A common mistake is carving on a flimsy surface which can spill drippings, so use a sturdy board and let the bird rest until slightly cooler to handle. When placed on the platter the bird should gleam and smell inviting, ready to carve and share.
Notes
- Bring to room temperature before you start roasting, removing the turkey from the fridge for about 30 to 60 minutes helps it cook more evenly and prevents the outside from overcooking while the interior catches up.
- Trust the thermometer, not the clock; probe placement in the thickest thigh muscle gives an accurate reading and prevents overcooking or undercooking.
- Double phase roasting by starting at a higher heat then lowering it helps produce crisp skin and tender meat, the initial blast creates color while the lower slow roast finishes the interior gently.
- Under skin butter distributes fat and flavor directly onto the breast, reducing dryness and infusing herbs close to the meat for deeper results.
- Tent with foil during most of the cook to avoid overbrowning, then remove or broil briefly at the end for final crispness so you control color without sacrificing juiciness.
- Keep aromatics in the cavity like citrus quarters and herb sprigs, they emit steam that subtly flavors the interior without making the meat soggy.