Perfect Gingerbread Cookie Recipe
Perfect Gingerbread Cookie Recipe is a warm, spicy cookie that smells of molasses and ground ginger, delivering crisp edges and tender centers. This easy, crowd friendly cookie uses pantry staples and a simple chilling trick for reliable results, ideal for holiday platters and decorating sessions. Make a batch ahead and enjoy a festive treat that doubles as a fun activity for family and friends.
Equipment
- Mixer
- Mixing Bowls
- Rolling Pin
- Cookie cutters
- Baking Sheets
- Parchment paper or silicone baking mats
- Cooling racks
Ingredients
- 10 tbsp butter, unsalted, room temperature Cream thoroughly to incorporate air and provide a tender, rich base that gives cookies a soft crumb and buttery flavor.
- 3/4 cup light or dark brown sugar, packed Pack evenly to add moisture and subtle caramel-like sweetness that enhances the dough's chewiness and helps with browning.
- 2/3 cup unsulphured molasses Stir in to deliver deep, robust molasses flavor and dark sweetness while contributing moisture and chewy texture to the cookies.
- 1 large egg, room temp Whisk to bind ingredients, add structure through coagulated proteins during baking, and contribute to leavening and a tender crumb.
- 1 tsp vanilla extract Add for a warm, floral sweetness that enhances overall flavor complexity and rounds out the spice notes in the dough.
- 3 1/4 cups all purpose flour Sift or whisk to build the bulk of the dough, provide structure via gluten development, and balance moisture for proper texture.
- 1 tsp baking soda Dissolve or mix thoroughly to react with acidic components and create leavening gases that lighten the cookie during baking.
- 1/2 tsp salt Sprinkle in to balance sweetness and enhance flavor contrast while controlling overall seasoning for a pleasing taste.
- 1 tbsp ground ginger Stir into the dry mix to bring bright, pungent warmth and characteristic ginger flavor that defines the cookie profile.
- 2 tsp ground cinnamon Blend well to add sweet, woody warmth and depth, harmonizing with other spices for a classic holiday spice profile.
- 1/2 tsp ground allspice Combine into the spice mix to add mild peppery sweetness and a nuanced tropical note that complements ginger and cinnamon.
- 1/2 tsp ground cloves Integrate with the other spices to provide sharp, aromatic intensity and a lingering warmth that completes the gingerbread spice blend.
Instructions
- Beat butter in large bowl with mixer for 1 minute until smooth and creamy. Add in brown sugar and molasses and beat until combined. Scrape down sides of bowl as needed. Beat in egg and vanilla for 2 minutes.: The first scent you'll notice is the sweet, buttery aroma becoming silkier as air incorporates, creating a light, glossy texture that signals readiness. This aeration helps the cookies have a tender crumb once baked, because those tiny bubbles expand in the oven. A common mistake is using butter that is too cold, which prevents proper creaming, or butter that is too soft, which causes greasy batter. If your mixer struggles, stop and scrape the bowl to ensure even mixing and avoid overworking the fats.
- In separate bowl whisk together flour, baking soda, salt, ginger, cinnamon, allspice and cloves until combined. Add dry ingredients to the wet and mix on low speed until combined. Dough will be thick and sticky. Divide dough in half and wrap each half tightly in plastic wrap. Flatten into a disc shape and chill in fridge for at least 3 hours, up to 5 days.: Once you add the brown sugar and unsulphured molasses , the bowl fills with a rich, molasses forward aroma and the texture turns glossy and slightly sticky. This step melds sweetness with that complex, almost smoky molasses note which forms the backbone of the cookie's flavor. Overbeating here can cause the mixture to become too loose, leading to spreading during baking; stop as soon as everything looks homogeneous and scrape the sides to ensure nothing remains unmixed.
- Preheat oven to 350 degrees F. Line 2 to 3 large baking sheets with parchment paper or silicone baking mats and set aside.: By scraping, you reunite any untouched pockets of butter or sugar, so the dough bakes evenly and the texture is uniform. You will see thin streaks of darker molasses disappear into the batter when the bowl is adequately scraped. Neglecting this can produce uneven flavor pockets or little streaks of raw sugar, which may caramelize oddly in the oven. Use a flexible spatula and work methodically around the bowl for best results.
- Remove 1 disc of dough from fridge and generously flour your work surface, your hands and rolling pin. Roll out disc to 1/4” thickness and use cookie cutters to cut into shapes. Place shapes 1 inch apart on prepared baking sheets. You can re-roll the scraps to create more shapes until dough is all used up.: As you blend in the large egg and vanilla , the mixture lightens slightly and smells rounder, the egg lending structure and moisture while vanilla softens the spice edges. This emulsification ensures the fat and water phase mix uniformly, which helps the dough hold together when you add the flour. A usual error is adding a cold egg which can seize the mixture; bring eggs to room temperature to avoid this.
- Bake cookies for about 9 to 10 minutes. If using smaller cookie cutters (less than 4 inches) cook for 8 minutes, and up to 11 minutes for larger (bigger than 4 inches) cookies. Let cool for 5 minutes on baking sheet before transferring to cooling racks. Once cooled, you can decorate as desired.: When you whisk the dry mix, the fragrance of the spices becomes bright and airy, with a dust cloud of warm aromas rising. The baking soda and salt distribute evenly, which is critical so all cookies rise consistently and the seasoning is balanced. If you skip thorough whisking, you risk pockets of leavening or overly spiced bites. Take your time to fully combine for predictable results.
- Add dry ingredients to the wet and mix on low speed until combined: At low speed the flour incorporates without developing too much gluten, which keeps the cookies tender. You will notice the dough transition from sticky batter to a thicker, cohesive mass. Mixing too quickly invites excess gluten formation creating tougher cookies, so resist the urge to crank the mixer. If the dough feels excessively dry, check your flour measurement before adding liquid; if too sticky, a short chill will help.
- Dough will be thick and sticky: The texture at this stage should be dense, pliable, and slightly tacky to the touch, which tells you the balance between fats, sugar, and molasses is right. This tackiness makes rolling easier once chilled, because the dough firms up. If it is crumbly, you likely added too much flour, and if it is runny the molasses ratio may be high; adjust by chilling the dough or lightly patting in a teaspoon of flour.
- Divide dough in half and wrap each half tightly in plastic wrap: Dividing into two discs speeds chilling and makes the dough easier to handle. Wrapping tightly avoids surface dryness and keeps the flavor concentrated. An uncovered disc will form a dry skin that ruins roll out, so make sure there are no gaps in the wrap. Label the wraps if chilling multiple batches so you know how long each has rested.
- Flatten into a disc shape and chill in fridge for at least 3 hours, up to 5 days: Chilling calms the gluten and firms the fats, which makes rolling simpler and sharpens the flavor as the spices meld overnight. When you press the disc it should feel chilled and slightly firm, not rock hard. Skipping this rest often results in spreading and misshapen cutters, so plan ahead and allow the full chill time. If you must speed things up, chill until the disc is firm but give it at least one hour for reasonable results.
- Preheat oven to 350 degrees F: The scent of the oven warming creates anticipation and preheating ensures cookies bake immediately at the correct temperature, producing crisp edges and a tender center. Make sure the oven reaches temperature before baking, as placing dough in a cool oven changes spread and texture. A frequent mistake is not preheating fully, resulting in underbaked, pale cookies; use an oven thermometer if you suspect inaccuracies.
- Line 2 to 3 large baking sheets with parchment paper or silicone baking mats and set aside: Lined sheets prevent sticking and promote even browning, and the parchment helps you transfer cookies cleanly. You will notice cookies lift and slide gently on the paper, which reduces breakage and keeps shapes intact. Avoid using greased sheets, which can cause excessive spreading and darker bottoms. Rotate sheets mid bake for uniform color if your oven has hot spots.
- Remove 1 disc of dough from fridge and generously flour your work surface, your hands and rolling pin: The scent of the chilled spices will be more pronounced as the dough warms slightly. Generous flour prevents sticking, making it easy to roll without tearing shapes. Beware of overflouring, which can dry the dough and dull the spice intensity; tap excess flour off your cutters and hands.
- Roll out disc to 1/4” thickness and use cookie cutters to cut into shapes: Rolling to an even 1/4” gives consistent bake times and a balance between crisp edge and tender middle. You will hear the slight squeak of the rolling pin as it moves and see clean, sharp edges on the cut shapes. If the dough resists, let it rest a few minutes to relax the gluten; forcing it risks cracking and misshapen cookies.
- Place shapes 1 inch apart on prepared baking sheets: Leaving space allows air to circulate so cookies brown evenly around the edges. The visual cue you want is a touch of separation between shapes that will not touch as they expand. Crowding the sheet leads to merged cookies and uneven baking, so use multiple trays if needed.
- You can re-roll the scraps to create more shapes until dough is all used up: Re-rolling gives you extra cookies, though subsequent rolls yield slightly less tender results due to gluten development. The aroma will stay concentrated, and you can control thickness easily on re-rolls. Try not to re-roll more than two or three times to avoid tough cookies from overworked dough.
- Bake cookies for about 9 to 10 minutes: As they bake you will see the edges darken to a warm brown and the centers set without puffing up dramatically. The smell of ginger and molasses intensifies, and the surface will feel dry to the touch when ready. A common mistake is overbaking, which produces a uniformly hard cookie; remove them when edges are colored and centers still look slightly soft.
- If using smaller cookie cutters (less than 4 inches) cook for 8 minutes, and up to 11 minutes for larger (bigger than 4 inches) cookies: Smaller shapes need less time to set, while larger cookies retain heat and need extra minutes to cook through. Watch for a subtle deepening of color at the rim, and a gentle spring back when tapped. Relying strictly on time can mislead you, so use visual cues to judge doneness and rotate sheets if needed.
- Let cool for 5 minutes on baking sheet before transferring to cooling racks: This brief rest firms the cookies so they move without breaking, and lets residual heat finish the bake gently. You will feel the aroma diffuse as steam escapes, and the bottoms will set. If you try to move them too soon they may deform, and if left too long they can stick to the parchment; five minutes is a sweet spot.
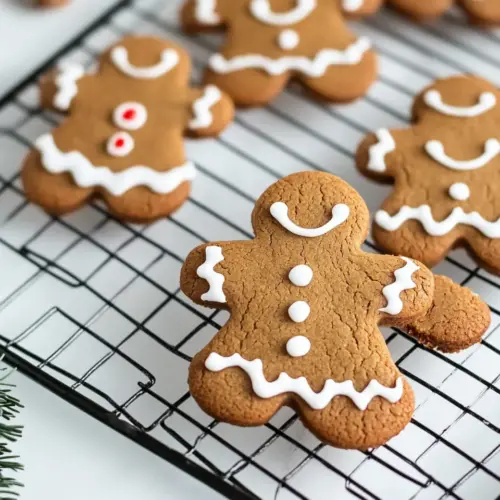
- Once cooled, you can decorate as desired: After cooling completely the surface will be matte and ready to accept icing which adheres well without sliding. Decorating adds a playful contrast in texture and visual appeal, and I enjoy the ritual of piping outlines and filling with glossy icing. If you plan to stack cookies, be sure the icing is fully dry to prevent sticking.
Notes
- Swap brown sugar depth: Use dark brown sugar instead of light for a deeper molasses flavor and richer color, which enhances the gumption of the spice blend without altering technique.
- Spice blend tweak: Increase ground ginger by a half teaspoon for extra zing, or add a pinch more ground cloves if you prefer a deeper, more aromatic profile.
- Decorating style: Try simple royal icing outlines and add sanding sugar while wet for sparkle, or keep things rustic with a dusting of sifted powdered sugar.
- Make ahead strategy: Prepare dough up to five days ahead and slice off portions to roll as needed, which spreads the work over time and keeps cookies fresher.
- Size variations: For cookie swaps, make smaller shapes and reduce bake time accordingly, giving you crisp bite sized treats that are perfect for plates of assorted cookies.