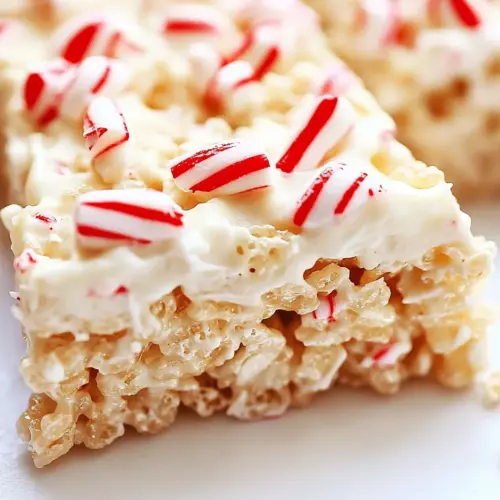
Peppermint Rice Krispies Treats
Peppermint Rice Krispies Treats are crispy, chewy, and minty, combining marshmallow clouds and crunchy rice krispies cereal with a glossy white chocolate top and crushed peppermint candies. This easy holiday dessert is perfect for last minute parties and kid friendly gatherings, offering classic textures with a festive twist. Make a batch for a crowd and watch them disappear.
Equipment
- Medium Saucepan
- Large Bowl
- 13 by 9 pan
- Microwave-safe Bowl
- Spatula
Ingredients
- 4 tablespoons unsalted butter Melted to bind the mixture and add a rich, creamy flavor; unsalted butter helps the marshmallows melt smoothly and prevents an overly salty taste. Provides moisture and a glossy finish to the treats while helping them set as they cool.
- 12 oz package mini marshmallows Melted into a sticky matrix that holds the cereal together and delivers classic sweet chewiness; mini marshmallows create the structure of the treats. Contributes sweetness and a soft, tender bite while melding with butter for easy mixing.
- 2 drops peppermint extract Added sparingly to infuse a cool, aromatic peppermint note that lifts the overall flavor; peppermint extract intensifies the holiday character without extra sweetness. Balances the richness of chocolate and marshmallow with a bright, refreshing finish.
- 6 cups rice krispies cereal Stirred in for structure and crunch; rice krispies cereal forms the bulk of the bars and provides the signature crispy texture. Absorbs the marshmallow-butter mixture to create cohesive, light, and airy treats.
- 1 cup white chocolate chips Folded in to introduce creamy sweetness and a smooth texture contrast; white chocolate chips add pockets of melt-in-the-mouth richness. Enhances the dessert’s flavor profile and pairs well with peppermint for a sweet, slightly tangy complement.
- 6 peppermint candies crushed Sprinkled or folded in to deliver crunchy bursts and concentrated peppermint flavor; crushed peppermint candies add texture and decorative color. Offers a crisp contrast and a sharp minty finish that complements the white chocolate and marshmallow base.
Instructions
- Line a 13" by 9" pan with aluminum foil or parchment paper. Set aside.: The foil or parchment creates an easy release surface and prevents sticking, so when you press the mixture in you will lift the whole slab from the pan without tugging. You should feel the cool metal or paper under your hands as you smooth the lining, and the straight edges help you judge where to press. A common mistake is to skip this and then struggle to cut neat bars, so take the extra minute to line the pan and lightly butter the liner if you want an even cleaner release.
- Butter a large bowl. Place cereal in the bowl.: Rubbing a little butter inside the bowl prevents the tacky marshmallow mixture from clinging as you combine ingredients. When the bowl is slightly glossy from the butter , pour in the rice krispies cereal , and you will notice the cereal slides more easily when you fold in the marshmallow. Avoid using too much butter , which can make the cereal greasy; a light coating is perfect.
- In a medium saucepan, melt the butter.: As the butter melts over medium heat, it will soften, foam slightly, and emit a gentle, nutty scent. This warm fat creates a shiny base for the marshmallows to dissolve into. Watch carefully because butter can go from melted to browned quickly, and browning will change the flavor profile of your bars.
- Add marshmallows and stirring often, cook until almost melted.: As you stir the marshmallows into the butter , you will hear soft crackles and see glossy blobs that gradually smooth out. Stop cooking when they are almost melted so residual heat finishes them without scorching. If you overcook, the mixture can become too thin and make the bars dense, so pull the pan off the heat at the right moment to preserve that pillowy texture.
- Remove from the heat, add the extract and stir until all of the marshmallows are melted.: Off the stove, the aroma of vanilla will linger as you add the concentrated peppermint extract . Stirring now melds the flavors without steaming away the delicate peppermint oils. Ensure the mixture is fully homogeneous to avoid pockets of unmelted marshmallows ; under stirring can produce lumps in the final bars.
- Pour the mixture over the cereal. Stir until coated.: When you pour the glossy marshmallow mass over the rice krispies cereal , you will hear a soft crackle and see the cereal glisten as it becomes enveloped. Use a gentle folding motion to coat evenly, so the flakes stay intact and airy. Overworking the cereal will crush it and create compact bars, so stir just until everything is evenly moistened.
- Press the cereal mixture into the prepared pan. Gently flatten the top.: Use a buttered spatula or lightly buttered hands to press the mixture, creating an even thickness. You should feel slight resistance as the cereal compacts, and the surface will become smooth and slightly glossy. Pressing too hard will make the bars dense, while too light a touch will leave a crumbly surface, so aim for firm but gentle pressure.
- Cool completely.: As the slab cools, the marshmallow network sets around the rice krispies cereal , and you will notice the texture firm up from tacky to sliceable. Cooling also helps the bars hold their shape when you drizzle chocolate. Cutting too soon is a common error, leading to misshapen pieces, so wait until they are fully cool to the touch.
- Place the chocolate in a heat-proof bowl and melt in a microwave.: Warm the white chocolate chips in short bursts, stirring frequently to achieve a glossy melt without seizing. You will see the chips soften, then become a pourable shine, and the smell will be sweet and creamy. Take care with microwaves that run hot, as overheated white chocolate becomes grainy and dull.
- Stir until smooth.: As you stir the melted white chocolate chips , the texture should become sleek and uniform, with no granules. This is the time to add a tiny splash of neutral oil if needed for sheen, but be cautious, because too much thins the chocolate. A common pitfall is under-stirring, which leaves streaks and an uneven drizzle.
- Spread over the top of the rice krispies treats.: Pour the warm, glossy white chocolate chips over the cooled slab and use the back of a spoon to create an even layer. The chocolate will set into a shiny shell that contrasts with the chewy base. Work quickly so the chocolate still adheres before it hardens, and avoid over-brushing which can disturb the top layer of the bars.
- Sprinkle crushed peppermint candy over the chocolate.: The moment the chocolate is still tacky, scatter the crushed peppermint candies so they stick and create a festive pattern. You will hear tiny taps as the candy lands and see color contrast against the white surface. If you wait until the chocolate is fully set, the candies will not adhere well, so time this carefully.
- Let sit until the chocolate is set.: As the chocolate cools, it will move from glossy and soft to firm and snappy. You can speed this on the counter or briefly chill, but rapid chilling can create condensation, so avoid drastic temperature changes. Patience here yields clean slices and a professional finish.
- Cut into bars and serve.: Use a sharp knife warmed briefly under hot water and wiped dry to slice neat bars. You will feel the crisp snap of the chocolate and the tender chew of the interior as you cut. If pieces crumble, the slices were cut too soon or the knife was dull, so sharpen and wipe between cuts for best results.
- Keep in an air-tight container for up to 1 week.: Stored properly, the bars retain their texture and flavor, with the chocolate maintaining its snap and the interior staying chewy. Keep them away from heat and moisture, because both will soften the chocolate or make the cereal lose its crunch. A common oversight is stacking warm bars, which creates sticking, so allow full cooling before storing.
Notes
- Use high quality marshmallows — Choose fresh mini marshmallows for the best melt and texture; stale marshmallows can become tough and grainy when melted.
- Control peppermint intensity — Start with two drops of peppermint extract and taste the cooled drizzle before adding more, since the flavor will concentrate as it sits.
- Protect the crunch — Fold the rice krispies cereal gently into the marshmallow so flakes remain intact and the bars stay light and crispy.
- Prevent seized chocolate — Melt white chocolate chips in short bursts and stir thoroughly; if it starts to seize, add a tiny amount of neutral oil to restore sheen.
- Ensure neat slices — Warm and dry your knife between cuts to achieve clean, professional looking bars without tearing.
- Make ahead and store — Store in an air-tight container at room temperature for up to one week, separating layers with parchment to avoid sticking.