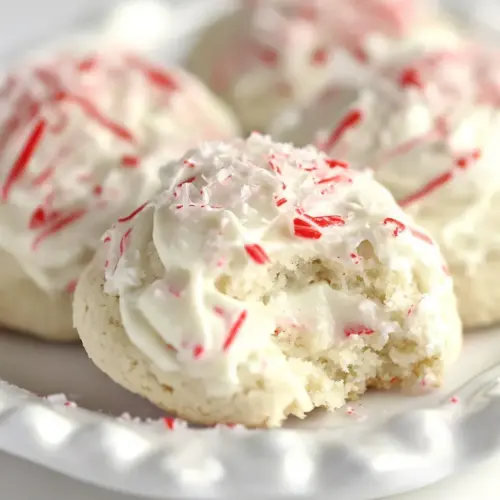
Peppermint Meltaways Cookies
Peppermint Meltaways Cookies are tender, buttery cookies with a delicate crumb and bright peppermint frosting. The texture is melt in the mouth, and the crushed peppermint adds festive crunch, making them ideal for holiday cookie swaps and easy weekend baking. Make a batch to share, because the flavor and texture keep people coming back for more.
Equipment
- Mixer
- Mixing Bowls
- Baking Sheet
- Parchment Paper
- Wire Rack
- Spatula
Ingredients
- 3/4 cup (170 g) butter, softened Cream until light and fluffy to provide the rich, tender fat base that creates a melt-in-your-mouth texture in the cookies. Impart essential flavor and help carry aromas from extracts and sugar throughout the dough. Soften to room temperature for even creaming with sugar and proper aeration.
- 1/3 cup (38 g) confectioners sugar Blend into the butter to sweeten delicately and add a fine texture that dissolves smoothly in the dough. Stabilize the creaming process so cookies remain tender and light after baking. Dust over finished cookies for a delicate snowy finish if desired.
- 1 teaspoon (5 g) Vanilla Extract Add for aromatic vanilla flavor that rounds out the sweetness and enhances other flavor notes in the cookies. Provide subtle warmth and familiarity that balances the peppermint. Measure precisely to avoid overpowering delicate peppermint notes.
- 1/4 teaspoon (1 g) Peppermint Extract Incorporate sparingly to impart a clear peppermint flavor that defines the cookie profile without becoming medicinal. Complement the vanilla and crushed peppermint candy to produce a bright, refreshing finish. Use the small amount to maintain balance and prevent bitterness.
- 1 1/4 cup (150 g) all-purpose flour Sift with other dry ingredients to form the structural framework of the cookies, supplying gluten for light cohesion while still permitting a tender crumb. Combine with cornstarch to moderate toughness and produce a delicate, crumbly texture. Measure accurately to maintain proper dough consistency.
- 1/2 cup (56 g) cornstarch Add to tenderize the dough by inhibiting gluten formation, producing a softer, meltaway consistency rather than a chewy cookie. Work with flour to create a delicate, short texture that dissolves on the palate. Ensure even distribution to avoid dense spots.
- 1/4 teaspoon (1 g) Kosher salt Season sparingly to enhance and balance the sweetness while brightening the overall flavor profile of the cookies. Counteract cloying sweetness and bring out the vanilla and peppermint notes. Dissolve evenly in the dough to avoid concentrated salty bites.
- 3/4 cup (85 g) confectioners sugar Dust over the shaped or finished cookies to add a sweet, snow-like coating that visually signals a delicate meltaway. Provide a slightly different texture on the exterior that dissolves quickly on the tongue. Use for presentation and an extra touch of sweetness.
- 1/4 cup (57 g) butter, softened Cream into the topping or finishing butter mixture to create a soft, spreadable coating that helps confectioners sugar adhere and delivers additional richness. Provide a second layer of buttery flavor that complements the base cookie without overwhelming it. Soften so it blends smoothly with extracts and sugar.
- 1/4 teaspoon (1 g) Peppermint Extract Add to the finishing butter or glaze to reinforce the peppermint theme and brighten the topping with concentrated minty notes. Work alongside the crushed peppermint to ensure consistent peppermint flavor throughout the cookie experience. Use sparingly to avoid overpowering the palate.
- 1/2 cup (106 g) crushed peppermint candy Sprinkle or press into the cookie surface to provide crunchy, intensely minty bursts and a festive appearance. Contrast the soft, meltaway interior with crisp texture and visual color. Choose finely crushed pieces to avoid large shards and ensure pleasant bite-size crunch.
Instructions
- Cream butter and confectioners’ sugar until light and fluffy. Beat in vanilla and peppermint extracts. In another bowl, whisk together flour, cornstarch, and salt. Gradually add the flour mixture into the butter mixture until well combined. Cover and refrigerate for 30 minutes.: You will hear a soft, rhythmic thrum from the mixer as the butter and confectioners sugar aerate, and after a few minutes the mixture will look paler and feel lighter when you lift the paddle. This aeration is why the cookies are tender, because trapped air expands in the oven and creates lift. Watch for a smooth, cloudlike texture without streaks of unmixed butter . A common mistake is rushing this step on low speed, which can leave small butter pockets and a dense bite, so give it the time it needs.
- Preheat oven to 350°F. Scoop cookie dough by the teaspoon and place 2 inches apart onto a parchment lined baking sheet. Bake until bottom of cookies are light brown, about 9 – 12 minutes. Remove from baking sheet to wire racks and allow to cool completely.: After creaming, adding the Vanilla Extract and Peppermint Extract will perfume the bowl immediately, releasing a bright minty scent layered over warm vanilla. Stir until the aroma is evenly distributed and the batter looks homogeneous. The why here is flavor integration, which prevents pockets of extract that would taste sharp. Avoid adding too much extract at once, since concentrated flavor can become artificial; measure precisely to keep the balance gentle.
- For the frosting, combine all ingredients in a medium bowl and beat at medium speed, scraping the bowl often, until fluffy, about 3 minutes. Spread the frosting over the cooled cookies and sprinkle with crushed candies. Store in an airtight container.: As you whisk the all-purpose flour , cornstarch , and Kosher salt , the dry mix should look uniform and slightly airy. This step ensures even distribution so the salt does not create streaks and the cornstarch blends into the flour. Whisking breaks up any lumps and helps the dry mix incorporate smoothly later. A typical pitfall is skipping this, which can yield dense spots or uneven texture, so take a minute to whisk thoroughly.
- Gradually add the flour mixture into the butter mixture until well combined: When you fold the dry mix into the creamed butter and sugars, it should transform from glossy and loose to a cohesive dough that holds together without being sticky. Use low speed or a spatula, adding the dry ingredients in portions so the dough absorbs evenly. The visual cue is a uniform, slightly satiny dough that cleans the sides of the bowl. Overmixing at this point develops gluten and will tenderize the crumb, so stop as soon as no streaks of flour remain.
- Cover and refrigerate for 30 minutes: Chilling firms the dough and allows the butter to solidify, which helps the cookies keep their shape while baking. You may notice the dough becoming noticeably firmer and easier to scoop after chilling. This step also deepens the flavors as the ingredients relax. A frequent error is skipping refrigeration, which can lead to spreading, so be patient and chill for the full time.
- Preheat oven to 350°F: As the oven warms, you will feel the kitchen shift and may catch a gentle warmth from the oven door. A stable, preheated oven ensures even rise and predictable browning. If the oven is cooler than the target, cookies may spread or bake unevenly, so always use an oven thermometer if your oven is inconsistent.
- Scoop cookie dough by the teaspoon and place 2 inches apart onto a parchment lined baking sheet: When you portion the dough, each mound should be uniform and slightly domed. Spacing them about 2 inches apart gives heat room to circulate, so they bake into round little disks rather than merging. Using a teaspoon yields small, delicate cookies that finish in the suggested time. Crowding the sheet will trap steam and cause irregular shapes, so leave space.
- Bake until bottom of cookies are light brown, about 9 to 12 minutes: As the cookies bake you may see the edges set first and the centers remain pale; look for the undersides to take on a light tan hue and for a faint, nutty aroma to emerge. The sound is subtle, a quiet stillness as moisture leaves the cookie. Pull them at the earlier end for a softer meltaway, or a couple minutes later for a slightly firmer bite. Overbaking results in a firmer, less delicate texture, so monitor closely in the final minutes.
- Remove from baking sheet to wire racks and allow to cool completely: Transferring to wire racks stops carryover baking and prevents soggy bottoms. The cookies will firm slightly as they cool and you will notice the surface become matte. Cooling fully is crucial before frosting, because warm cookies will melt the frosting and make a mess. A mistake to avoid is frosting too soon, which leads to sliding or pooling of the topping.
- For the frosting, combine all ingredients in a medium bowl and beat at medium speed, scraping the bowl often, until fluffy, about 3 minutes: The frosting should transform from gritty sugar and soft butter into a pale, airy cloud when beaten. You will see it grow slightly in volume and hear a change in the mixer tone, from heavy to lighter. Scraping ensures no unmixed pockets of confectioners sugar remain. Underbeating gives a dense, spread resistant frosting, while overbeating can make it too soft, so stop when fluffy.
- Spread the frosting over the cooled cookies and sprinkle with crushed candies: When you spread the frosting it should glide on smoothly, leaving a soft, glossy top that holds the sprinkled crushed peppermint candy . The candies add a bright crunch and a festive look. Press gently so the pieces adhere. A common slip is waiting too long to apply the candies so they do not stick, or pressing too hard and crushing the cookie beneath, so be gentle and timely.
- Store in an airtight container: Proper storage keeps the cookies tender and prevents the frosting from drying out. Layer with parchment to avoid sticking and keep them at room temperature for up to a week. If they become too soft from humidity, a short time in a cool place helps firm them up. Air exposure is the main enemy, so use a tight seal.
Notes
- Room temperature butter is easiest to cream, but not so soft that it is greasy; aim for a slightly springy feel.
- Sift confectioners sugar if it is clumpy to ensure a smooth frosting with no grit.
- Use an oven thermometer if your oven tends to run hot or cold, it will improve bake consistency.
- Prep crushed candies ahead by placing them in a sealed bag and pounding gently so they are ready when frosting is spread.
- Layer cookies with parchment in storage to prevent the frosting from sticking and to keep shapes intact.