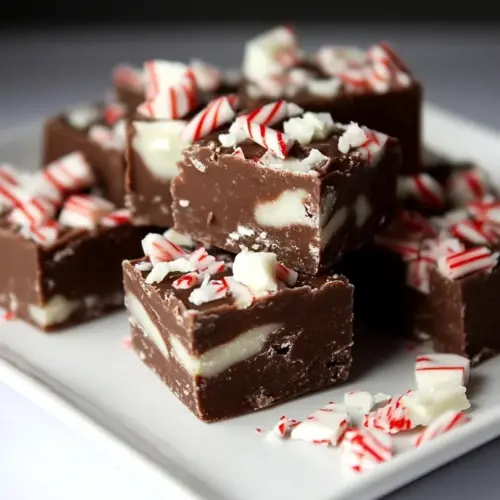
Peppermint Fudge
Peppermint Fudge is a creamy layered candy featuring a rich chocolate base and a silky white chocolate top with a crisp peppermint crunch. Easy to make and festive in presentation, this sweet is perfect for holiday gifting and parties, delivering bright minty notes and smooth texture that will charm any crowd. Make it for seasonal gatherings for a reliable, crowd pleasing treat.
Equipment
- 8 x 8-inch baking pan
- Parchment paper or aluminum foil
- Medium pan nonstick, thick-bottomed
Ingredients
- 4 tablespoons unsalted butter divided Melted and divided to control richness and texture; used to soften and bind melted chocolate for a silkier, creamier fudge consistency while providing a subtle buttery flavor when combined with the chocolate layers.
- 3/4 cup milk chocolate chips see note 1 Melted and combined with butter and part of the sweetened condensed milk to create a smooth, sweet chocolate layer; contributes milky cocoa flavor and helps set the base structure of the multi-layered fudge.
- 3/4 cup dark chocolate chips Melted alongside milk chocolate to deepen cocoa intensity and add complexity to the chocolate layer; helps balance sweetness and provides a firmer set due to darker cocoa solids.
- 1 (14-ounce) can sweetened condensed milk divided Poured and divided between chocolate layers to supply sweetness and structure; acts as the primary sweetener and liquid that helps all chocolate chips melt uniformly and gives fudge its dense, creamy body.
- 1/4 teaspoons salt divided Sprinkled and divided to enhance overall flavor balance and control seasoning; a small amount brightens chocolate flavors and keeps sweetness from tasting flat while used sparingly to avoid overpowering.
- 1 teaspoon vanilla extract Added for subtle aromatic depth and rounding of flavors; a small measure enhances the chocolate notes and melds the layers together with warm, familiar vanilla undertones.
- 1 -1/2 cups white chocolate chips Melted as the top or contrasting layer to introduce sweet, creamy white chocolate flavor; provides a pale, smooth finish and sets into a firm, velvety top layer for the peppermint element.
- 1/2 teaspoon peppermint extract Stirred into the white chocolate layer for a clear mint profile; a small amount delivers cool peppermint flavor that complements rich chocolate without adding extra sweetness.
- 3 tablespoons peppermint crunch candy topping optional, see note 2 Sprinkled on top as an optional crunchy garnish to add peppermint candy texture and decorative contrast; crushed pieces provide bright minty crunch and visual appeal to finished fudge.
Instructions
- Line 8×8-inch pan with parchment/foil, leaving an overhang for easy removal. Cut butter into tablespoons.: You will feel the satisfying weight of a well prepped pan, and the overhang makes unmolding effortless later. Make sure the parchment or foil lies flat against the sides so the fudge has clean edges, pressing gently into the corners with your fingers. If the liner wrinkles, the final squares may have uneven sides, so smooth it carefully. A common mistake is skipping the overhang, which makes removal messy and increases the chance of cracking when you try to lift the set fudge out.
- Combine 2 tablespoons butter, milk chocolate chips, dark chocolate chips, half the sweetened condensed milk (198 g), and 1/8 teaspoon salt in a thick-bottomed, nonstick pan over low heat. Constantly stir with a heat-resistant spatula, scraping the sides and bottom. Do not raise the heat—patience ensures a smooth mixture.: Working with unsalted butter in measured tablespoons ensures even melting and predictable fat distribution across the recipe. Cutting the butter ahead of time means it will incorporate quickly into the melting chocolate without leaving oily pockets. The small pieces melt faster and help you maintain very low heat, preventing scorching. Avoid adding large chunks which can create uneven melting and require higher heat, risking grainy texture.
- Once melted, take pan off heat. Mix in vanilla thoroughly. Pour into the prepared pan, smoothing into an even layer with the spatula. Refrigerate while preparing the white chocolate layer.: As these ingredients gently warm, you will notice the chocolate soften, then slowly melt into a glossy mass; the aroma deepens into warm cocoa and caramel notes from the condensed milk. Stir constantly with a heat resistant spatula, scraping the sides and bottom to prevent sticking. Low heat preserves the chocolate oils and avoids separation, producing a smooth, velvety mixture. A frequent error is turning the heat up to hurry the melt, which can cause graininess or burning.
- Clean and dry the pan. Add remaining 2 tablespoons of butter, white chocolate chips, rest of the sweetened condensed milk, and 1/8 teaspoon salt. Heat on low, stirring constantly. After melting, remove from heat, add peppermint extract, and mix well. Pour over chilled fudge, spreading evenly to cover the bottom layer.: The constant motion yields a uniform texture and prevents hotspots which can cause the chocolate to seize. You will hear soft, continuous motions of the spatula and see the mix become glossy; keep scraping the pan so nothing scorches. Patience here creates the sheen and finish you want, and it also helps you notice small lumps early so you can adjust the heat. If you stop stirring for too long, localized burning can occur, leaving bitter spots in the base.
- Sprinkle Peppermint Crunch candy over fudge, pressing gently. Cover and refrigerate 4–8 hours until firm.: Maintaining low heat is critical because rapid temperature spikes force cocoa solids to clump and fat to separate. Gentle warmth lets ingredients marry into a silky emulsion. While it may be tempting to speed things up, you will sacrifice texture if you increase the heat. A common pitfall is trying to rescue a scorched pan by turning the heat higher, which compounds the problem rather than fixing it.
- Remove fudge using the parchment overhang. Cut into small pieces using a hot, sharp knife (run knife under hot water and dry it).: Removing the pan from the heat at the right moment prevents residual warmth from overcooking the chocolate, preserving gloss and body. After you pull it off, continue stirring for a few seconds to smooth any final streaks and to let the temperature even out. This resting action also keeps volatile flavors like vanilla from dissipating when added. Leaving the pan on the heat too long will thin the mixture excessively and make it harder to set properly.
- Mix in vanilla thoroughly: Adding vanilla extract off the heat preserves its aromatic lift, and stirring it in distributes the rounded flavor across the entire base. You will notice the scent bloom as the vanilla blends with warm chocolate, enriching the overall profile. Take care to stir just until incorporated so you do not accidentally heat the extract. A mistake is adding vanilla while the pan is still hot enough to evaporate aromatics, which reduces its impact.
- Pour into the prepared pan, smoothing into an even layer with the spatula: When you pour the warm base, it should flow and level with gentle encouragement from the spatula, forming a uniform foundation for the white layer. Smooth it into corners so the top layer will sit evenly; small ridges can trap air and cause gaps later. Tap the pan lightly on the counter to release bubbles. If you leave the layer uneven, the white chocolate may pool in low spots and create inconsistent thickness.
- Refrigerate while preparing the white chocolate layer: Chilling firms the base so the white layer will sit neatly on top rather than blending in. You will feel the temperature change through the pan, and the surface will turn from glossy to matte when it is sufficiently cool. This step also speeds up the overall process because a chilled base requires less time to set fully after both layers are combined. Skipping refrigeration risks the layers merging and losing the defined contrast you want.
- Clean and dry the pan: Removing any residual base mixture prevents cross contamination and ensures the white layer is poured into a clean environment. Wipe or rinse thoroughly, then dry completely; even a small amount of water can cause white chocolate to seize when heated. A damp pan also cools the white mixture unevenly on contact. The common error here is not drying the pan fully, which can lead to textural issues in the white layer.
- Add remaining 2 tablespoons of butter, white chocolate chips, rest of the sweetened condensed milk, and 1/8 teaspoon salt: When you combine these ingredients, the white chocolate will melt into a creamy, luscious mixture; the scent will shift toward sweet, creamy notes with a buttery undertone. Use low heat and constant stirring to achieve a glossy, pourable consistency. This combination creates the top layer’s structure and sweetness, so even melting is essential. If you rush the process, the white chocolate may become grainy or separate.
- Heat on low, stirring constantly: Low, steady heat ensures the white chocolate melts smoothly without scorching. You will see the chips collapse and become thick, then gradually loosen into a satin sauce. Stirring keeps the texture uniform and prevents little bits from forming. An easy-to-make mistake is using too high heat, which can cause fat to separate and leave the mixture oily rather than creamy.
- After melting, remove from heat, add peppermint extract, and mix well: Adding the peppermint extract off the heat preserves its bright, cooling character. Stir thoroughly so the mint aroma disperses through the white layer, giving that signature holiday lift. Allow a moment for the steam to calm so the extract does not dissipate. A typical error is over adding peppermint, which creates a medicinal intensity rather than a subtle lift.
- Pour over chilled fudge, spreading evenly to cover the bottom layer: The white layer should flow into a smooth cap that conceals the base, and you can use the spatula to coax it into corners for uniform thickness. Visually, you will want a clean line between layers, so pour slowly and spread gently. If the base is not cold enough, the layers can blend, so ensure the bottom layer is chilled. Pouring too quickly may cause the layers to merge or create an uneven top.
- Sprinkle Peppermint Crunch candy over fudge, pressing gently: The topping adds bright color and crunchy texture, pressed lightly so it adheres without sinking. The sound of the crystals settling is crisp, and the contrast enhances each bite. Distribute the topping evenly for consistent texture in every piece. Applying too much pressure can force bits into the white layer and create divots, so press just enough for adhesion.
- Cover and refrigerate 4–8 hours until firm: The waiting time is when the fudge sets into clean, sliceable squares. The refrigerator cools the fats and chocolate, transforming glossy spreads into firm, tactile bars. Allow the full chill time for best texture; cutting too early can cause smearing or soft centers. One mistake is impatience, cutting before the fudge is fully firm, which ruins neat presentation.
- Remove fudge using the parchment overhang: Lifting the fudge by the overhang keeps edges intact and simplifies transferring to a cutting board. The feel of a solid slab coming away from the pan is satisfying, and you will see crisp layer separation. If the overhang was omitted, scooping out pieces can damage the sides, so always line the pan first.
- Cut into small pieces using a hot, sharp knife (run knife under hot water and dry it): A warm, dry knife slices cleanly through both layers, producing neat squares and avoiding crumbly edges. Heat the blade between passes so it glides, wiping it dry each time to prevent water from touching the fudge. The visual is a clean surface with tidy, glossy cross sections. Common mistakes include using a dull knife or a cold blade, both of which tear the fudge and leave ragged edges.
Notes
- Choose quality chocolate: Higher quality milk chocolate chips and dark chocolate chips will give a cleaner flavor and better mouthfeel, reducing graininess when melted gently. I prefer chips with fewer stabilizers because they melt into a smoother mass.
- Don’t rush the melt: Slow, steady heat prevents separation and yields a glossy finish. If the mixture looks grainy, remove from heat and stir patiently until it smooths out, rather than increasing temperature to fix it.
- Crush candy consistently: For the peppermint crunch, aim for mostly fine crumbs with a few larger shards so you get a mix of texture and visual interest. I use a double bag and rolling pin to control the size easily.
- Use a scale for accuracy: Weighing the portion of sweetened condensed milk ensures both layers receive the intended ratio and helps the fudge set predictably. Measuring by volume can introduce small but impactful variance.
- Chill in a flat area: Place the pan on a level shelf in the fridge so the layers set evenly. An uneven surface can cause slanted layers or pooling in low spots.
- Pack for gifting: Store squares in parchment lined tins with layers separated by parchment inserts to keep the crunch intact. I label the container with the date so recipients know how fresh it is.