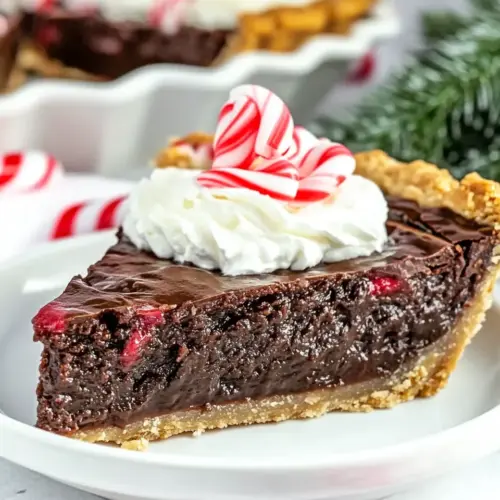
Peppermint Chocolate Chess Pie
Peppermint Chocolate Chess Pie combines a creamy, custard like chocolate filling with bright peppermint pieces for a festive winter dessert. This easy to love pie is rich yet balanced, perfect for holiday gatherings or an easy weeknight treat that feels special. Make it for its glossy set and minty crunch, you will want to serve it at every seasonal celebration.
Equipment
- Pie Plate
- Oven
- Whisk
- Mixing Bowl
Ingredients
- 1 recipe pie crust (or store bought) Use to line and support the pie, providing a flaky or tender base that holds the filling during baking and serving. Blind-bake briefly if needed to prevent a soggy bottom and ensure even cooking of the custard-like center. Choose a homemade crust for richer flavor or a store-bought crust for convenience without affecting the filling mechanics.
- 1/4 cup (57 g) unsalted butter melted Melt to add richness, smoothness, and glossy mouthfeel to the chocolate custard while helping dissolve sugar and cocoa for uniform texture. Incorporate while warm so it blends evenly with the eggs and dry ingredients, contributing to a tender set and pleasant flavor depth.
- 1/4 cup (20 g) unsweetened cocoa powder Sift or whisk into the batter to provide intense chocolate flavor without adding extra fat, helping to deepen color and balance sweetness. Combine with sugar and butter so it hydrates properly and disperses evenly, preventing clumps and ensuring a smooth custard.
- 3 large eggs Beat to provide structure and thicken the custard through coagulation of proteins as it bakes, creating the classic firm yet slightly jiggle texture of a chess pie. Whisk thoroughly with the sugar and other wet ingredients to incorporate air and ensure an even, stable set.
- 1 1/2 cups (300 g) granulated sugar Dissolve to sweeten and tenderize the filling while promoting a glossy, set custard as sugars caramelize slightly during baking. Measure carefully to maintain the delicate balance between sweet and rich chocolate-peppermint flavors and to influence the final texture of the pie.
- 1/4 teaspoons salt Season to enhance and balance the sweetness, drawing out the chocolate and peppermint flavors while subtly sharpening the overall taste. Use precisely to avoid overpowering the dessert, allowing the other components to shine.
- 1 teaspoon vanilla Add to flavor the custard with warm, aromatic notes that complement chocolate and peppermint, elevating the overall taste profile. Mix in with the wet ingredients for even distribution so every bite carries a hint of vanilla depth.
- 1/2 cup (118 ml) milk Pour to provide moisture and loosen the custard into a pourable consistency, contributing to a smooth, creamy texture once baked and set. Use full-fat or reduced-fat milk according to preference, understanding fat content will slightly affect richness and mouthfeel.
- 2 tablespoons (16 g) all-purpose flour Whisk to thicken and stabilize the filling by absorbing some liquid and preventing separation, contributing to a silky, cohesive custard. Use all-purpose flour sparingly and blend well to avoid lumps that could create texture inconsistencies in the baked pie.
- 3/4 cup peppermint baking pieces see note Fold in to introduce refreshing peppermint bursts and crunchy texture contrasts that complement the chocolate custard, distributing flavor throughout the pie. Add according to taste and consider reserving a few pieces for sprinkling on top for visual appeal and extra peppermint intensity.
- Whipped cream and crushed candy canes for garnish optional Garnish optionally to add light creaminess and festive crunch while balancing the rich, dense filling with airy texture and extra peppermint flavor. Apply just before serving to maintain whipped cream volume and to keep crushed candy canes crisp and decorative.
Instructions
- Preheat oven to 350°F. Unroll pie crust and place it into pie plate. Chill until ready to fill.: As the oven warms you should notice a faint oven smell that signals it is reaching temperature, and the chilled crust will relax into the plate without shrinking; chilling the crust keeps the fat cold so the edges stay flaky. If the crust feels warm or tacky, return it to the refrigerator for ten to fifteen minutes, because a warm crust can slump during blind baking and result in a dense edge. A typical mistake is rushing this step, which can cause an uneven crust, so take the few extra minutes to keep everything cold.
- Whisk butter and cocoa. Whisk in eggs. Add sugar, salt, vanilla, and flour and whisk until smooth. Gently whisk in milk. Stir in peppermint baking pieces.: Right away you will smell the chocolate lift as the butter and cocoa combine, giving a toasted cocoa aroma. Be mindful when adding the eggs to the warm butter; let the butter cool briefly or whisk briskly so the eggs do not scramble. The batter should become glossy as the sugar dissolves, and small streaks of air will settle out with a few quiet stirs. Fold in the peppermint pieces at the end to keep them intact; overmixing can pulverize them and make the filling streaked rather than dotted. One common error is not fully dissolving the sugar, which can leave a grainy texture, so whisk until smooth and check the bottom of the bowl for undissolved crystals.
- Pour batter into prepared pie shell. Bake for 45-55 minutes until it’s just slightly jiggly in the center and no longer glossy on top. Cool completely before slicing and topping.: As the pie bakes you will see the edges set first, turning a matte, satiny sheen while the center retains a subtle wobble; listen for a very gentle popping of tiny bubbles near the surface, and expect a sweet, chocolatey perfume. The visual cue of losing the glossy top paired with a slight jiggle in the middle is your signal to remove it from the oven. If you bake until it is fully firm with no jiggle you risk a dry, rubbery texture, so err on the side of a tender center. Cooling is crucial, because the filling firms as it chills; slicing too soon will cause the filling to be overly soft and messy on the plate.
- Serve with whipped cream or Cool Whip and crushed candy canes.: The final step is about contrast, and when you add a dollop of whipped cream you introduce a cool, airy note against the dense custard. The crushed candy cane provides a crunchy, minty counterpoint and a festive look. For best presentation, spoon the cream gently so you do not disturb the slice, and sprinkle crushed candy canes immediately before serving so they maintain their crispness. A typical misstep is over topping, which can overwhelm the delicate chocolate mint balance, so use garnish sparingly.
- Store pie in refrigerator for up to 2 days or freeze for up to one month.: Once cooled, the pie will keep its texture in the refrigerator , but you should cover it loosely to prevent the whipped topping from absorbing fridge odors. If you plan to freeze, wrap the pie tightly in plastic and foil to protect it from freezer burn; thaw overnight in the refrigerator to maintain its creamy structure. A common mistake is storing the pie at room temperature for long periods, which can cause the filling to weep or develop an off texture, so refrigerate promptly for best results.
Notes
- Swap crust style: Use a graham cracker crust for a sweeter, slightly crunchy base that complements the chocolate and peppermint, keeping bake time similar but watch for a softer edge where the crust meets the filling.
- Peppermint alternative: If you cannot find peppermint baking pieces, use the recommended half teaspoon peppermint extract, but add it cautiously because extracts concentrate quickly and can overpower the filling.
- Make ahead strategy: Bake the pie a day ahead and refrigerate uncovered until firm, then cover and garnish the day of serving to keep the topping crisp.
- Freezer handling: To freeze, wrap tightly in plastic and foil; thaw slowly in the refrigerator to maintain the silky custard texture and avoid condensation on the surface.
- Lower sugar tweak: Reduce sugar by up to a quarter cup if you prefer a less sweet pie, but expect a slightly softer set; you may need an extra five to ten minutes baking time to compensate.
- Presentation option: For a refined finish, pipe stabilized whipped cream in small rosettes around the edge and sprinkle with finely crushed candy cane for a delicate festive touch.