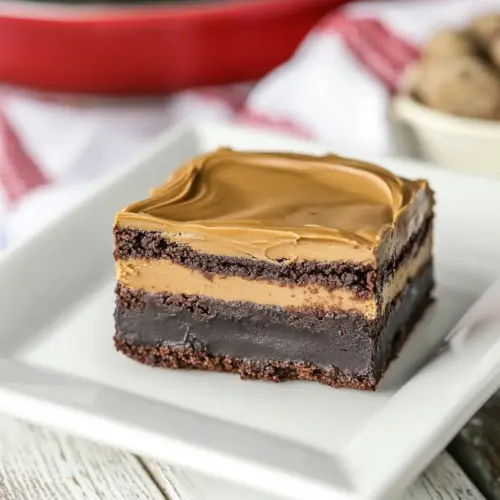
Peanut Butter Truffle Brownies
Peanut Butter Truffle Brownies are rich, fudgy, and intensely chocolatey with a creamy peanut butter truffle layer and glossy ganache. This indulgent treat blends deep cocoa flavor with the comfort of peanut butter, perfect for gatherings or an easy weeknight dessert that feels special. Make a batch to share and enjoy the layered textures and decadent finish.
Equipment
- Mixing Bowl
- Microwave
- 9 x 13-inch pan
- Offset Spatula
Ingredients
- 1 cup butter Melted and rich, provides the fat needed for a tender, fudgy crumb and delivers moistness throughout the brownie batter. Helps carry flavor and contributes to a glossy, crackly top when properly creamed with sugar. Also aids in dissolving cocoa and evenly distributing heat during baking.
- 2 cup s sugar Granulated and sweet, balances the cocoa's bitterness while contributing to structure by dissolving into the wet ingredients. Encourages a shiny crust and helps trap air when mixed, which affects the final texture. Can be adjusted slightly for sweetness preference but impacts moisture and chewiness.
- 3 eggs Beaten until just combined, contributes to leavening and structure by coagulating proteins that set the brownie matrix. Adds richness and moisture while helping emulsify the batter when combined with fats. Should be mixed in gently to avoid over-aeration, which can change density.
- 1 tablespoon vanilla Fragrant and sweet, enhances overall flavor depth and complements both chocolate and peanut butter notes in the brownies. Small amounts intensify aromatic perception without adding moisture or texture. Best added with wet ingredients to evenly disperse the flavor.
- 2/3 cup cocoa powder Dry and bitter, provides the concentrated chocolate flavor and dark color essential to classic brownie taste. Binds with fats to create a smooth, chocolatey batter and influences overall intensity; sift to avoid lumps. Can be adjusted for darkness but will change sweetness balance.
- 1 cup flour All-purpose and neutral, supplies the primary structure through gluten formation once hydrated and mixed. Helps give the brownies body without overwhelming tenderness; careful not to overmix to maintain fudgy texture. Works with leaveners to create slight rise and chew.
- 1/2 teaspoon salt Fine and mineral, enhances the overall flavor by balancing sweetness and strengthening gluten slightly for structure. Prevents blandness and helps control yeast or chemical leavening reactions in the batter. Use precise measurement to avoid making the brownies overly salty.
- 1/2 teaspoon baking powder Powdered and reactive, causes gentle lift by releasing carbon dioxide when combined with moisture and heat, contributing to a slightly lighter brownie. Balances density so brownies remain fudgy yet sliceable, especially when used sparingly. Ensure even distribution to avoid uneven rise.
Instructions
- Preheat oven to 350º.: The kitchen fills with a faint warmth as the oven approaches 350º . You want an even, consistent heat so the edges set while the center stays fudgy. If the oven is cooler than expected, the brownies may bake longer and dry out, so use an oven thermometer if yours runs hot or cold. Avoid opening the door often, which drops the temperature and can cause uneven rise.
- Line a 9 x 13-inch pan with non-stick foil. Set aside.: Lining the pan gives you a smooth surface and makes lifting the finished slab easy. Press the foil into the corners and smooth the surface, so the batter spreads evenly and the top finishes flat. If the lining is wrinkled, the top may have ripples after baking. Be careful not to create gaps where batter can leak out.
- In a large microwave-safe bowl, melt the 1 cup butter in the microwave.: As the butter melts, it will hiss slightly and transform into a golden pool with a buttery aroma. Let it cool for a minute so it is warm but not scalding before adding eggs . Too hot butter can cook the eggs on contact, creating lumps. A common mistake is overheating, which can separate the fats and change texture.
- Mix in sugar, then eggs and vanilla.: When you stir in the sugar , the mixture becomes thicker and glossy, and folding in the eggs and vanilla yields a slightly aerated batter. The sugar starts to dissolve in the warm butter , helping with a shiny top. If you add cold eggs , the batter can seize slightly, so use room temperature eggs for the smoothest blend.
- Sift the cocoa powder into the egg mixture, along with the salt and baking powder. Mix well.: Sifting ensures the cocoa powder integrates smoothly without lumps, and the dry ingredients release a deep cocoa scent as they are incorporated. The baking powder and salt disperse uniformly, supporting even rise and balanced flavor. Skipping sifting risks pockets of dry cocoa powder in the baked brownies, which affects texture.
- Add flour and mix till just combined. Scrape into prepared pan and smooth top.: When you add the flour , the batter will thicken and take on a velvety, dense texture. Mix only until you no longer see streaks of flour , to avoid developing too much gluten which would make the brownies chewy in an undesirable way. A frequent error is overmixing, which tightens the crumb.
- Bake for about 25-30 minutes. Cool completely.: As you transfer the batter to the lined pan, use a spatula to spread it evenly, watching for air pockets or uneven thickness. A smooth top bakes evenly and gives you clean squares after cutting. If the batter sits lopsided, one side may finish earlier than the other. Tap the pan gently to release large air bubbles.
- While the brownies are cooling, mix together the filling ingredients.: The kitchen will slowly fill with a warm chocolate fragrance, and the edges will set while the center should still feel slightly soft. Use a toothpick in the center; a few moist crumbs indicate a fudgy interior. Overbaking makes the brownies dry, while underbaking leaves them too gooey to hold a truffle layer. Rotate the pan halfway through if your oven has hot spots.
- Beat until smooth adding the extra teaspoon of milk if needed. The mixture should be spreadable. Spread filling evenly over cooled brownies.: Cooling lets the crumb settle and the structure firm up, which is essential before adding the filling. The surface will lose its initial sheen and become easier to spread upon. If you try to top warm brownies, the filling and ganache will sink in or melt, so be patient. A common impatience error is rushing this step and ruining the clean layers.
- Chill for at least 30 minutes.: As you whisk the filling, it should take on a creamy texture, and the scent of peanut butter will become prominent. Mixing at a moderate speed ensures a smooth, spreadable consistency without aerating it too much. If the filling is too thick, a teaspoon of milk can loosen it; if too thin, chilling briefly will firm it up.
- While the filling is cooling, make ganache by melting the chocolate chips, butter, shortening, and cream (if using) together gently in the microwave.: The filling should be glossy and easily spreadable, with a dense, creamy mouthfeel. If you add milk, do so sparingly and stop as soon as you reach the right spreadable texture. Over thinning makes it slide off the brownies when chilled. Watch for lumps and beat them out for a uniformly smooth layer.
- Stop and stir at 30-second increments, till melted and smooth.: As you spread, the filling should glide across the surface and create an even layer that will set firmly in the fridge. Try to keep a consistent thickness for neat slices. Uneven filling leads to messy servings and inconsistent bites. Use a small offset spatula for control.
- Put dollops of ganache over the filling and carefully spread it across the filling with a small offset spatula. Return to refrigerator to set topping.: The fridge cools everything down and firms both the brownie and the filling, so the top layer will sit nicely without shifting. You will notice the glossy finish dull slightly as it sets. Skipping sufficient chilling is why some toppings run or sag when sliced.
- While the filling is cooling, make ganache by melting the chocolate chips, butter, shortening, and cream if using together gently in the microwave: The ganache should be silky and pourable, with a rich chocolate aroma. Heat in short bursts and stir between intervals so the mixture becomes smooth without seizing. If you overheat, the chocolate can become grainy, so patience and short intervals are key. A seized ganache can sometimes be rescued with a little warm cream.
- Stop and stir at 30-second increments till melted and smooth: Frequent stirring encourages a uniform melt and a glossy finish, and the sound will go from faint bubbling to quiet as it smooths. The final texture should coat the back of a spoon and shine. If you fail to stir often, parts may overheat while others remain solid, producing a lumpy ganache.
- Put dollops of ganache over the filling and carefully spread it across the filling with a small offset spatula: The ganache should flow and level into a glossy top, creating a sleek final layer. Working quickly but gently gives you a uniform finish and prevents the ganache from streaking into the filling. If you press too hard, the ganache can dig into the filling and create unevenness. Smooth from center to edges for the neatest look.
- Return to refrigerator to set topping: As the ganache cools, it will firm to a satiny finish, and you will see the shine dull to a set surface that still yields to the touch. Proper chilling ensures clean squares when you slice. If you slice too soon, the topping will smear, so allow adequate time to set for neat presentation.
Notes
- Measure flour properly, spoon and level the flour into your cup to avoid packing which can lead to dense brownies. Accurate measuring keeps the crumb fudgy rather than heavy.
- Control bake time, check at the earlier end of the window so you can aim for fudgy centers. Remove when a few moist crumbs cling to a toothpick for the best texture.
- Let layers cool, always cool the brownies completely before adding filling and chill again after ganache. Patience prevents melting and sliding of layers.
- Use quality cocoa, since the cocoa powder is the primary chocolate flavor, a good one makes a noticeable difference in depth and aroma.
- Warm the ganache slightly before stirring, this helps achieve a silky finish. Stirring regularly during heating prevents hot spots and seizing.
- Cut with a hot, clean knife, dip and wipe the knife between cuts for the neatest squares with glossy edges.