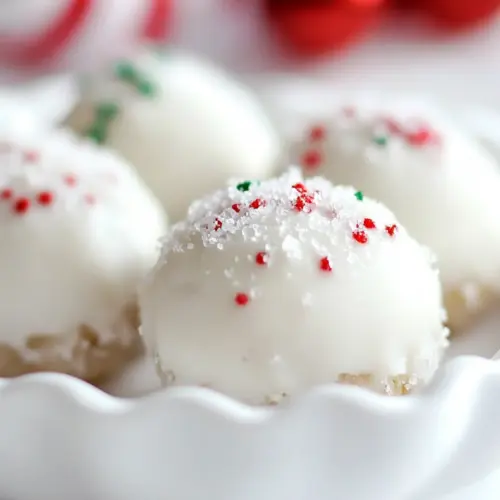
Peanut Butter Snowballs
Peanut Butter Snowballs are creamy, crisp little treats that combine smooth peanut butter centers with a shiny vanilla candy shell. Easy to make and perfect for holiday gatherings, these bite sized delights offer a sweet contrast of textures and simple ingredients, making them an ideal easy party dessert to whip up in under an hour. Their festive look makes them hard to resist.
Equipment
- Mixing Bowl
- Baking Sheet
- Wax paper
- Spoon or spatula
- Small scoop or hands
- Saucepan or microwave safe bowl for melting coating
Ingredients
- 1/2 cup creamy peanut butter Provide creaminess and nutty flavor while binding the dough; helps create soft, cohesive centers for the snowballs and adds richness to balance sweetness. Incorporate at room temperature for easier mixing and a smoother texture.
- 3 tablespoons butter, softened Add creaminess and mild dairy fat to lighten the peanut butter; offers pliability for rolling and contributes subtle richness that improves mouthfeel. Soften before mixing to ensure even distribution throughout the dough.
- 1 cup powdered sugar Sweeten and stabilize the mixture while absorbing excess oil; creates a powdered exterior that firms up the centers and helps achieve the signature sweet, smooth interior. Sift or add gradually to prevent lumps and reach desired consistency.
- 1 pound vanilla candy coating Coat and set the assembled balls with a sweet, firm shell that provides structure and a glossy finish; melts for dipping then hardens to protect the centers and add visual appeal. Temper slightly if needed to avoid cracking and ensure an even, durable coating.
- Christmas sprinkles Decorate with festive color and a crunchy contrast; sprinkle over the coating before it sets to add holiday flair and a slight textural bite. Use sparingly for an attractive finish without overwhelming sweetness.
Instructions
- Combine sugar, peanut butter, and butter in a bowl mixing until dough forms.: The bowl will quickly become fragrant with nutty peanut butter , and you should feel the mixture turning from separate ingredients into a cohesive, slightly tacky dough. Mix until no dry streaks of powdered sugar remain and the surface looks smooth. You want a consistency that holds together when squeezed but is not greasy. If the dough seems crumbly, it indicates the butter may be too cold, or the peanut butter needs a stir; add a touch more peanut butter to bring it together. Avoid overmixing, as that can warm the fats and make the dough too soft.
- Shape into 1-inch balls and place on a baking sheet lined with wax paper. Chill for 30 minutes.: Rolling the dough into uniform balls ensures even chilling and a consistent bite. The smoothness of the ball's exterior matters because bumps can cause the coating to pool unevenly. As you roll, you will notice the dough becoming slightly firmer from the heat of your hands; if it gets too soft, briefly chill your palms or the mixture. A common mistake is making balls too large, which changes the bite and chilling time, so aim for roughly 1 inch in diameter.
- When done chilling, melt candy coating according to package directions until smooth and dip balls coating them completely. Allow excess to drip off and place back on waxed paper-lined baking sheet.: Chilling firms the centers so they hold their shape during dipping. You will feel the texture change from pliable to slightly firm, and the surface will stop sticking to your fingers. This step reduces the risk of the centers falling apart in the warm candy coating. If you skip or shorten chilling, the balls may absorb too much coating or become misshapen. Place them in a single layer to ensure uniform cooling, and resist the urge to crowd the pan.
- Top with sprinkles and chill for an additional 15-20 minutes. ENJOY!: The melted vanilla candy should be glossy and flow easily off a spoon. Dip each chilled ball and watch the coating wrap it like a thin shell, then lift and let excess drip off. The visual cue to stop dripping is when the coating forms a smooth surface without streaks or gaps. Overheating the coating can cause it to thicken or seize, so follow the package heat guidelines closely. If the coating becomes grainy, remove it from heat briefly and stir gently to restore smoothness.
- Allow excess to drip off and place back on waxed paper lined baking sheet: After dipping, set each snowball back onto the wax paper and listen for a faint settling sound as the coating calms. The underside should set without flattening; if you see puddles forming under the balls, it means too much coating was used or the center was too warm. Use a fork or dipping tool to gently lift and release any pools, ensuring an even base. Avoid touching them until the coating firms, because fingerprints will mar the finish.
- Top with sprinkles and chill for an additional 15 20 minutes: Sprinkles adhere best when the coating is still tacky, so apply them immediately after placing the dipped balls onto the sheet. The short final chill locks the coating into a crisp shell and helps sprinkles settle without sinking. Expect a subtle cracking sound when you bite in after chilling, signaling a set shell and soft interior. A typical pitfall is waiting too long to add sprinkles, which results in poor adhesion, or placing them on coating that is too hot, which causes colors to bleed.
Notes
- Use creamy peanut butter, not natural: Regular creamy peanut butter gives a smooth texture that blends predictably with powdered sugar, preventing oily or crumbly dough.
- Soften butter to room temperature for easy mixing: Room temperature butter combines smoothly without leaving lumps, giving a tender center.
- Measure powdered sugar by spooning into the cup: This avoids packing and keeps the sweetness balanced and the texture light.
- Melt candy coating gently following package timings: Low controlled heat keeps the coating glossy, avoiding a grainy finish that spoils the appearance.
- Chill on a single layer so air circulates evenly: Crowding the tray can cause uneven chilling and misshapen balls.
- Use a cookie scoop for uniformity: A small scoop ensures consistent size, which helps with even setting and appearance.
- Work near the fridge so you can quickly return trays to chill between batches: This keeps centers firm and prevents coating issues.
- Apply sprinkles immediately while coating is tacky: This ensures they adhere cleanly without falling off later.
- Store in a cool, dry place in an airtight container to maintain texture: This keeps the shell crisp and the center soft for days.
- Freeze for longer storage in a freezer safe container for up to two months: Thaw at room temperature before serving for best texture.