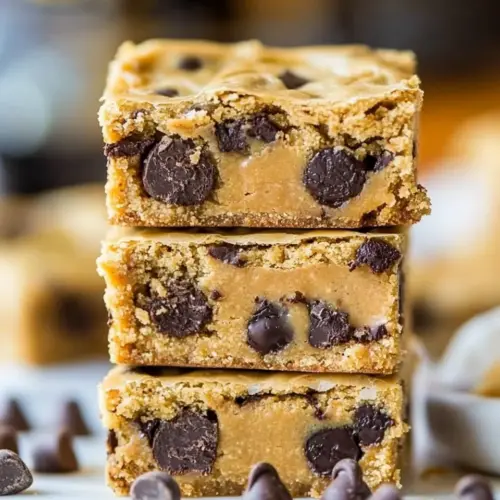
Peanut Butter Chocolate Chip Nutter Butter Bars
Peanut Butter Chocolate Chip Nutter Butter Bars are a rich, chewy traybake with creamy peanut butter and pockets of melted chocolate chips, studded with crunchy Nutter Butter cookies. This easy, nostalgic dessert is perfect for bake sales, parties, or an indulgent afternoon treat, delivering gooey centers and crisp edges in every square. Make it for its comforting textures and crowd pleasing flavor.
Equipment
- Baking pan 8x8 inch
- Aluminum Foil
- Microwave-safe Bowl
- Spatula
- Measuring Cups
Ingredients
- 1/2 cup unsalted butter, 1 stick, melted Melted provides fat and moisture to bind the batter while contributing a tender, rich texture and slight crisping at the edges when baked. Used warm so it blends smoothly with sugar and peanut butter, creating a cohesive base for the bars.
- 1 large egg Beaten adds structure and lift by incorporating air and setting as it cooks, yielding a slightly cake-like crumb and helping to bind the other wet ingredients together. Use at room temperature for optimal emulsification with the melted butter and sugar.
- 1 cup light brown sugar, packed Packed lends sweetness and a subtle molasses note that deepens the flavor profile and adds chewiness to the finished bars. Measuring it packed ensures consistent sweetness and moisture content for the batter.
- 1 tablespoon vanilla extract Aromatic enhances overall flavor by providing warm, rounded notes that complement both chocolate and peanut butter, balancing sweetness and richness. Vanilla also helps meld the other flavors into a more harmonious finished product.
- 1/2 cup creamy peanut butter Creamy contributes concentrated peanut flavor, fat, and smoothness that enrich the batter and reinforce the peanut-butter cookie components of the bars. Its texture helps create a cohesive filling and tender mouthfeel.
- 3/4 cup all-purpose flour Starchy supplies structure and bulk to the bars by forming the gluten network when mixed, helping to set the crumb while keeping the bars tender when combined with the right proportion of fats. All-purpose flour ensures a balanced chew without making the bars too dense.
- 10 Nabisco Nutter Butter Cookies Crunchy provides a distinct nut-butter cookie texture and concentrated peanut flavor when chopped or layered whole, adding contrast to the soft, chewy batter. Using a recognizable branded cookie delivers a familiar flavor profile and nostalgic element to the bars.
- 1 cup semi-sweet chocolate chips, divided Melting contributes the chocolate coating and pockets of sweetness; dividing allows some to be mixed in for pockets of chocolate and some to be melted for a glossy drizzle or topping. Semi-sweet balance prevents the bars from becoming overly sweet while giving rich chocolate flavor.
Instructions
- Preheat oven to 350 F. Line an 8-by-8-inch baking pan with aluminum foil, spray with cooking spray; set aside.: You will notice the oven beginning to hum as it reaches temperature, and a consistent hot air flow is vital for even browning. Getting the pan lined and greased now prevents sticking and makes removing the bars simple after baking. A common mistake is skipping the foil and struggling to remove squares later, so take the minute to prepare the pan carefully. Ensure the foil is pressed into the corners so the batter spreads evenly without pooling in creases.
- In a large, microwave-safe bowl melt the butter, about 1 minute on high power.: As the butter melts you will see it go from solid to glossy liquid, and the warm, dairy aroma signals readiness. Stir briefly to ensure even heat distribution and to check there are no unmelted pockets. A trap is overheating, which can make the butter splatter or burn; heat in short bursts and stir between intervals for control. Let it sit so the surface calms before adding other ingredients.
- Wait momentarily before adding the egg so you don’t scramble it. Add the egg, brown sugar, vanilla, and whisk until smooth.: Right after the butter melts, take a breath and let it cool slightly; you will avoid a scrambled texture and instead create a glossy, emulsified mixture. As you whisk, you should feel the mixture thicken and smooth under the whisk, and the smell will shift to sweet and toasty. If the mixture looks grainy, keep whisking until it smooths out. A common slip is adding the egg too soon, which yields cooked flecks, so always pause briefly after heating fats.
- Add the peanut butter and stir until smooth.: When the peanut butter joins the bowl the aroma deepens into a roasted, nutty note and the texture becomes silkier. Use a flexible spatula to press and scrape, ensuring no pockets of sticky paste remain. If the peanut butter feels stiff, warm it slightly first; cold peanut butter will create lumps. Avoid vigorous beating that incorporates too much air, which can alter the bar crumb.
- Add the flour and stir until just combined, don’t overmix.: As the all-purpose flour folds in you will see the batter transform from glossy to a slightly denser batter that holds its shape when scooped. Stir until no visible streaks of flour remain, then stop; overmixing develops gluten and makes the bars tough rather than tender. A telltale overmix is a rubbery pull when you lift the spatula, so err on the side of gentle folding.
- Stir in most of the chopped Nutter Butters, reserving about 1/4 cup to be sprinkled on top.: The chopped Nutter Butter cookies will introduce little flecks of golden crunch throughout the batter, and you will hear a faint clinking as they fold in. The reason to reserve some is visual and textural, so the top gets an eye catching crunch. A mistake is adding all the cookies into the batter, which makes the top look plain; saving some reserved pieces gives contrast and a professional look.
- Stir in most of the chocolate chips, reserving about 2 tablespoons to be sprinkled on top.: When you mix in the majority of the chocolate chips , the batter will take on speckles of dark promise that melt into pockets during baking. Reserving a few chips ensures the top has glossy, melty highlights once baked. Beware stirring too hard which can break chips into fragments; gentle folding keeps them intact for beautiful melted pools.
- Turn batter out into prepared pan, smoothing the top lightly with a spatula.: Pouring the batter reveals its weight and sheen, and smoothing creates an even surface so the bars bake uniformly. Use light pressure when smoothing to avoid compressing the reserved cookie bits into the batter. An error is over flattening which can compact air pockets and yield a denser texture, so keep movements light and even.
- Evenly sprinkle the reserved Nutter Butters and reserved chocolate chips over the top, lightly pressing them down with your finger or a spatula.: As you scatter the reserved Nutter Butter cookies and chocolate chips , the pan begins to look irresistible, with glossy chips and cookie crumbs ready to meld. Lightly pressing helps them adhere so they do not tumble off when sliced. Avoid pressing too deeply, which buries the decorative pieces and hides their effect. Aim for a balance where they sit slightly embedded but still visible on the surface.
- Bake for about 28 to 30 minutes, or until a toothpick inserted in the center (if you can find a bare patch to test) comes out mostly clean, or with a few moist crumbs, but no batter. Allow bars to cool in pan for at least 30 minutes before slicing and serving. Bars will keep airtight at room temperature for up to 1 week, or in the freezer for up to 6 months.: During the bake you will notice the aroma deepen and the top take on a light golden tint, with melted chocolate chips becoming glossy. The toothpick test is important because a slightly moist crumb signals tenderness, while raw batter means underbaked. A frequent error is opening the oven too often, which drops temperature and can make the center sink; keep the door closed until near the end of the bake window. Cooling in the pan lets the bars set so they slice cleanly, and proper storage keeps them fresh for days or months if frozen.
Notes
- Room temperature egg: Bringing the egg to room temperature helps it incorporate smoothly into the warm butter and prevents the batter from seizing or becoming lumpy.
- Gently warm stiff peanut butter: If your peanut butter feels too stiff to stir in, warm it briefly in the microwave so it blends evenly without leaving pockets of dense paste.
- Adjust sugar for sweetness: If you prefer slightly less sweetness, reduce the brown sugar by 2 tablespoons, but be mindful this can affect chewiness slightly.
- Swap cookie brand carefully: If you do not have Nabisco Nutter Butter cookies, choose a peanut butter sandwich cookie with similar density to preserve texture contrast.
- Storage tips: Store finished bars in an airtight container at room temperature for up to one week, or freeze layers separated by parchment for up to six months for easy thaw and serve.