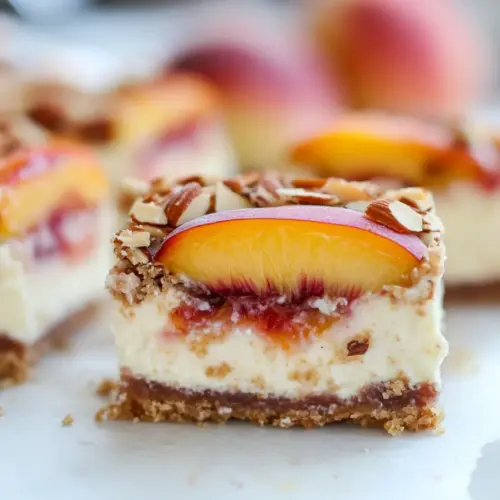
Peach Almond Yogurt Cheesecake Bars
Peach Almond Yogurt Cheesecake Bars are creamy and bright, with a nutty almond crust and roasted peach folded into a silky yogurt filling. This easy summer dessert balances tangy and sweet, creating a satisfying treat for brunch, picnics, or casual dinners. With simple pantry ingredients and a short bake, it is a compelling reason to celebrate seasonal fruit and make dessert at home.
Equipment
- 8 inch baking pan
- Oven
- Mixing Bowl
- Blender or food processor
- Baking dish for peaches
Ingredients
- 2 cups almond flour Provide a nutty, slightly sweet base and a tender, crumbly texture to form the crust; when combined with melted coconut oil and maple syrup it binds well and creates a sturdy foundation for the bars. Use almond flour for a gluten-free, moist crust that complements the cheesecake filling and enhances overall richness.
- 1/4 cup pure maple syrup Add sweetness and moisture to the crust while lending a subtle caramel flavor that deepens during baking; maple syrup helps bind the almond flour and coconut oil together for a cohesive base. Adjust quantity for desired sweetness and to maintain the right crust consistency without making it soggy.
- 3 tablespoons coconut oil melted and cooled Melt and cool to act as the fat that binds dry crust ingredients, providing richness and helping the crust set firmly as it cools; coconut oil contributes a subtle tropical note. Ensure it is cooled slightly to avoid prematurely cooking other ingredients while still fluid enough to mix evenly.
- 1/2 teaspoon almond extract Enhance the nutty aroma and reinforce almond flavor in both crust and filling; a small amount of almond extract intensifies the overall almond profile without overpowering. Use sparingly to avoid a bitter or artificial taste, especially when paired with multiple almond elements.
- 1/4 teaspoons salt Balance sweetness and enhance flavor depth by highlighting other ingredients like almond and vanilla; salt also helps control and elevate the overall taste profile. Even in small quantity, salt is essential to prevent the bars from tasting flat or overly sweet.
- 2 cups plain whole milk yogurt Provide a creamy, tangy base for the cheesecake filling that keeps it light and slightly tangy while contributing moisture and body. Whole milk yogurt adds richness and a silky texture that sets into a custard-like filling when combined with eggs and starch.
- 1/3 cup maple syrup Sweeten the filling gently while adding a mild maple dimension that complements the almond and peach flavors; maple syrup also thins the filling slightly for a smooth, pourable consistency. Use as measured to balance sweetness against the tanginess of the yogurt and peach.
- 2 eggs Set and thicken the filling while contributing structure and a custardy texture when baked; eggs help the filling coagulate and hold together once cooled. Whisk evenly into the yogurt mixture for a uniform bake and to avoid pockets of unmixed egg.
- 1 teaspoon pure vanilla extract Provide warm, familiar flavor and aromatic complexity that complements maple and almond notes in the filling; vanilla enhances overall sweetness perception without adding sugar. Use pure vanilla extract for the best depth and cleaner flavor compared with imitation extracts.
- 1/2 teaspoon almond extract Reinforce the almond flavor profile in the filling for continuity with the crust and to boost nutty aroma; adding almond extract here layers the flavor without altering texture. Keep the quantity small to prevent an overpowering, artificial taste.
- 2 tablespoons + 1 teaspoon tapioca starch Thicken and stabilize the yogurt-based filling to create a smooth, sliceable texture by preventing excessive weeping during baking and cooling; tapioca starch yields a glossy, tender set. Dissolve starch evenly to avoid lumps and ensure it activates properly during baking for optimal consistency.
- 1 cup peach halved, roasted, and chopped (about 1 roasted peach) Contribute fresh, concentrated peach flavor and a soft, slightly caramelized fruit component when roasted; peaches add natural sweetness, moisture, and textural contrast in the filling. Use halved, roasted, and chopped peaches to ensure a tender fruit presence that blends well with the creamy cheesecake filling.
Instructions
- Preheat the oven to 375 degrees F and lightly oil an 8” x 8” baking pan.: You should feel the warmth building in your kitchen as the oven reaches temperature, and the smell of clean heat will signal readiness. Lightly oiling the pan prevents sticking and helps you lift the bars cleanly after chilling. A common mistake is to skip the oil or use too much, which can either cause sticking or create greasy edges. Use a neutral oil or nonstick spray applied evenly with a paper towel, and make sure the oven rack is centered so heat distributes evenly.
- In a bowl, mix together all ingredients for the crust.: When you stir the almond flour , maple syrup , and cooled coconut oil , you should notice the mixture take on a slightly glossy, cohesive texture that holds when pinched. The aroma of almond and maple will become more pronounced. If the mixture feels too dry, add a tiny splash more maple syrup, and if it is too wet, add a tablespoon of almond flour. Avoid overmixing which can lead to an oily, compact crust instead of a tender one.
- Pour the crust into the prepared baking pan and press it into the bottom and sides.: Use the back of a measuring cup or your fingertips to press the crust uniformly, aiming for an even thickness across the base and a slight lip up the sides. A well pressed crust provides structural support and prevents the filling from seeping under. Take care not to press so hard that the crust becomes dense and compact, as that will rob it of a pleasant crumb.
- Bake in the oven for 10 to 15 minutes, until edges are slightly browned.: Watch for the gentle browning at the edges and a nutty scent rising from the oven; that tells you the crust is toasted and flavorful. Baking too long will darken the crust and can create a bitter note, while underbaking may leave it fragile. If your oven runs hot, check at 10 minutes, and if you see even golden edges you can remove it promptly.
- Set aside and allow crust to cool to room temperature.: Cooling the crust prevents the filling from melting upon contact and keeps the layers distinct. You will notice the crust firming as it cools, and that is a good visual cue before adding the filling. One pitfall is pouring warm filling over a hot crust, which can cause sogginess; patience at this stage pays off.
- You can roast the peach while you’re baking the almond crust.: Roasting the peach simultaneously saves time and concentrates the fruit flavors. As the peach roasts the kitchen will fill with a caramelized, fruity perfume that signals readiness. Be mindful of oven space and temperature so both crust and fruit roast properly without overcrowding.
- Cut the peach in half, remove the pit, and lightly coat the flesh with olive oil or coconut oil.: Coating the cut peach with a little oil encourages caramelization and prevents sticking in the pan. The peach flesh should glisten slightly, and you may detect the fruity sugars becoming more pronounced as they prepare to roast. Avoid over oiling which can make the surface slick instead of browned.
- Place the peach cut-side down on a baking dish and place in the oven with the crust. Roast for 20 minutes, or until the peach skin is pulling away from the flesh, and juices are seeping out.: During roasting watch for juices to bubble and the skin to shrink; those are reliable cues that the peach is caramelized and the flavor is intensified. The sound is quiet, mostly the gentle bubble of juices, but the aroma will be rich and sweet. If you under roast, the peach will be too firm and not integrate as well into the filling, while over roasting can collapse the texture into complete mush.
- Remove from the oven, allow peach to cool, then chop it and set aside.: Allow the roasted peach to cool so you do not add excess heat or liquid to the filling. When chopping, you want small pieces that will distribute evenly, releasing bursts of fruit without sinking. A common error is chopping while hot, which can dilute the filling with steam and make it looser than intended.
- Lower the temperature of the oven to 350 degrees F.: Reducing the oven heat prepares the environment for a gentle, steady bake of the filling, which helps it set without cracking. You should notice the oven cycling more gently at this lower temperature. Forgetting to lower the temperature can cause the filling to bake too quickly at the edges while the center remains unset.
- In a blender or food processor, combine all of the ingredients for the cheesecake filling except for the roasted peaches. Blend just until combined.: As you pulse, watch for a smooth, glossy mixture that flows but still has body. The smell of maple syrup and vanilla will become more aromatic. Overblending can incorporate too much air, leading to cracks or a curdled texture, so stop as soon as the mixture is uniform.
- Add the chopped roasted peaches and pulse/blend quickly just to combine with the filling.: You want flecks of roasted peach distributed through the filling without breaking down into a puree. Small bursts of fruit should appear as orange specks in the pale filling, promising pockets of syrupy sweetness. Overprocessing here will smear the peaches and lose the texture contrast, while underprocessing can leave large hot chunks.
- Pour the cheesecake filling into the pan with the crust and bake for 30 to 45 minutes.: As the filling bakes it will change from glossy to matte and the edges will set first while the center may wobble slightly like loose jelly. That gentle wobble is what you want because residual heat will finish the set. Baking too long can dry the top and cause cracks, while underbaking will leave the center too soft; check towards the shorter end and use the oven off rest to finish set up.
- Turn the oven off and allow the cheesecake to sit for 10 minutes inside the hot oven before removing it.: This resting period lets the temperature equalize slowly, preventing sudden contraction that can crack the surface. You will notice the filling settle and the wobble diminish a bit. Removing it immediately can shock the filling and cause fissures, so let patience do the work here.
- Allow cheesecake to cool for 20 minutes, then place it in the refrigerator to chill for 2 hours.: Cooling at room temperature first avoids condensation when it hits the cold fridge. After 2 hours in the refrigerator the bars will firm into clean slices. Cutting too early risks a sloppy slice, and chilling longer only improves sliceability and flavor melding.
- Cut cheesecake squares and serve with fresh peaches and a drizzle of honey.: When slicing, use a sharp knife wiped between cuts for neat edges. The contrast of chilled, creamy filling and a little fresh peach and honey is delightful, offering a final bright note. A common serving mistake is cutting while the bars are still too warm, which leads to uneven pieces and a messy presentation.
Notes
- Swap starch carefully If you replace tapioca starch with corn starch follow the recipe quantity but expect a slightly different mouthfeel, corn starch may yield a denser set.
- Adjust sweetness Taste the filling mixture before baking and add a little more maple syrup if your peaches are underripe, or reduce it if fruit is very sweet.
- Control oven variability If your oven runs hot, check the crust and the filling early; using an oven thermometer helps you bake to the intended temperatures.
- Make it ahead These bars improve after resting, so you can bake them the day before and chill overnight for easier slicing and better flavor melding.
- Roast for intensity Roast the peach longer for more caramelized flavor, but watch closely so it does not become pasty.