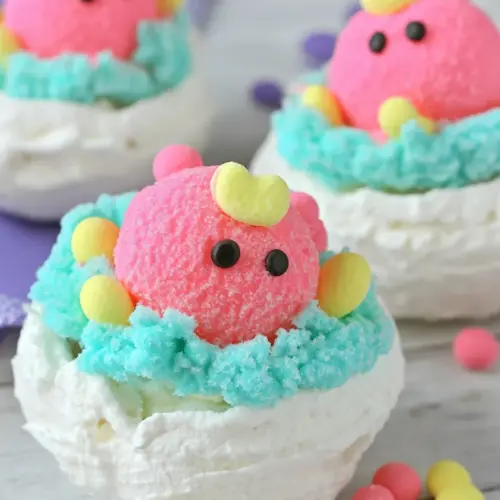
Pavlova Peeps Nests
Pavlova Peeps Nests are airy, crispy on the outside and pillowy inside, topped with cloudlike whipped cream and playful Peeps for a festive Easter dessert. This easy, elegant treat offers light texture contrast and bright visual appeal, perfect for spring gatherings and simple celebrations. Make it for a cheerful centerpiece that guests will love.
Equipment
- Electric Mixer
- Mixing Bowl
- Baking Sheet
- Parchment Paper
- spoons
Ingredients
- 3 large egg whites Whip to soft peaks and provide structure and volume to the meringue base for the nests using three large egg whites, ensuring stability and lightness when properly beaten.
- 1/8 teaspoon cream of tartar Stabilize the whipped egg whites and help maintain peak structure by adding an eighth teaspoon of cream of tartar, which improves texture and prevents weeping during baking.
- 1/2 cups sugar Sweeten and dissolve into the meringue to create a glossy, stable finish; half a cup of sugar must be added gradually to achieve stiff, shiny peaks and desired sweetness.
- 1 teaspoon pure vanilla extract Flavor subtly and add aromatic depth with a teaspoon of pure vanilla extract, enhancing the overall taste without overpowering the delicate meringue.
- 1 1/2 cups whipped cream unsweetened Fold gently to create a creamy filling or topping using one and a half cups of unsweetened whipped cream, which adds richness and provides a soft contrast to the crisp meringue.
- 1/2 teaspoon vanilla Enhance and complement the whipped cream filling by adding a half teaspoon of vanilla, lending additional sweet, aromatic notes to the nest interiors.
- 1 tablespoon powdered sugar Dust sparingly to sweeten and lightly thicken the whipped cream by incorporating one tablespoon of powdered sugar, helping stabilize the filling and add a fine texture.
- 3 -4 drops green food coloring Tint the whipped cream or decorative elements with three to four drops of green food coloring to achieve a natural-looking grassy hue for the nests without altering flavor.
- About 8 Peeps Garnish and complete the nests by arranging about eight Peeps as centerpiece decorations, providing playful color and a seasonal, festive touch to each dessert.
- Candy eggs and/or sprinkles if desired Optional: Decorate further with candy eggs and/or sprinkles for color, texture, and added visual appeal to the finished pavlova peeps nests as desired.
Instructions
- Preheat oven to 200 degrees. Line two baking sheets with parchment or a silpat.: You will feel a warm steady air once the oven stabilizes, which matters because low, slow heat dries the meringue without browning it. The temperature control prevents rapid expansion that can crack the shell. A common error is using too high a heat, which causes uneven color and hollows. Check that racks are centered so heat circulates evenly.
- Beat egg whites using an electric mixer on high until stiff peaks form, about 2 minutes. Add the sugar, 1 tablespoon at a time, with the mixer running. Beat until the egg whites are very stiff and glossy and if you feel the meringue between your fingers there is no grittiness (the sugar has dissolved), about 5 minutes. Beat in vanilla.: The parchment creates a nonstick surface and a consistent base so the meringue can crisp without adhering. You will notice the meringue lifts cleanly off parchment after cooling, which preserves the nests' underside texture. Avoid greasing the sheet which can cause spreading. If sheets wobble, stabilize them so the meringue circles stay uniform.
- Using 2 spoons, scoop dollops of meringue on your prepared cookie sheet. Use the back of one spoon to smooth the meringue into a small circle and place an indent in the center to hold the filling. Alternately, you could place your meringue in a piping bag and pipe small circles. You will get about 8 circles.: As you whip the egg whites you will hear a gentle rushing sound, and the mixture will transform from glossy to a thicker, cloudlike mass. Stiff peaks mean the meringue holds upright peaks when the whisk is lifted. A common pitfall is underwhipping, which gives flat pavlovas, so watch for volume and firmness.
- Bake for 50-60 minutes, rotating the pans halfway through. They are done when the outside is no longer sticky, but the inside is still soft. Turn off the oven and let the pavlovas cool inside it.: Slowly adding the sugar helps it dissolve into the foam, which produces a glossy, stable meringue. After each addition the mixture becomes firmer and shinier, and you should feel no grittiness when rubbed between fingers. If you rush this step, sugar can remain undissolved causing a sandy texture once baked.
- Once cool, remove the pavlovas to a serving plate.: A fully integrated meringue looks satiny and holds shape well. This stage ensures the exterior will set crisp while the interior stays tender. Overbeating can dry out the foam, so stop once the sugar has dissolved and peaks are firm.
- Take your whipped cream and stir in the powdered sugar, vanilla, and food coloring. Alternately, you could use whipped topping or leftover frosting (but those wouldn’t need sweeting). Place about 2 tablespoons of whipped cream on top the pavlovas. Top with a Peep and sprinkles!: Adding the vanilla at this point integrates aroma and flavor without deflating the foam. You will notice a fragrant lift, but the texture should remain airy. If you add liquid too early, the foam can soften, so this timing helps preserve volume.
- Using 2 spoons scoop dollops of meringue on your prepared cookie sheet: Spoon the meringue into roughly equal portions so each nest bakes uniformly, and you will see soft peaks settle into smooth domes. The back of a spoon helps shape a shallow indent in each circle to hold filling later. A frequent mistake is making uneven sizes, which bake at different rates, so aim for consistency.
- Use the back of one spoon to smooth the meringue into a small circle and place an indent in the center to hold the filling: Smoothing creates a glossy surface that crisps evenly, and the indent ensures the creamy filling sits snugly without spilling. You will notice that a neat rim forms, which helps the nest keep a structured bowl. Do not press too hard or you will compress the air out of the meringue.
- Alternately you could place your meringue in a piping bag and pipe small circles: Piping gives you precise, uniform nests with decorative ridges that crisp into pretty textures. The ridged walls also catch the light and make each nest look professional. If piping, hold the bag steady to avoid shaky edges, which can bake unevenly.
- You will get about 8 circles: Expecting about eight ensures you portion correctly and plan serving sizes. Counting ahead helps you space the nests on sheets so they do not touch while baking. A common oversight is crowding the pan, which causes steam pockets and uneven cooking.
- Bake for 50 to 60 minutes rotating the pans halfway through: During this long bake the exterior dries and sets into a crisp shell while the center remains tender, and you will hear a faint hollow sound if you tap the underside when they are done. Rotating promotes even color and texture on both trays. Avoid opening the oven frequently, as sudden temperature changes can cause cracking.
- They are done when the outside is no longer sticky but the inside is still soft: The visual cue is a matte, dry exterior with a slight give at the center. You should not see glossy patches on the shell. If they seem tacky, return them to the oven for a bit longer, but watch closely to prevent over drying which makes the interior chalky.
- Turn off the oven and let the pavlovas cool inside it: Cooling in the turned off oven allows the meringues to dehydrate gently, preventing sudden collapse from rapid temperature shift. You will notice the nests contract slightly as they settle. A common error is removing them while still hot, which can invite cracking from rapid cooling.
- Once cool remove the pavlovas to a serving plate: The cooled nests will lift cleanly from the parchment and look fragile and pristine. Handle them carefully because they can chip or break if stacked. If one cracks a bit, it still tastes wonderful, but aim to transfer with a thin spatula for stability.
- Take your whipped cream and stir in the powdered sugar vanilla and food coloring: The cream should be chilled and softly whipped so it holds shape but still spreads easily into the indent. The powdered sugar dissolves quickly, smoothing the texture, while the additional vanilla echoes the meringue flavor. A heavy hand with coloring can result in a too-bright hue, so blend gradually.
- Alternately you could use whipped topping or leftover frosting: If you choose ready-made options they can be used without sweetening, offering convenience for busy days. The texture may be slightly different but the nests will still be festive and tasty. Keep in mind some toppings are denser, which can change the balance of cream to meringue.
- Place about 2 tablespoons of whipped cream on top the pavlovas: A measured dollop creates a pleasing proportion of cream to meringue so each bite keeps the nest structure intact. Spoon gently into the indent so you do not overfill and cause spillover. Overfilling can make the presentation sloppy and mask the delicate shell.
- Top with a Peep and sprinkles: The final decorations bring color and whimsy, and you will hear delighted comments when you place a Peeps atop each nest. Lightly scatter candy eggs or sprinkles for texture contrast. Avoid piling on too much garnish which can overwhelm the delicate flavors and textures.
Notes
- Chill equipment Before whipping the whipped cream unsweetened, chill the bowl and beaters to help the cream reach firm peaks faster.
- Sift powdered sugar Sifting the powdered sugar into the cream prevents lumps and helps the filling stay silky smooth.
- Measure precisely Accurate measurement of egg whites and sugar ensures the meringue structure forms correctly, so use standard measuring tools.
- Avoid humidity High humidity can make it hard for meringue to dry properly, so choose a dry day or a well ventilated kitchen when possible.
- Peeps placement Place each Peeps on the cream just before serving to keep colors fresh and prevent any stickiness from developing.