Pavlova
Pavlova is a crisp outside and marshmallow soft center dessert topped with creamy mascarpone and bright fresh berries. This airy treat is visually stunning, light in texture, and perfect for spring gatherings or easy weeknight celebrations. Make it for guests or intimate dinners, the contrast of crunchy meringue and silky cream creates a dessert worth the patience.
Equipment
- Heatproof Bowl
- Saucepan
- Stand mixer with whisk attachment
- Parchment Paper
- Rimmed Baking Sheet
- Spatula
- Instant read thermometer
Ingredients
- 1 1/2 cup (300 grams) superfine sugar Sweeten and stabilize the meringue by providing fine-grain sugar that dissolves easily when whipped; superfine sugar yields a glossy, crisp shell and tender interior and helps achieve stiff peaks without a gritty texture. Measure carefully by weight for consistent structure and sweetness, especially important in pavlova where balance determines crispness and chew.
- 3/4 cup (180 grams) egg whites, room temperature Whip to volume and structure by using room-temperature egg whites that incorporate air more readily; beaten egg whites form the meringue’s light, airy scaffold that sets during baking. Ensure no trace of yolk or oil to allow stable peaks and optimal lift for the pavlova’s airy center and crisp exterior.
- 1/4 teaspoon kosher salt Enhance stability and balance by adding a pinch of kosher salt which strengthens the meringue’s protein network and balances sweetness; salt also subtly enhances overall flavor. Use sparingly to avoid drawing out moisture that could compromise the crisp shell.
- 1 tablespoon (8 grams) cornstarch Absorb excess moisture and contribute to a marshmallow-like interior by incorporating cornstarch, which helps create a tender, slightly chewy center while maintaining the crisp outer shell. Sift it in to prevent lumps and distribute evenly through the whipped whites for consistent texture.
- 2 teaspoons (12 grams) vanilla bean paste Impart concentrated, aromatic vanilla flavor by using vanilla bean paste, which adds visible specks of vanilla and a richer profile than extract; it complements the delicate sweetness of the pavlova. Stir in gently to preserve the whipped structure while ensuring even flavor distribution.
- 1 1/2 teaspoons (7.5 grams) distilled white vinegar Stabilize the egg-white foam and tenderize texture with distilled white vinegar, which slightly acidifies the mixture and helps coagulate proteins for a more stable meringue. Add at low volume to avoid altering flavor while improving the pavlova’s ability to hold shape during baking.
- Vanilla Mascarpone Cream (recipe follows) Provide a rich, creamy topping contrast by preparing Vanilla Mascarpone Cream that adds tanginess and smoothness to complement the crisp meringue; the cream anchors fresh fruit and balances sweetness. Chill and whip lightly to a spreadable consistency so it sits loftily atop the pavlova without collapsing the shell.
- Fresh berries Add brightness, texture, and fresh acidity by using fresh berries as a topping; berries cut through sweetness and provide color and seasonal flavor contrast. Choose ripe, firm fruit to avoid excess juice that could soggify the pavlova’s surface.
- Garnish: confectioners’ sugar Finish with a light dusting of confectioners’ sugar to add a delicate sweetness and an elegant powdered appearance; it enhances presentation and provides a subtle textural contrast. Sift sparingly just before serving to maintain visual appeal without overpowering the flavors.
Instructions
- Preheat oven to 300°F (150°C). Using a pencil, dark-colored ink pen, or permanent marker, draw an 8-inch circle on a 16 1/2 x 12-inch sheet of parchment paper. Turn parchment over, and place on a rimmed baking sheet.: You will notice the warm oven is the first signal that this dish requires attention to heat. The slight warmth makes the template transfer easier and helps the meringue start to set when it first goes in. The scent of warm air from the oven feels calming, and preparing the template gives you a visual anchor for shape. One why note: tracing the circle ensures consistent sizing and even baking across the meringue. A common misstep is skipping the reverse parchment trick, which can smear ink onto the meringue, so always turn the paper over.
- In a heatproof bowl, whisk together superfine sugar, egg whites, and salt by hand. Place bowl over a saucepan of simmering water. Cook, gently whisking frequently, until sugar completely dissolves and an instant-read thermometer registers 120°F (48°C) to 130°F (54°C).: As you whisk over the warm steam, you will sense the mixture becoming smoother and warmer to the touch, with the sugar gradually losing its grainy feedback. The surface will look glossy and homogeneous, and the thermometer is your best friend here to ensure the sugar has dissolved without cooking the eggs. This gentle heating helps stabilize the proteins in the egg whites , which is why it matters for volume later. Avoid overheating, which can scramble the whites, and do not rush the whisking; uneven dissolution is the most frequent error at this step.
- Carefully transfer sugar mixture to the bowl of a stand mixer. Using the whisk attachment, beat at medium-high speed until stiff peaks form, 4 to 5 minutes.: When you switch to mechanical whisking, the sound will rise to a high, almost singing speed as air is incorporated. You will see soft peaks form, then firm up, and the mixture will become glossy and thick. That tactile change tells you the foam is trapping air correctly. The why is straightforward, more aeration equals structure for the meringue. A usual mistake is under beating, which yields a flat, deflated result, so watch for peaks that stand straight without drooping.
- In a small bowl, whisk together cornstarch, vanilla bean paste, and vinegar. Add to meringue, and beat at medium-high speed until incorporated, about 30 seconds. Spoon meringue inside drawn circle on prepared pan. Using a spatula, spread meringue until it is the width of drawn template, with swoopy sides. Using spatula, make an indentation in center (about 1 inch deep). (Do not spoon out; push meringue in center toward outer edge. Final dimensions of the meringue should be 8 inches wide, 2 1/2 inches tall, and 1 inch deep in the center.) Place in oven, and immediately reduce oven temperature to 225°F (107°C).: Mixing the cornstarch , vanilla bean paste , and distilled white vinegar first ensures even distribution so the texture remains consistent throughout. As you fold this into the glossy foam, the batter will take on a slightly more stabilized feel; the scent of vanilla unfolds and feels comforting. Shaping is tactile work, and forming that central nest creates a place for the creamy filling, which is important for presentation and balance. A common error is overworking the meringue, which can deflate it, so handle gently and avoid scraping out the indentation; instead push from the center to the edge as instructed.
- Bake until dry to the touch, 1 1/2 hours to 1 hour and 40 minutes. Turn oven off, and let meringue stand in oven with door closed for 8 hours or overnight.: That sudden drop in temperature is purposeful, it prevents the exterior from browning too quickly while allowing the interior to dry slowly. The oven will produce a dry, warm smell rather than a toasty aroma, and the meringue will set gently. This slow start is why pavlova gets its exterior crunch without a burnt surface. A typical pitfall is opening the oven door soon after reducing the heat, which can cause collapse, so resist the urge to check too early.
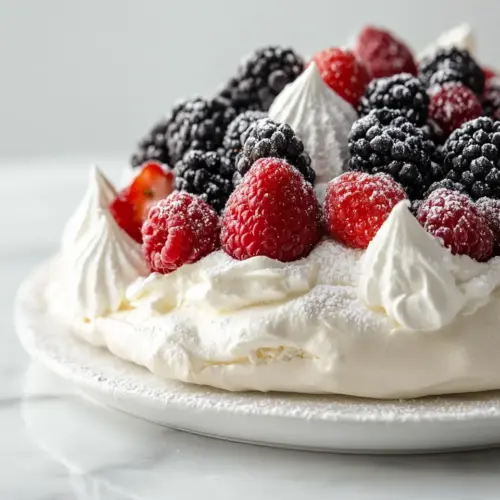
- Just before serving, spoon Vanilla Mascarpone Cream in center of meringue, and top with berries. Garnish with confectioners’ sugar, if desired. Serve immediately.: Over the long bake you will notice the surface becoming matte and crackly, and if you tap it lightly it should sound hollow. Turning the oven off and letting the meringue cool slowly inside is essential for that marshmallow center to set without cracking dramatically. The long cool down is what stabilizes texture and prevents moisture shock. Many people make the mistake of rushing removal, which leads to a chewy or collapsed interior, so plan ahead and allow the full cool down time.
- Just before serving, spoon Vanilla Mascarpone Cream in center of meringue, and top with berries. Garnish with confectioners’ sugar, if desired. Serve immediately.: At this final stage the contrast of temperatures and textures is most apparent, the cool cream against the crisp shell and bright fresh berries releasing a burst of juice. Spoon gently to avoid cracking the shell, and watch the way the cream nestles into the center. The visual is rewarding, with red and blue fruits against snowy white meringue. One common misstep is assembling too far ahead, which soggifies the shell, so only fill just before serving to preserve that crispness.
Notes
- Make mini pavlovas for individual servings. Pipe or spoon smaller meringue nests onto the parchment and reduce baking time, keeping an eye on texture to ensure a crisp outside and soft inside, perfect for parties and easier to serve.
- Swap the mascarpone cream for a lighter whipped cream. Whip cold heavy cream with a touch of confectioners’ sugar and vanilla for a lighter finish, which pairs especially well with very sweet berries and reduces richness.
- Prepare the meringue a day ahead. Bake and cool the pavlova in the oven overnight, then store in an airtight container; assemble with cream and berries just before serving to preserve crispness.
- Use different fruit combinations seasonally. Try stone fruits in late summer or citrus segments in cooler months for a bright contrast to the sweet meringue, adjusting to balance acidity and sweetness.
- Pipe decorative edges for an elevated presentation. Use a piping bag to create textured edges and peaks before baking, which takes the visual drama up a notch for special occasions.