Paleo Vanilla Pudding Parfaits
Paleo Vanilla Pudding Parfaits are a creamy, easy paleo dessert with a silky coconut milk base, light whipped texture, and bright berries. This simple parfait is naturally dairy free and grain free, perfect for a quick summer treat or easy weeknight dessert. Make ahead friendly and crowd pleasing, it offers fresh flavor and smooth mouthfeel that invites another spoonful.
Equipment
- Medium Bowl
- Whisk
- Saucepan
- Hand mixer or stand mixer
- Refrigerator
Ingredients
- 13.5 ounces full-fat canned coconut milk divided Provide rich creaminess and body to the pudding while contributing natural coconut flavor; use divided portions so some can be warmed to bloom gelatin and the rest chilled to adjust texture and richness, creating a silky mouthfeel.
- 2 teaspoons gelatin Bloom and set the pudding by absorbing liquid and forming a gentle gel; sprinkle over warm coconut milk, whisk until dissolved, and chill to achieve a stable, scoopable custard consistency.
- 2 tablespoons honey or more to taste Sweeten and balance the pudding with a floral, lightly caramelized sweetness; add gradually and taste for desired sweetness, remembering honey also slightly influences texture and mouthfeel.
- 2 teaspoons vanilla extract Impart warm aromatic notes and round out the flavor profile; stir into the pudding mixture after dissolving gelatin to preserve its delicate fragrance and enhance overall taste.
- 1/2 teaspoon Diamond Crystal kosher salt Enhance and brighten flavors while controlling seasoning balance; dissolve into the liquid to ensure even distribution and to lift the sweetness and fruit flavors without overpowering them.
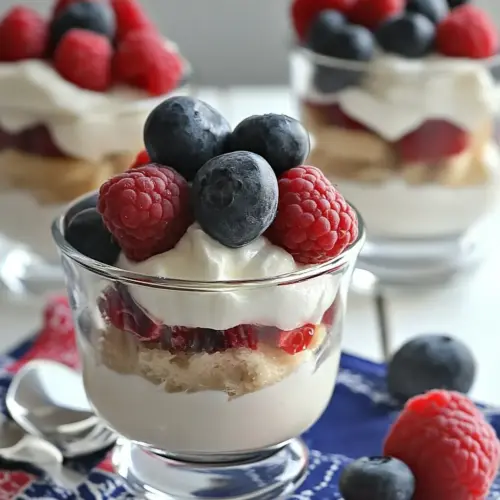
- 2 cups mixed berries cut into bite-sized pieces (e.g. strawberries, blueberries, raspberries, etc.) Provide fresh, tart, and juicy contrast to the rich vanilla pudding; cut into bite-sized pieces to distribute texture, color, and bright acidity throughout the parfait layers.
Instructions
- Shake the can of coconut milk well, and pour 1/4 cup of it into a medium bowl. Sprinkle the gelatin on top and whisk briskly to get rid of the lumps. Set the bowl aside.: The aroma of the coconut milk is immediate, a soft, tropical scent that tells you the fat content is ready to carry flavor. As the gelatin meets the cold milk it will start to bloom, forming pale, spongy clumps that vanish under vigorous whisking. The brisk whisking helps disperse the gelatin evenly and avoids pockets of uncooked granules. Pay attention to texture at this stage, because a smooth bloom ensures an even set later. A common mistake is adding gelatin to warm liquid first, which will cause clumping; always sprinkle it over cold milk and whisk promptly.
- Next, heat the remaining coconut milk and honey over medium heat, stirring frequently, until the sweetened milk is steaming, but not boiling.: When you warm the remaining coconut milk with honey , watch for tiny wisps of steam and a gentle shimmer on the surface, signals the sweetness is dissolving and flavors are marrying. Stirring frequently prevents a skin from forming on top and stops the fat from separating. Avoid reaching a boil, which can alter the texture and flavor of the coconut and may weaken the gelatin's setting power. If you see rolling bubbles, reduce the heat immediately. A common pitfall is overheating, which creates a grainy texture rather than a glossy custard.
- Pour the hot coconut milk into the bowl with the gelatin/coconut milk mixture, and whisk well to combine.: As you pour, the warm milk will melt the bloomed gelatin and the whisking motion will create a glossy, uniform base. You might notice steam rising and a faint sweet scent intensifying, and the mixture will thin momentarily before beginning to thicken as it cools. Whisking thoroughly eliminates any lingering gelatin bits and emulsifies the fat back into the liquid. If you stop whisking too soon, you may end up with small gel pockets; persistent whisking is the best prevention.
- Stir in the vanilla extract and salt.: Adding vanilla now lets the aromatic oils meld into the warm mixture, releasing a comforting perfume. The small amount of salt brightens the sweetness, making flavors pop when the pudding is tasted cold. After stirring, pause to smell the mixture; the balance of sweet and aromatic cues is a good indicator you are on track. A typical error is overdoing the vanilla which can edge into an artificial note, so stick to the recommended quantity for a subtle lift.
- Place the bowl in the fridge uncovered for 30 minutes, and then cover with a silicone lid or plastic wrap until the pudding firms up, at least 2 hours. You can keep it in the fridge for up to 4 days before serving.: Cooling initially uncovered helps release lingering heat and prevents condensation from forming on the cover. After the initial chill, covering avoids absorbing fridge odors and keeps the surface from drying out. As the pudding chills, you will notice it transition from a pourable custard to a soft gel, with a muted sheen rather than glossy liquid. Patience here pays off, because inadequate chilling yields a runny layer later. One mistake is rushing to serve before the pudding sets fully, which undermines the layering texture.
- When you’re ready to serve, take the bowl of coconut pudding out of the fridge. Uncover it, and grab a hand or stand mixer.: Pulling the pudding from the fridge you may feel a firm, slightly springy surface under the spoon. The chilled aroma is cooler and subtler than when warm. Using a mixer at this stage transforms the set gel into a lighter, whipped pudding; it aerates the mixture and creates a silkier mouthfeel. Make sure your mixer attachments are clean and dry to prevent any dilution of texture. A frequent oversight is using too low a speed, which lengthens whipping time and reduces volume.
- Beat the pudding until it’s nice and fluffy and transforms from a stiff JELL-O-like texture to a thick, smooth pudding. It’ll take at least a minute, so be patient!: As you beat, listen for a change in the mixer sound and watch the pudding loosen and hold soft peaks. The surface will look glossy and slightly pillowy, and the scent will bloom again as air is incorporated. This step is why the pudding feels indulgent rather than dense. If you overbeat, the structure can break and become soupy, so stop when you reach a thick, scoopable consistency. Avoid trying to rush this — impatience is the usual error here.
- Divide the pudding into 4 bowls or cups, alternating layers of berries and pudding. Serve immediately and dig in!: Layering creates visual appeal and ensures every bite includes both creamy and fruity elements. As you spoon the pudding, the sound is soft and the texture yields smoothly, while the fresh berries add a gentle pop and lively color contrast. Serve right away to preserve the berries' texture and the pudding's airy quality. A mistake I see often is assembling too early and letting the fruit release juice into the pudding, which can make the layers soggy; assemble just before serving for best results.
Notes
- Choose high quality canned coconut milk for the best mouthfeel; look for brands that separate into a thick cream and liquid, and shake well before opening to reblend.
- Measure gelatin carefully, and sprinkle it over cold coconut milk to bloom properly; if it forms clumps, sift quickly and whisk until smooth.
- Sweeten mindfully with honey so the sweetness complements the tartness of the berries; start with the recipe amount and adjust after tasting the warm mixture.
- Chill in stages, leaving the bowl uncovered initially to let residual heat escape, then cover once it is no longer warm to the touch to avoid condensation.
- Rewhip leftovers with a hand mixer before serving if the pudding firms too much in the fridge, this restores fluff and improves scoopability.