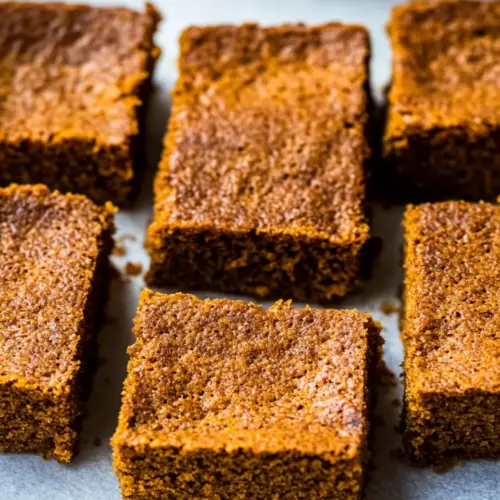
Paleo Pumpkin Cake Bars
Paleo Pumpkin Cake Bars are tender, spiced bars with a moist pumpkin center and a gently browned top. These gluten free, nourishing bars combine almond meal and coconut flour for a satisfying texture, perfect for an easy weeknight dessert or cozy brunch treat. Make them for seasonal gatherings because they travel well and please a crowd.
Equipment
- electric hand mixer
- 8×8-inch pan
- Parchment Paper
- Mixing Bowls
- Toothpick
Ingredients
- 1/2 cup + 2 tablespoons pure canned pumpkin purée Adds moist, tender texture and concentrated pumpkin flavor while contributing natural sweetness and hydration to the batter; helps bind ingredients and enriches the crumb for a soft, cake-like bar.
- 3/4 cup coconut sugar packed Provides brown-sugar-like sweetness and caramel notes while helping to tenderize the crumb; dissolves into the wet ingredients to evenly sweeten and support browning during baking.
- 1 egg Adds structure and protein to the bars by coagulating during baking; helps emulsify fats and liquids to create a stable batter and contribute lift when combined with leaveners.
- 1 egg yolk Enhances richness and moisture more intensely than a whole egg while contributing additional fat and lecithin for a smoother, tender crumb and improved texture.
- 1/2 tablespoon vanilla extract Imparts warm vanilla aroma and rounds out flavors; enhances perceived sweetness and depth while blending with spices to create a more complex profile.
- 3/4 cup + 2 tablespoons almond meal Provides bulk and a mildly nutty, moist texture while acting as the primary gluten-free flour; absorbs liquids and helps form the cake-like structure in Paleo baking.
- 2 tablespoons coconut flour Contributes concentrated absorbency and slight coconut flavor while helping to firm the batter and prevent excess moisture, improving sliceability of the bars.
- 3/4 teaspoon baking powder Supplies chemical leavening to produce gentle lift and aeration in the batter; reacts with acids to create small air pockets for a lighter, tender texture.
- 1/2 teaspoon baking soda Works with baking powder to boost rise by reacting with acidic components; helps create a balanced leavening system for even texture and crumb.
- 1/4 teaspoon salt Balances and enhances all flavors while controlling fermentation and chemical reactions; prevents bitterness and strengthens structure by moderating dough chemistry.
- 1 teaspoon cinnamon Adds warm, familiar spice flavor with sweet and woody notes; complements pumpkin to create classic seasonal flavor and enhances overall aroma.
- 2 1/2 teaspoons pumpkin pie spice Delivers a blend of warming spices to achieve classic pumpkin pie character; intensifies autumnal flavors and layers complexity without additional ingredients.
Instructions
- Preheat your oven to 350°F and line an 8×8-inch pan with parchment paper, leaving a small overhang around the sides of the pan. This will make the bars easier to remove later.: When you set the oven to 350°F , listen for that faint click and feel the warmth begin to build. The room fills with a neutral warmth that readies the pan for even baking. Lining an 8×8-inch pan with parchment and leaving an overhang makes it effortless to lift the bars out once cooled, avoiding scraped edges or broken slices. If the paper shifts, press it into the corners so the batter spreads evenly. A common mistake is skipping the overhang, which makes removal messy and increases the chance of breaking the bars, so take the extra minute to secure the paper.
- In a large bowl, using an electric hand mixer, beat the pumpkin purée and coconut sugar until well combined. Add in the egg, egg yolk, and vanilla extract and beat until smooth, scraping down the sides as necessary.: At this stage you will notice a glossy, thick orange batter forming as the pumpkin and coconut sugar emulsify. The sound of the mixer will shift from a low hum to a slightly higher whir as the sugar dissolves into the purée. This blending is important because it distributes sweetness evenly and prevents grainy pockets. Scrape the bowl once or twice to incorporate all the pumpkin and ensure uniform texture. A common error is underbeating, which leaves the sugar gritty and affects the mouthfeel, so mix until the surface looks smooth and cohesive.
- Add the almond meal, coconut flour, baking powder, baking soda, salt, cinnamon, and pumpkin pie spice into the bowl and stir until smooth and well combined.: As you add the whole egg , extra egg yolk , and vanilla , the batter will lighten and gain elasticity. The mixture should become silkier and slightly more fluid, with tiny ribbons forming as the beaters lift from the bowl. Scraping down the sides ensures nothing is left unincorporated, which would create uneven pockets in the final bake. Watch for a uniform color and consistent sheen. A typical slip up here is adding dry ingredients too quickly afterwards, which can lead to lumps, so make sure the wet mix looks cohesive before proceeding.
- Pour the batter into the prepared pan and let it stand for 5 minutes to allow the coconut flour to begin absorbing the moisture.: When the dry almond meal and coconut flour hit the wet mixture, the batter will thicken noticeably and take on a nutty aroma. Stirring by hand or on low speed lets you control the texture, ensuring there are no dry streaks. The spices will bloom against the moist batter, releasing warm, sweet notes that hint at the finished flavor. This blending stage matters because it creates a uniform crumb. Avoid overmixing, which can compact the batter and make the bars heavy; stir only until you no longer see dry bits.
- Bake until the top is dark brown and a toothpick inserted in the center comes out clean, about 37-40 minutes.: After pouring, the batter will look glossy and slightly domed. Letting it rest gives the coconut flour time to hydrate, which prevents a gummy center and helps the bars set properly. During this pause you might notice the surface tighten just a bit, a good sign that the flours are doing their job. If you skip this rest, the texture can be uneven, so allow the five minute absorption period for the best crumb.
- Let cool completely before slicing into bars.: As the bars bake at 350°F , the kitchen will fill with a warm spice aroma and the top will gradually deepen to a dark golden brown. You may hear a faint settling sound as steam escapes and the crumb finishes setting. Insert a toothpick into the center at the lower end of the time range, because ovens vary; it should come out clean or with a few moist crumbs but not wet batter. Overbaking risks dryness, while underbaking leaves a gooey center. If the edges brown too quickly, tent with foil and continue baking gently until the center is set.
- Let cool completely before slicing into bars: Once out of the oven, the bars will still be warm and slightly wobbly in the center, which is normal. Cooling allows the structure to firm up and makes clean slicing possible, thanks to the redistributed steam and settled crumb. I recommend leaving the bars in the pan until room temperature, then lifting them out with the parchment overhang and chilling briefly if you prefer very neat slices. Cutting while warm often results in ragged edges, so patience here yields prettier pieces and a better texture.
Notes
- Nut swap: Try using a slightly coarser almond meal for a heartier bite, it changes the mouthfeel and adds rustic texture without altering flavor.
- Sweetness level: Reduce the coconut sugar by one to two tablespoons if you prefer a less sweet bar, this keeps spice forward notes more pronounced.
- Spice boost: Add an extra 1/4 teaspoon of cinnamon or a pinch of ground cloves for a more aromatic profile that stands up beautifully to coffee or tea.
- Make ahead: Bake and cool completely, then wrap tightly and refrigerate for up to five days, this helps flavors meld and makes slicing tidier.
- Serving warm: Gently reheat single slices in a low oven or toaster oven for a minute or two to revive that just baked sensation.