Overnight Cinnamon Rolls
Overnight Cinnamon Rolls are pillowy, sweet, and hands off overnight, producing gooey centers and a tangy cream cheese frosting. Rich with butter and cinnamon, these rolls are perfect for a relaxed weekend brunch or an easy holiday morning. The slow chill builds flavor, making them an irresistible treat you will want to make again and again.
Equipment
- Mixing Bowl
- Microwave
- Thermometer
- Stand mixer with paddle and dough hook
- Rolling Pin
- 9×13-inch pan
- Knife or dental floss
Ingredients
- 1 cup whole milk Warm whole milk to lukewarm temperature to activate yeast and dissolve sugars; it provides moisture and tenderness to the dough. Combine gently with yeast and sugars to create a foamy starter that ensures light, fluffy rolls. Use whole milk for richer flavor and softer crumb compared with lower-fat options.
- 2 packets instant yeast Activate instant yeast by sprinkling into warm milk and allowing brief rest; it leavens the dough for rise and airy texture. Use packets as measured units to ensure consistent fermentation and predictable doubling time. Adjust handling and proofing time based on kitchen temperature to avoid overproofing.
- 2 tablespoons brown sugar Add brown sugar for mild molasses flavor and to feed yeast, enhancing browning and caramel notes in the dough. Incorporate with wet ingredients so it dissolves and evenly sweetens the dough without creating grainy pockets. Its moisture content also contributes to a softer crumb and richer color.
- 1/2 cup granulated sugar Dissolve granulated sugar into the dough for sweetness, aiding yeast activity and crust caramelization during baking. Measure precisely to balance sweetness with other components and prevent overly sticky dough. Ensure even distribution by combining with fats and liquids before adding flour.
- 2 teaspoons salt Incorporate salt to control yeast fermentation and enhance overall flavor balance in the dough. Dissolve or mix thoroughly to prevent localized inhibition of yeast where salt contacts it directly. Use measured amount to improve structure and bring out other ingredients' flavors.
- 1/2 cup softened butter Soften butter to spreadable consistency and cut into the dough for richness, tender crumb, and improved mouthfeel. Blend with sugars and eggs to create an emulsion that traps air and aids dough development. Use at room temperature to ensure even incorporation without melting.
- 1 whole egg Beat a whole egg into the dough to contribute structure, moisture, and richness, aiding browning and binding. Whisk briefly before adding to ensure even distribution and smoother dough texture. Egg also adds protein that strengthens gluten for a balanced roll consistency.
- 2 egg yolks Add egg yolks to increase richness, color, and emulsification, resulting in a silkier dough and softer crumb. Mix yolks with other wet ingredients to create a cohesive, enriched dough that browns attractively. Extra yolks boost fat and lecithin content for improved tenderness.
- 4 cups all-purpose flour Stir in all-purpose flour gradually to form the dough, providing the gluten framework for rise and structure. Sift or fluff before measuring to avoid dense dough and achieve consistent hydration ratios. Knead to develop adequate gluten without overworking, ensuring airy rolls.
- 1/2 cup brown sugar Combine brown sugar with cinnamon for the filling to deliver sweetness, moisture, and deep caramel-like flavor between the dough layers. Spread evenly over rolled dough to create cohesive swirls that melt into gooey pockets when baked. The moisture helps the filling bind and prevents dry texture.
- 1 teaspoon cinnamon Mix cinnamon into the filling to supply warm, aromatic spice that defines the classic cinnamon roll profile. Use measured amount to complement sweetness without overpowering the dough’s buttery notes. Ensure even sprinkling for consistent flavor in each roll.
- 8 ounces softened butter Soften butter for the filling so it spreads easily and melds with sugar and cinnamon to create a luscious paste. Apply at room temperature to achieve smooth, even layers that help the cinnamon-sugar adhere to the dough. Butter also promotes moistness and golden, tender edges when baked.
- 1 (8-ounce) package softened cream cheese Soften cream cheese until smooth to prepare a tangy, creamy frosting that balances the rolls' sweetness. Beat with other frosting ingredients to remove lumps and create a glossy, spreadable glaze. Use full-fat cream cheese for stable texture and richer flavor.
- 1/2 cup softened butter Soften butter for the frosting to combine smoothly with cream cheese and powdered sugar, creating a silky glaze. Ensure butter is at room temperature to avoid lumps and achieve a homogeneous frosting consistency. Softened butter also contributes richness and easier spreading onto warm rolls.
- 4 cups powdered sugar Sift powdered sugar into the frosting to sweeten and thicken the glaze, providing a smooth, glossy finish. Gradually incorporate while mixing to reach desired spreadability and avoid a gritty texture. Powdered sugar helps the frosting set while remaining creamy.
- 1 teaspoon vanilla Add vanilla to the frosting to give aromatic depth and amplify the overall flavor profile with sweet floral notes. Stir in at the end of mixing to preserve its delicate aroma and ensure even distribution. Use pure vanilla extract for best, natural flavor.
- dash of salt Include a dash of salt to the frosting to enhance sweetness balance and bring out complex flavors in the cream cheese blend. Mix sparingly to avoid over-salting while improving overall taste perception and rounding out richness. A small amount heightens flavor contrast without noticeable saltiness.
Instructions
- Heat 1 cup whole milk in the microwave to 105 degrees Fahrenheit, about 45 seconds. Use a thermometer to make sure it is not too hot, or it will kill the yeast. Add 2 tablespoons brown sugar and 2 packets instant yeast. Pour into the mixing bowl and set aside for 5 minutes or so, until the yeast is nice and frothy.: As the milk warms you should notice a gentle steam and a faint milky aroma that signals the liquid is approaching the ideal temperature, which is key so the instant yeast wakes up but does not get scalded. After adding the brown sugar the mixture takes on a hint of caramel scent, and within five minutes the surface should develop a creamy, foamy head that smells slightly sweet and yeasty, indicating active fermentation. If you do not see any foam, the yeast might be old or the milk was too hot or too cool, so double check the thermometer. A common mistake is overheating the milk, which kills the yeast and prevents rise, so always test temperature carefully. Stir gently once before letting it rest to incorporate the sugar and yeast, and cover loosely so the bowl does not lose heat too quickly.
- Add 1/2 cup granulated sugar, 1/2 cup softened butter, 1 whole egg, and 2 egg yolks and mix until soupy. Add half of the 4 cups all-purpose flour and 2 teaspoons salt, and mix with the paddle attachment on low until combined.: Right after the foamy yeast develops, you will add the granulated sugar , soft butter , whole egg , and extra egg yolks , which creates a glossy, soupy batter with a sweet dairy aroma. Using the paddle attachment starts gentle incorporation so fats disperse evenly without overworking gluten. When you add half the flour and the salt , the mixture will begin to thicken and take on a more dough like texture, with a slightly tacky feel. If the mixture seems too dry, resist the urge to add extra liquid; sometimes it just needs more kneading. A frequent error here is adding all the flour at once, which can prevent proper hydration and make the dough stiff, so follow the split flour approach for a softer crumb.
- Scrape down the bowl and paddle, and switch to the dough hook attachment. Add the remaining half of the flour and mix on low for 6 minutes, until the dough is nice and smooth.: After switching to the dough hook, the sound changes to a soft whir as the hook develops the gluten. The dough will transition from a shaggy mass to a smooth, elastic ball that easily pulls away from the bowl sides, and you might see a faint sheen from the incorporated butter . Kneading for about six minutes builds the right structure without toughening the crumb, leading to rolls that are tender yet hold their shape. Over kneading can make the dough tight and resistant, while under kneading leaves it loose and collapse prone, so stick to the time and watch for elasticity. If the dough sticks excessively to your hand, a light dusting of flour helps, but be cautious not to add too much.
- Form the dough into a ball and place it in an oiled bowl. Cover and allow to rise for about 2 hours or until doubled in size.: Once shaped, the dough should feel pillowy and spring back slightly when poked. In an oiled bowl the surface will not form a dry crust, allowing an even rise as the yeast produces gas. Covering traps warmth and humidity, encouraging a steady fermentation that results in a tender interior. You will know it is ready when the dough approximately doubles and retains a shallow indentation when pressed. Common pitfalls include placing it in a drafty spot, which slows rising, or letting it overproof until it collapses, which weakens the structure and can lead to dense rolls.
- Once doubled in size, punch down the dough and turn out on a lightly floured surface. Using a rolling pin, roll into an 18×12-inch rectangle.: Pushing out excess air should give a soft sigh and a slightly fermented scent. On a floured surface the dough becomes easier to roll, and you will feel it elongate under the rolling pin into that large rectangle needed for even spirals. The surface should be smooth and slightly tacky without sticking. Rolling to the specified dimensions ensures uniform thickness, which promotes even baking. If you roll too thin, the rolls can be dry; too thick and the centers may remain doughy, so aim for consistent thickness from edge to edge.
- For the filling, mix 1/2 cup brown sugar and 1 teaspoon cinnamon in a small bowl. Using your fingers or a spatula, spread 8 ounces softened butter evenly across the dough. Sprinkle the sugar mixture across the dough evenly.: Mixing the brown sugar and cinnamon releases a warm, spicy aroma you can almost taste. Spreading the softened butter creates a glossy, fragrant canvas that helps the sugar adhere, and as you sprinkle the mixture you will see the dough take on a caramel flecked look. Use firm, even pressure to cover the entire surface so each slice gets a generous ribbon of filling. A mistake here is using butter that is too cold, which will tear the dough, or too melted, which will seep through and make the base soggy.
- Starting from the bottom, roll the dough up making sure to keep it snug and tight. Using a sharp knife or unflavored dental floss, cut into 12 even rolls. Place evenly spaced in an oiled 9×13-inch pan and cover with plastic wrap. Refrigerate for 8-12 hours.: As you roll, the dough should form tight spirals with visible concentric layers and a subtle resistance that signals even tension. Cutting twelve even pieces yields uniformly sized rolls that bake consistently, and using dental floss for slicing keeps edges neat without squashing. Placing them in an oiled pan prevents sticking and allows the rolls to rise slowly and develop flavor in the fridge overnight. Avoid over rolling which can squeeze out filling, and do not leave the pan uncovered in the fridge, which can dry the dough surface.
- Remove rolls from the fridge about 45 minutes to an hour before baking. Preheat oven to 350 degrees Fahrenheit.: Taking the rolls out ahead of baking allows them to come closer to room temperature, which helps them proof a final time and bake more evenly. You will notice a gentle aeration as the dough loosens and the surface becomes slightly puffed. Preheating to the specified temperature ensures proper oven spring and golden browning. A typical mistake is putting cold dough straight into a hot oven which can result in uneven rise, so give them that warm up period for best texture.
- When the oven has reached temp and the rolls are barely touching, bake for 30-35 minutes. If the tops are browning too quickly, a sheet of foil over them can prevent further browning while the rest of the rolls finish baking.: During baking the kitchen fills with warm, sugary aromas and the tops will turn a deep golden color. The edges should be lightly caramelized and the centers cooked through, while an internal pull apart should feel tender and slightly moist. If you see rapid darkening, tent foil to avoid over browning while the middle finishes. A common error is under baking to avoid color, which can leave raw dough inside, so rely on both visual cues and gentle pressing to confirm doneness.
- While the rolls are baking, prepare your cream cheese icing. In the bowl of your mixer add 1 (8-ounce) package softened cream cheese and 1/2 cup softened butter. Whip together using the paddle attachment until smooth and creamy, about 2 minutes. Add 4 cups powdered sugar and mix on low until combined. Add 1 teaspoon vanilla and a dash of salt. Mix at medium/high speed until light and fluffy.: As you whip the cream cheese and butter , the texture becomes silky and the aroma subtly tangy, which balances the sweetness to come. Slowly adding the powdered sugar prevents a sugar cloud and allows you to reach the proper consistency. Whipping at medium high aerates the frosting, resulting in a cloud like spread that melts into warm rolls. To avoid a grainy glaze, ensure both dairy elements are at room temperature before mixing, and scrape the bowl to incorporate any pockets of unmixed sugar.
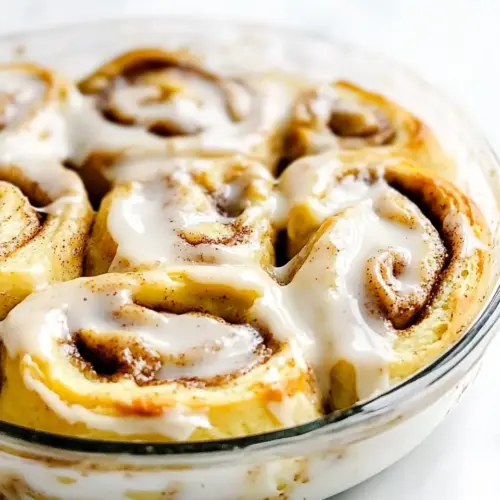
- Spread the icing liberally across the almost completely cooled cinnamon rolls. Serve and enjoy!: The final spread should be thick enough to settle into the crevices without completely sinking in, creating glossy peaks and ribbons across the rolls. Cooling slightly before icing preserves the creaminess of the frosting while still allowing it to soften and seep into the warm interiors. If you frost piping hot rolls the icing can become too runny, so aim for warm, not hot. Serve with a fork or your fingers, and enjoy the contrast of the tender dough and the rich, tangy icing.
Notes
- Measure your flour properly, spoon the flour into your measuring cup and level it off or weigh it, because too much flour will make the rolls dense rather than tender; weighing gives the most consistent outcome.
- Check yeast freshness, if your instant yeast does not foam after the warm milk and sugar step, it is likely expired or the milk was the wrong temperature; replace yeast to ensure a good rise.
- Keep butter at the right softness, for spreading use butter that yields to gentle pressure but still holds shape, as overly soft butter will seep through and overly firm butter will tear the dough.
- Cut even rolls, use unflavored dental floss or a sharp serrated knife and measure roughly into twelve equal pieces to ensure even baking and uniform servings.
- Tent with foil if needed, if the tops brown too quickly during baking cover lightly with foil to prevent burning while the centers finish cooking through.
- Allow a short cool down before icing, wait until rolls are almost cool to spread the cream cheese frosting so it becomes glossy and slightly melted into the swirls rather than running off the pan.