Oreo Ice Cream Cake
Oreo Ice Cream Cake is a creamy, crunchy, and easy no bake dessert that layers crushed Oreo crust, soft cookies and cream ice cream, warm hot fudge, and whipped topping for a crowd pleasing finish. Perfect for summer parties and birthdays, this make ahead treat delivers satisfying texture in each bite and is simple enough to assemble in under an hour of hands on time, making it a must try dessert.
Equipment
- 9x13 pan
- Mixing Bowl
- Measuring Cup
- Spatula
- Microwave or small saucepan
Ingredients
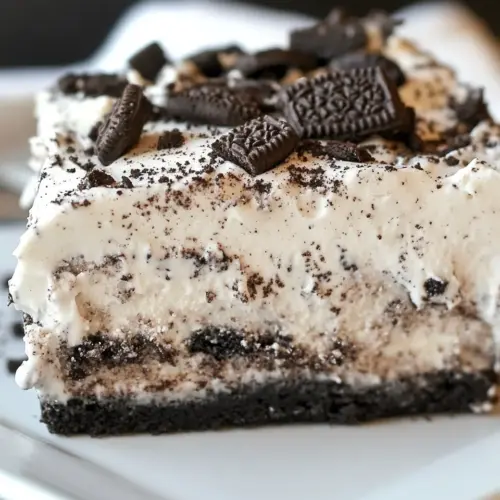
- 1 (13.29-ounce) package Oreos, crushed (see notes) Crushed and crunchy, provides the primary chocolate sandwich cookie flavor and texture for the cake base and layers; use as directed to form a sturdy crust and add signature Oreo pieces throughout. Can be pulsed to varied sizes to balance structural integrity with pleasant cookie bits that contrast the creamy ice cream.
- 1/4 cup butter, melted Melted and rich, binds the crushed cookies into a compact, sliceable crust while adding subtle buttery flavor; pour over crumbs and press firmly to form an even foundation for the cake. Chilling briefly after pressing helps the crust set and prevents crumbling when slicing.
- 1/2 gallon cookies and cream ice cream, softened Softened and creamy, supplies the main frozen filling that defines the cake’s cookies-and-cream character and smooth, scoopable texture; spread evenly over the crust for uniform layers. Allow to become pliable but not melted so it re-freezes into a dense, scoopable layer that holds shape.
- 1 (16-ounce) jar hot fudge, warmed Warm and glossy, introduces a decadent, fudgy ribbon of chocolate that contrasts the cold ice cream and adds intense flavor and moisture; drizzle or layer to create pockets of oozy fudge inside the cake. Warming slightly eases spreading and helps it set into ribbons between frozen layers.
- 8 ounce whipped topping, thawed Thawed and airy, delivers light, sweet topping to finish the cake with creamy peaks and a smooth surface; spread or pipe for an attractive presentation and softer bite. Keep chilled after applying to maintain structure and prevent runniness.
Instructions
- Add crushed cookie crumbs to a bowl reserving 1/2 cup for the top. Add butter and mix well. Press into a greased 9×13 pan.: The bowl should fill with fragrant, chocolatey dust that smells like fresh cookies, and as you stir the crumbs you can feel the varied particle sizes between your fingers. This reserved half cup will become the finishing flourish on top, adding visual contrast, so keep it aside dry and separate. Why this matters, the reserved crumbs give a crunchy accent after freezing, and skipping this step can leave the final presentation muted. A common mistake here is over crushing, which produces too fine a powder that will not provide that satisfying crunch, so aim for a mix of fine crumbs and small pieces.
- Spread softened ice cream over crust and freeze for 2 hours.: When you pour the warm, melted butter into the crumbs, watch the mixture darken and develop a glossy sheen as the fats coat the pieces. Mixing until thoroughly combined ensures the crust will bind when pressed. You are looking for a texture that feels like damp sand, not soupy, which means the ratio is right. If you add too much butter , the crust will become greasy and loose, so measure and mix carefully. If the mixture seems too dry, add a teaspoon of melted butter at a time until the right consistency is reached.
- Drizzle warm fudge over ice cream and freeze for 1 hour.: As you press the crumb mixture into the greased pan, listen for the faint compressing sounds and notice the surface smooth out under gentle pressure. A flat, even crust is essential so the ice cream layer sits uniformly, and using the bottom of a measuring cup helps compact the crumbs. This compaction is what prevents the crust from falling apart when sliced. If you press too lightly, the crust will crumble, and if you press too hard, it may become overly dense, so aim for firm, even pressure.
- Add whipped topping, sprinkle with reserved Oreos, and freeze for 2 hours. Remove from the freezer and let it set out for 15 minutes before serving. ENJOY!: The softened ice cream should spread like a velvet blanket, studded with cookie bits, and your spatula will leave gentle trails as you smooth it. This texture is key because it freezes into a scoopable yet sliceable layer. Freezing for 2 hours helps the ice cream set so the next layers do not sink or blend. Avoid spreading ice cream that is too soft, which can create air pockets and an uneven set, so if it becomes too loose, return it to the freezer briefly before proceeding.
- Drizzle warm fudge over ice cream and freeze for 1 hour: When you warm the hot fudge , it should be just pourable and glossy; as you drizzle it over the cold surface, you will see the fudge form ribbons that slightly set on contact, creating beautiful streaks. This creates a contrast of warm, molten chocolate and cold, creamy ice cream which elevates the eating experience. Freezing for 1 hour locks the fudge in place. One mistake is heating the fudge too much, which makes it too thin and causes it to sink into the ice cream rather than decorate it, so heat gently and stir to keep viscosity right.
- Add whipped topping, sprinkle with reserved Oreos, and freeze for 2 hours: The thawed whipped topping should be airy and light as you spread it, and when you smooth it across the surface it softens the visual transitions between layers. Sprinkling the reserved Oreos adds a finishing crunch and a lovely contrast against the white topping. Freezing for another 2 hours ensures everything is solid and sliceable. A common slip is applying the topping to a surface that is not fully set, which can cause the layers to compress and smear, so be sure the prior layers are firm before spreading the topping.
- Remove from the freezer and let it set out for 15 minutes before serving: As the cake rests at room temperature for about 15 minutes, you will notice the edges soften and the knife glide more smoothly through the layers, making clean slices easier. The brief tempering balances the frozen interior with a slightly softer eating temperature that highlights flavors and textures. Avoid leaving it out too long, which will cause the ice cream to melt and lose structure; watch for a slight give when you press gently at the center to know it is ready.
Notes
- Make a thicker crust: Increase the quantity of crushed Oreos and butter proportionally to deepen the crunch and create a more substantial base for hearty slices.
- Use different ice cream: Swap the cookies and cream ice cream for a complementary flavor like chocolate or caramel to shift the overall profile while keeping the same assembly method.
- Vary the topping: Replace the whipped topping with a lightly sweetened mascarpone dollop for a richer, creamier finish that is still spreadable and pairs well with warm hot fudge.
- Adjust fudge thickness: Warm the hot fudge less for thicker ribbons or a touch more for thinner streaks that sink just slightly into the ice cream.
- Change presentation: Make individual portions in ramekins or silicone molds so each person gets a neatly layered serving without slicing a large pan.