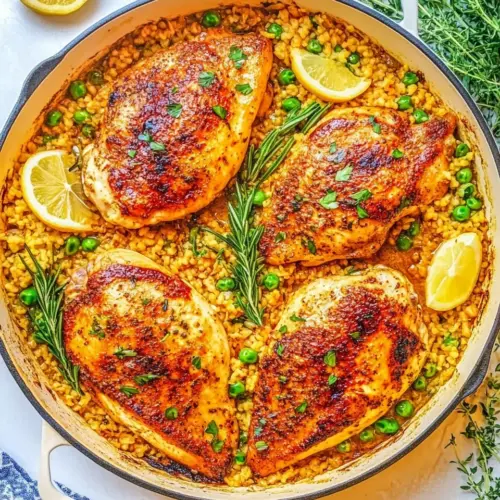
One Skillet Lemon Chicken
One Skillet Lemon Chicken is a bright, comforting one pan meal with toasted pearled farro, juicy chicken, and snap asparagus. Zesty lemon and savory Parmesan create a silky sauce that soaks into the grain, making for an easy weeknight dinner that feels special. Make it when you want a simple, flavorful meal that impresses with minimal cleanup.
Equipment
- large skillet (must be oven safe)
- Digital Thermometer
Ingredients
- 1 cup pearled farro, toasted, then rinsed (make sure to select pearled farro which is essentially quick-cooking farro compared to the other types) Provide a nutty, chewy base that soaks up flavors; pearled farro cooks relatively quickly and helps thicken the skillet liquid for a hearty texture. Toasting enhances its aroma and rinsing removes excess starch, ensuring separate grains rather than a gummy result. Pairing with lemony, savory components balances its earthiness and creates a substantial one-skillet meal.
- 2 pounds boneless skinless chicken thighs, about 5 pieces; read the FAQs in the blog post for chicken substitution questions Add rich, tender protein with flavorful dark meat that stays moist during skillet cooking; boneless skinless thighs tolerate higher heat and longer simmering without drying out. Cutting into about five pieces allows even searing and consistent portioning across the pan. Follow substitution guidance if using other cuts to maintain cooking time and texture.
- 1 teaspoon paprika, or to taste (smoked paprika may be substituted) Impart warm, mild heat and a subtle smokiness depending on variety; paprika enhances color and visual appeal on seared chicken. Adjust seasoning to taste and consider smoked paprika for a deeper smoky note. Sprinkle before cooking to form a flavorful crust during browning.
- 1 teaspoon kosher salt, or to taste Enhance overall flavor depth and bring out natural savory notes in both chicken and farro; kosher salt dissolves easily and seasons throughout the dish. Use to taste to control sodium level, keeping in mind the chicken broth may contribute additional salt. Add gradually and adjust at the end for balanced seasoning.
- 1/2 teaspoon freshly ground black pepper, or to taste Brighten and balance flavors with a touch of ground black pepper that adds gentle heat and aromatic complexity. Grind fresh for more pronounced flavor and adjust quantity to preference. Combine with salt and paprika for a well-rounded seasoning profile.
- 2 tablespoons olive oil, divided; or more if necessary Facilitate browning and prevent sticking while contributing fruity, savory undertones; olive oil is used both for searing the chicken and for sautéing aromatics. Divide between searing and cooking the shallot/garlic to control smoking and flavor layering. Add more if needed to ensure proper pan lubrication for farro absorption.
- 1 large shallot, sliced thin (or sub with 1/3 cup finely diced white onion) Provide a sweet, mild onion flavor and tender texture when thinly sliced; shallot offers a subtler, more complex aroma than regular onion. Slice thin for quick softening in the skillet and to meld with garlic without overpowering the dish. Substitute with finely diced white onion if necessary, adjusting cook time for size.
- 2 to 3 cloves garlic, finely minced Contribute pungent, savory depth and aromatic lift; finely minced garlic infuses the cooking liquid and complements lemon and mustard. Add during the shallot step to bloom its flavor without burning. Adjust cloves to preference for a balanced garlicky presence.
- 2 1/2 cups chicken broth, (I recommend reduced sodium) Create the braising liquid that cooks the farro and flavors the chicken, providing savory richness and salt control with reduced-sodium broths preferred. Measure carefully to ensure the proper rice-to-liquid ratio for tender farro without excess sogginess. Simmer gently to concentrate flavors and meld with mustard and lemon.
- 1 tablespoon Dijon mustard, or to taste (grainy mustard may be substituted, do not use basic yellow mustard) Add tangy, sharp acidity and emulsifying power that helps thicken the pan sauce while brightening the dish; Dijon mustard integrates smoothly into warm liquids. Stir into the broth to create a cohesive, slightly creamy coating for the farro and chicken. Adjust amount to taste for the desired tang level.
- Zest of 1 medium lemon Lift and freshen the dish with fragrant citrus oils from the lemon zest that complement the savory components; zest adds concentrated lemon flavor without extra liquid. Sprinkle into the cooking liquid or finish on top for an aromatic burst. Pair with lemon juice to create layered citrus notes.
- Juice of 1 lemon, about 2–3 tablespoons juice Provide lively acidity and bright citrus flavor that cuts through the richness of chicken and Parmesan; freshly squeezed juice integrates into the braising liquid. Measure roughly 2–3 tablespoons for balanced tartness and adjust to taste at the end. Use to finish the dish for a fresh, zesty lift.
- 1 small bunch asparagus, trimmed and cut into 2-inch pieces (about 2 cups; do not use frozen or canned vegetables; fresh broccolini, broccoli, green beans, or fresh snap peas may be substituted) Contribute fresh, crisp green texture and a mild vegetal note that contrasts the tender chicken and chewy farro; trimmed asparagus cooks quickly and holds color. Cut into 2-inch pieces for even cooking and add near the end to retain bite and vibrant appearance. Substitute with similar fresh vegetables when needed, avoiding frozen or canned options.
- 1/4 cup freshly grated Parmesan cheese, or more to taste if desired Bring salty, umami richness and a creamy finish when stirred into the hot farro and sauce; freshly grated Parmesan melts into the pan for cohesive flavor. Add toward the end off heat to prevent graininess and to create a smooth, savory coating. Use more to taste for an extra savory finish.
- Optional for garnishing: minced fresh parsley, extra grated Parmesan, lemon wedges Provide fresh herbal brightness, extra savory topping, and citrus wedges for finishing and presentation if desired; minced parsley adds color and a mild grassy note. Offer extra grated Parmesan for guests who prefer more cheese and lemon wedges to adjust acidity. Use as optional garnishes to personalize flavor and appearance.
Instructions
- Preheat oven to 350 F. Farro: In a large, oven-safe skillet, add the farro (keep the skillet dry), and toast it over medium heat for about 4-5 minutes; stir nearly constantly until the farro is lightly browned and fragrant. Transfer to a strainer or colander, rinse, and set aside. Tips– Toasting farro before cooking enhances its nutty flavor and adds depth to the dish. After toasting, rinse the farro to remove any powdery residue. This step preserves the nutty flavor while preventing the dish from becoming gummy or overly starchy. In contrast to rice, where you wash or rinse it first, then cook it; farro is the opposite. Toast first, then rinse it.: You should notice warm steam and a faint oven hum as it reaches temperature, which creates an even environment for the skillet to finish cooking the chicken and farro . This moderate heat allows the farro to soften without the chicken drying out. A common mistake is preheating too hot, which can overbrown the top before the center is done, so wait until the oven fully signals ready.
- Chicken: Evenly season the chicken with paprika, salt, and pepper. Heat 1 tablespoon olive oil in a large, oven-safe skillet over medium heat, add the chicken, and sear it for about 4 minutes per side, or until browned; it should not be fully cooked through at this point. Transfer to a plate and set aside.: In a large, oven safe skillet, add the farro, keep the skillet dry, and toast it over medium heat for about 4 to 5 minutes, stir nearly constantly until the farro is lightly browned and fragrant : Expect a warm, toasty aroma and small plumes of steam as the kernels darken; the sound is a gentle, even sizzle rather than a pop. This toasting step intensifies nutty flavors and helps the grains stay separate after cooking. If you skip stirring often, some kernels will scorch, producing a bitter note, so be attentive and keep the farro moving in the pan.
- Vegetables: To the same skillet, add the remaining olive oil (or more if desired) and the shallots. Sauté for 2–3 minutes until softened, stirring very frequently. Then add garlic and cook 30-60 seconds more; stirring continuously.: After the toasting, rinsing removes powdery dust and prevents a gummy final texture while preserving the browned flavor you just developed. You will see cloudy water at first that quickly clears as the fine residue washes away. A common error is to skip rinsing, which can result in clumpy, starchy grains, so use a fine mesh and let the water run until clear.
- Incorporating and Simmering: Stir in the rinsed farro. Add a splash of broth to deglaze the pan, scraping up any browned bits. Stir in the Dijon mustard, lemon zest, and remaining broth. Bring to a simmer, then reduce heat to low. Nestle the seared chicken into the skillet.: Evenly season the chicken with paprika, salt, and pepper : The seasoning should coat each piece so that when you sear the chicken it forms a flavorful crust, adding both color and taste. Pat the seasoning into the meat to help it adhere. Overlooking even seasoning will leave some bites bland, so take an extra moment to spread the spices uniformly.
- Baking: Transfer to the oven and bake, uncovered, for 15 minutes. Remove from the oven, stir in the asparagus and take care to have the chicken thighs to the top of the dish. Bake for another 10–15 minutes, or the until farro is tender and chicken reaches 165°F as measured by a thermometer. Baking Tip: If it takes longer (or less) time to for your chicken and farro to be done, so be it. Bake as long as necessary, whatever that means in your kitchen, with your oven, pan, ingredients, etc. Farro Absorption Tip: Farro continues to absorb liquid as it rests, so don’t worry if there’s extra liquid in the pan when you finish baking. As the dish rests and time passes, the farro will continue to soak up the liquid, and therefore even more flavor.: You will hear a satisfying sizzle and watch the surface caramelize to an appetizing golden brown, which locks in juices and creates fond for the sauce. The goal is a deep exterior color without cooking through, because finishing in the oven ensures even doneness. A common pitfall is overcrowding the pan, which steams the meat instead of searing, so give pieces breathing room.
- Finishing: Remove the skillet from the oven, squeeze lemon juice over the dish, and sprinkle with Parmesan. Optionally, garnish with fresh parsley or other fresh herbs such as oregano or thyme, if desired. Flavoring Tips: Taste the dish and if necessary, add additional salt or pepper, to taste. If you used reduced sodium broth, chances are you'll want to add a generous bit more salt (I add about 1 more teaspoon) and pepper, but it's based on your preferences. Serve warm.: Let the seared chicken rest briefly so juices redistribute, and the residual heat will carry some cooking forward without toughening the meat. Placing it on a plate prevents the pan from becoming crowded when you add other ingredients. Avoid leaving it too long at room temperature, especially if your kitchen is warm, as that can invite uneven final cooking.
- Vegetables: To the same skillet, add the remaining olive oil, and the shallots : You will notice the pan releasing fragrant, sweet aromatics as the shallot heats; this step uses the browned bits in the pan to build depth. The oil helps lift those fonded flavors into the aromatics. If you turn up the heat too high here, the shallots can burn quickly, so keep a gentle medium heat and stir frequently.
- Sauté for 2 to 3 minutes until softened, stirring very frequently: The shallots should become translucent and tender, offering a mellow onion sweetness. The frequent stirring prevents localized browning and ensures even cooking. A common mistake is leaving them unattended, which can produce bitter charred edges, so stay present.
- Then add garlic and cook 30 to 60 seconds more; stirring continuously: Once the garlic becomes fragrant, you will smell a warm, savory lift; this brief cooking develops its flavor without bitterness. Keep it moving because garlic burns faster than onions and turns acrid if left too long. If you detect a sharp, charred smell, lower the heat and remove the pan from direct heat immediately to avoid bitterness.
- Incorporating and Simmering: Stir in the rinsed farro : The farro will hiss slightly as it meets the hot aromatics and begins to soak up flavors; you want it fully coated so each kernel picks up the pan flavors. This step helps the grain integrate so the final texture is cohesive rather than grainy. A mistake is dumping it in cold or adding too much liquid immediately, which can cool the pan and prevent proper flavor melding.
- Add a splash of broth to deglaze the pan, scraping up any browned bits: You will see the browned fond dissolve into the liquid, creating a glossy base full of concentrated flavor. Use a wooden spoon to lift those bits because they contain intense savory notes that transform the broth. A common oversight is skipping deglazing, which wastes those flavorful caramelized pieces and leaves the sauce flat.
- Stir in the Dijon mustard, lemon zest, and remaining broth: As the mustard and lemon zest meld into the broth, the sauce will take on a subtle tang and aromatic lift. Stir until the mustard is fully dispersed so the liquid gains body and a balanced brightness. If the mustard clumps, whisk it into a small amount of warm broth first to smooth it out before adding.
- Bring to a simmer, then reduce heat to low: Look for gentle bubbling rather than a rolling boil, which helps the farro absorb liquid evenly without breaking apart. A gentle simmer infuses the grains while preserving texture. Boiling too hard makes the farro tough and the broth evaporate too quickly, so adjust the flame as needed.
- Nestle the seared chicken into the skillet: Arrange the chicken so pieces sit partially submerged in the broth but with tops exposed, which allows the meat to finish cooking while the farro softens. You will notice the skillet look like a composed one pan meal at this stage. Avoid crowding, as even heat circulation around pieces ensures consistent doneness.
- Transfer to the oven and bake, uncovered, for 15 minutes: The oven’s dry heat will finish cooking the chicken while the farro continues to absorb the broth; you should see small pockets of bubbling around the edges. This initial bake sets the structure for the final meld of flavors. A common slip is moving the skillet before the time is up, which interrupts the gentle oven finish.
- Remove from the oven, stir in the asparagus and take care to have the chicken thighs to the top of the dish: When you add the asparagus , the visual contrast of green against golden chicken is a good cue that you are close to done. Stir gently to distribute the vegetable without burying the meat, which helps the asparagus keep some snap. Overmixing can break the grain and muddle textures, so be gentle.
- Bake for another 10 to 15 minutes, or until farro is tender and chicken reaches 165°F as measured by a thermometer: Listen for a soft simmer and watch for the farro to plump; the internal chicken temperature is the definitive sign of doneness. The asparagus will darken slightly and remain tender crisp. A frequent mistake is relying solely on visual cues for chicken, so use a digital thermometer to be safe and avoid dryness from overbaking.
- Finishing: Remove the skillet from the oven, squeeze lemon juice over the dish, and sprinkle with Parmesan : The fresh lemon juice will deliver a bright, acidic pop that sharpens the sauce, while the Parmesan melts into creamy ribbons that bind the farro and broth. You will notice a fragrant citrus top note and a silky mouthfeel as cheese softens. If the dish tastes flat, add a pinch more salt, as reduced sodium broth may need adjustment.
- Optionally, garnish with fresh parsley or other fresh herbs, if desired: A sprinkle of chopped parsley adds herbaceous color and a clean finish, while extra Parmesan offers more savory richness. Serve warm straight from the skillet for a rustic presentation. One pitfall is overgarnishing, which can mask the dish’s clean flavors, so use garnishes sparingly.
Notes
- Check internal temperature: A quick, reliable way to prevent overcooking is using a digital thermometer; probe the thickest part of a thigh and remove at 165°F. This avoids dry meat and gives you repeatable results every time.
- Toast then rinse the farro: Toasting develops depth while rinsing removes surface starch; this two part method keeps the grains separate and flavorful instead of sticky.
- Reserve pan fond: Don’t wipe the skillet after searing the chicken; the browned bits dissolve into the broth when you deglaze, producing richer sauce with minimal effort.
- Adjust lemon at the end: Add fresh lemon juice after baking to preserve its lively acidity and aroma; too much acid early can dull the brightness during oven time.
- Use reduced sodium broth: Starting with less salt lets you fine tune seasoning at the finish, preventing an overly salty outcome especially after adding Parmesan.
- Don’t overcrowd the skillet: Sear chicken in batches if needed, because proper contact with the pan creates color and fond essential for flavor.
- Garnish sparingly: A small sprinkle of chopped parsley or extra Parmesan brightens presentation and flavor without overwhelming the dish.