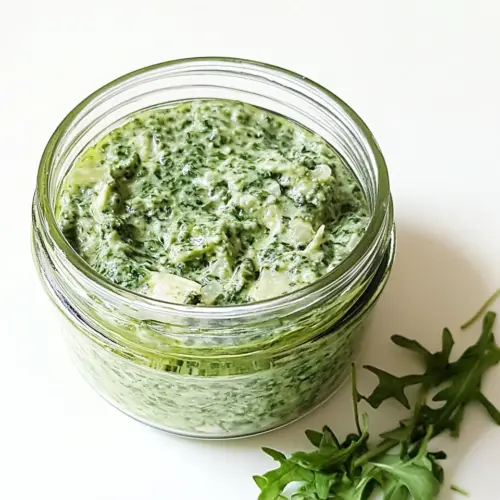
Oil Free Arugula Pesto
Oil Free Arugula Pesto is a bright, creamy vegan sauce that blends peppery arugula, sweet basil, and crunchy walnuts into an herbaceous spread. This easy pantry friendly condiment works as a pasta sauce or sandwich spread and is perfect for an easy weeknight dinner or a fresh spring lunch, offering bold flavor with lighter texture.
Equipment
- Food Processor
- Citrus Juicer
- Measuring Cups
Ingredients
- 1 cup fresh arugula Provide a bright, peppery foundation and leafy bulk that contributes fresh flavor and vibrant color to the pesto; blends down smoothly when pulsed and pairs well with basil for balanced herbaceousness.
- 1 cup fresh basil Add aromatic sweetness and classic pesto character while softening the sharpness of arugula; releases essential oils when chopped or blended to create depth and a fragrant finish.
- 1 tablespoon freshly squeezed lemon juice Provide high acidity that lifts and balances the herb flavors, preventing the pesto from tasting flat; brightens the overall profile and helps preserve the green color slightly.
- 2 to 3 cloves garlic, to taste Deliver pungent, savory heat and depth; crushing or mincing before blending releases sulfurous oils that underpin the herbs and make the pesto more complex.
- 1/2 cup raw walnuts Contribute rich, buttery texture and natural nuttiness that helps thicken and give body to the sauce without oil; blends to a creamy consistency while adding subtle earthiness.
- 1/4 cup water Offer necessary moisture to help the mixture emulsify and reach a spreadable consistency without adding fat; allows controlled thinning so the pesto remains oil-free yet smooth.
- 1/4 teaspoons salt, plus more to taste Enhance and season the mixture to taste, bringing out the individual flavors and balancing acidity and bitterness; a pinch more at the end sharpens and completes the pesto.
Instructions
- Combine all of the ingredients in a small food processor and process until everything is broken down. I prefer my pesto to have a bit of a chunky texture, but you can use a blender if you would like a smoother result.: The moment you start the processor you will hear a steady whir and smell bright herbal notes. As the blades chop, the leaves will collapse and release vivid green pigments, and the walnuts will begin to turn into small mealy bits that help thicken the sauce. This stage matters because it determines texture, so pulse a few times to avoid over processing into puree if you prefer a chunkier pesto. A common error is running the processor continuously at high speed which can heat the mixture and dull the fresh flavors; use short pulses and scrape the bowl if needed to ensure even consistency.
- Once the pesto is smooth enough, taste it and adjust any seasonings as needed. When you use fresh ingredients, the taste will always vary by batch, so I usually end up adding an extra splash of lemon juice or an extra pinch of salt to make it taste 'just right.' Also, I think it should be noted that I love a spicy punch of garlic, so 3 cloves is usually perfect for me, but if you're not the biggest garlic fan, you might only want to start with 1 or 2 cloves and add more to taste. The nice thing about making a blended sauce like this one is you can always taste as you go and adjust as needed.: You will notice when using a food processor the mixture holds more visible bits of walnut and leaves, giving a rustic mouthfeel with little bursts of herb. A blender will create a silkier, more homogeneous sauce, often at the cost of losing that rustic chew. The why is simple, texture affects how the pesto clings to food and how intense each bite feels. To troubleshoot, if your processor struggles, add a splash of water and pulse again rather than over blending, which can warm the pesto and change its color.
- Because these ingredients are all fresh, I'd recommend keeping this sauce stored in an airtight container in the fridge for no longer than a week for best flavor.: Close your eyes and taste for brightness, salt, and garlic presence. This sensory check is when the pesto comes alive, and you may find it needs an extra squeeze of lemon juice to lift it or a pinch more salt to anchor flavors. The textures will also reveal themselves now, so if it feels too thick add a teaspoon of water at a time until it reaches a spreadable consistency. A frequent slip is adding too much acid at once, which can dominate the herbs; always adjust incrementally and taste between additions.
- When you use fresh ingredients, the taste will always vary by batch, so I usually end up adding an extra splash of lemon juice or an extra pinch of salt to make it taste 'just right.': Fresh arugula and basil fluctuate in intensity, so I treat every jar as unique. After processing, give it a final sniff and a small taste to calibrate. That little tweak of lemon juice or salt makes the difference between good and memorable. Avoid adding large amounts all at once, because it is harder to correct over seasoning than under seasoning.
- Also, I think it should be noted that I love a spicy punch of garlic, so 3 cloves is usually perfect for me, but if you're not the biggest garlic fan, you might only want to start with 1 or 2 cloves and add more to taste: The raw garlic will assert itself differently depending on the clove size and freshness, so begin modestly if unsure. Pulse and taste between additions because raw garlic can quickly dominate the herb profile. If the pesto ends up too garlicky, try diluting with more basil or a little extra water , and remember that the flavor will mellow slightly as it rests in the fridge.
- The nice thing about making a blended sauce like this one is you can always taste as you go and adjust as needed: Continual tasting is key, because the balance of herb, nut, acid, and salt defines success. Use a clean spoon for each taste so you don’t contaminate the jar, and note how the flavors evolve after a few minutes of resting. If the texture firms up too much after chilling, stir in a teaspoon of water before serving. One common oversight is skipping the tasting stage, which leads to flat or unbalanced pesto.
- Because these ingredients are all fresh, I'd recommend keeping this sauce stored in an airtight container in the fridge for no longer than a week for best flavor: Proper storage preserves the bright color and prevents spoilage. Press a thin layer of plastic or a little extra water on top to minimize air contact, and keep the container chilled. Over time the herbs will darken and the flavor will soften, so I prefer to make smaller quantities and enjoy them quickly. A mistake people make is leaving it unrefrigerated for long periods; always store it cold and use within seven days for peak freshness.
Notes
- Control the texture, pulse the processor for a chunkier result or blend longer for a silky finish, adding water gradually to reach your desired consistency.
- Balance acidity, add lemon juice in small increments and taste often so the herb flavors remain vibrant and not overshadowed.
- Garlic preference, start with one clove if you are sensitive and increase to two or three to build a stronger savory backbone without overwhelming the herbs.
- Nut aroma, toast the walnuts lightly for deeper flavor but keep watch as they can burn quickly and become bitter if left too long.
- Salt carefully, use fine salt and add a little at a time since it enhances the herbs and is difficult to correct if added in excess.
- Storage trick, press a dab of water or a thin plastic sheet on the surface to minimize oxidation and keep the pesto greener longer in the fridge.