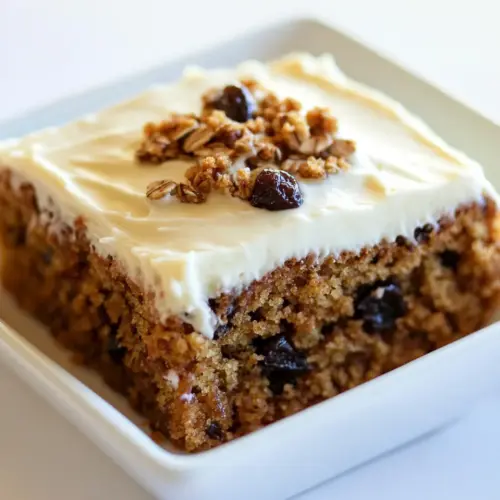
Oatmeal Raisin Snack Cake with Cream Cheese Frosting
Oatmeal Raisin Snack Cake with Cream Cheese Frosting is a cozy, textural cake with plump raisins, warm spices, and a tangy creamy frosting. The recipe yields a moist, tender crumb from quick cooking steel cut oats and balanced sweetness from brown and granulated sugars, perfect for casual gatherings or a comforting treat. Make it for weekday baking, it is straightforward and reliably delicious.
Equipment
- 9 x 13-inch baking pan
- Electric Mixer
- Medium Bowl
- Small Bowl
- Wire Rack
- Rubber spatula
Ingredients
- 1 1/2 cups (375 ml) boiling water Boiling and soaking to hydrate the oats and raisins, contributing moisture and helping dissolve sugars for even texture in the cake. Adds heat to bloom flavors and ensures a tender crumb by integrating with dry ingredients. Serves as the primary liquid base to bind batter components and activate baking soda.
- 1 1/2 cups (217.5 g) raisins Plumply sweet and chewy, raisins lend concentrated fruity sweetness and texture contrast throughout the cake. When soaked in boiling water they rehydrate, become tender, and infuse the batter with natural sugars and flavor. Also contributes bursts of chew that balance the soft oat crumb.
- 1 cup (160 g) quick-cooking steel cut oats Coarsely textured quick-cooking steel cut oats provide hearty chew, nutty flavor, and whole-grain structure to the snack cake. Their partially broken form absorbs liquid quickly for a moist, rustic texture without remaining raw. Adds fiber and a distinct oat aroma that complements spices and raisins.
- 1 1/3 cups (166.67 g) all-purpose flour Light, all-purpose flour builds the cake’s structure by forming gluten when mixed with liquids, supporting rise and crumb. Provides neutral background to showcase oats, spices, and raisins while controlling density. Balances moisture absorption for a tender but stable snack cake.
- 1 teaspoon baking soda Leavening with baking soda produces carbon dioxide when reacting with acidic components or heat, helping the cake rise and become airy. Neutralizes some acidity from brown sugar or soaked raisins to improve crumb tenderness. Ensures even lift and lighter texture in the finished cake.
- 1 teaspoon ground cinnamon Warm ground cinnamon adds aromatic spice, enhancing sweetness and depth with a familiar baking scent. Distributes spice flavor uniformly throughout the batter for balanced warmth. Complements raisins and nutmeg to create classic oatmeal spice cake notes.
- 1/2 teaspoon (0.5 teaspoon) ground nutmeg Fragrant ground nutmeg contributes subtle warmth and earthy, slightly sweet spice without overwhelming other flavors. Used sparingly to support cinnamon and add complexity to the spice profile. Enhances overall aroma and pairs well with cream cheese frosting.
- 1/2 teaspoon (0.5 teaspoon) salt Seasoning with salt brightens and balances sweetness while enhancing overall flavor complexity in the cake. Strengthens gluten structure slightly and deepens spice and sugar notes. Helps control taste, preventing a flat or overly sweet result.
- 1/2 cup (113.5 g) unsalted butter, at room temperature Softened unsalted butter provides richness, tenderness, and flavor, creating a smooth batter when creamed with sugars. Imparts moisture and helps trap air for lift, contributing to cake crumb and mouthfeel. Using unsalted allows precise control over overall salt level.
- 1 cup (200 g) granulated sugar Granulated sugar sweetens the cake, helps tenderize the crumb by interfering with gluten formation, and aids in creaming to incorporate air. Contributes to caramelization and color during baking for appealing crust and flavor. Works with brown sugar to balance moisture and sweetness.
- 1 cup (220 g) light brown sugar Light brown sugar offers moist, molasses-like sweetness that deepens flavor and keeps the cake tender. Adds acidity to interact with baking soda for leavening and contributes to a richer color and softer crumb. Enhances the cake’s caramel and toffee undertones.
- 2 eggs Whole eggs act as binding agents, providing structure, richness, and moisture while aiding emulsification of fats and liquids. Help with leavening and stability during baking to create cohesive crumb and lift. Add protein and contribute to golden color and tender texture.
- 1 teaspoon vanilla extract Pure vanilla extract delivers sweet, aromatic flavor that rounds out the cake and enhances other ingredients’ profiles. Small concentration boosts perceived sweetness and flavor complexity without adding sugar. Harmonizes spices and fruit notes for a balanced taste.
- 8 ounces (226.8 g) cream cheese, cold Cold cream cheese supplies tangy, creamy body to the frosting, offering a pleasant contrast to the sweet powdered sugar. Its firmness when cold makes it easier to beat into a smooth, stable frosting that holds shape. Adds richness and tartness that complements the spiced cake.
- 3 tablespoons unsalted butter, at room temperature Room-temperature unsalted butter creates a silky, airy frosting texture when creamed with cream cheese and sugar. Contributes richness, spreadability, and structure so the frosting sets nicely on the cake. Unsalted form permits precise control of overall saltiness in the topping.
- 2 cups (240 g) powdered sugar Powdered sugar sweetens and thickens the frosting to a smooth, pipeable consistency while dissolving easily for a creamy texture. Balances cream cheese tang with sweetness and helps stabilize the frosting for spreading. Provides body and sweetness without graininess.
- 1/2 teaspoon (0.5 teaspoon) vanilla extract Vanilla extract enhances and rounds the frosting’s flavor with warm, aromatic notes that lift the cream cheese’s tang. Small addition intensifies overall sweetness perception and adds depth to the topping. Ensures a cohesive flavor link between cake and frosting.
- Pinch of salt A pinch of salt sharpens sweetness and balances flavors in the frosting, preventing it from tasting flat or overly sugary. Accentuates the cream cheese tang and vanilla while rounding out the overall profile. Used sparingly to fine-tune taste harmony.
Instructions
- Make the Cake: Preheat oven to 350 degrees F. Grease a 9 x 13-inch baking pan.: The aroma of a preheated oven is the first signal that baking has begun, a warm dry heat that primes the pan for even browning. You should feel the oven stabilizing at 350 degrees F before the batter goes in, which promotes a steady rise and an even set. Greasing the pan helps release later and encourages a golden edge. A common slip here is placing the pan in before the oven is fully up to temperature, which can lead to uneven bake and a denser center; wait until the oven reads true heat. Visually, the batter should begin to set around the edges within the first 12 to 15 minutes, and you will notice the top start to take on a pale gold tone as the oven does its work.
- In a medium bowl, stir together the boiling water, raisins and oats and let sit for 20 minutes.: Right away you will notice steam and a sweet raisin perfume as the boiling water hits the dried fruit and oats . This soak plumps the raisins and softens the quick cooking steel cut oats , allowing them to integrate into the batter rather than draw moisture out during baking. After about 20 minutes the raisins should look swollen and glossy, and the oats should be tender but still retain some tooth. If you skip the soak, the raisins will remain dry and chewy in the finished cake, and the oats might stay too firm; soaking prevents both issues. Stir once or twice during the soak to ensure even hydration and to taste a raisin to confirm plumpness.
- In a small bowl, whisk together the flour, baking soda, cinnamon, nutmeg and salt; set aside.: As you whisk, the scent of the cinnamon and nutmeg will lift and combine with the neutral smell of the all purpose flour , creating an aromatic base for the batter. Whisking distributes the baking soda and salt so they activate evenly when mixed into the wet ingredients, which is crucial for consistent lift. If the dry ingredients are not well combined, you risk pockets of leavening that cause uneven texture. Visually, the mixture should look uniform with a light dusting of spices through the flour, and you should not see clumps of baking soda .
- Using an electric mixer, beat the butter and both sugars together on high speed until light and fluffy, about 5 minutes. Reduce the speed to medium and add the eggs and vanilla extract, beating to combine. Reduce the mixer speed to low and add the oat mixture, then gradually add the flour mixture, beating until just combined. Give the mixture a final stir with a rubber spatula and transfer to the prepared baking pan.: When you start creaming the room temperature butter with the granulated sugar and light brown sugar , listen for a change in resistance and watch the color shift to paler and more aerated; that trapped air is what lightens the final crumb. After about 5 minutes on high, the texture should look fluffy and lifted, and you will see tiny air bubbles in the batter. Adding the eggs at medium speed helps them emulsify, creating a smooth, cohesive batter. When you fold in the soaked oat mixture and then gradually the dry mix, stop mixing as soon as the streaks disappear; over mixing will develop gluten and tighten the crumb. A frequent error is rushing the creaming step or over beating after adding flour which yields a tougher cake. The finished batter should be glossy, moderately thick, and should pour with a slight ribbon into the prepared pan, spreading evenly with a spatula.
- Bake until golden brown and a toothpick inserted in the center comes out clean, about 40 to 45 minutes. Place on a wire rack and cool completely before frosting.: As the cake bakes you will notice a deepening aroma of cinnamon and caramelized sugars, and the surface will transition from pale to a warm golden brown. The edges will pull slightly away from the pan, and a toothpick inserted in the center should emerge clean or with a few moist crumbs when it is done; this is the best indicator of doneness. Avoid opening the oven repeatedly which can cause collapse; if the center still looks very jiggly at the time mark, return it to the oven for a few more minutes. Transfer the pan to a wire rack so air can circulate underneath and cool the cake fully, which prevents the frosting from sliding. If you frost warm cake, the frosting will melt and lose structure.
- Make the Cream Cheese Frosting: Using an electric mixer, beat the cream cheese and butter on medium-high speed until smooth, about 3 minutes. Reduce the mixer speed to medium-low and gradually add the powdered sugar until it is all incorporated. Add the vanilla extract and salt, increase the mixer speed to medium-high and beat until light and smooth, about 2 minutes. Spread over the cooled cake and serve. Leftovers can be stored at room temperature, covered, for up to 4 days.: When you whip the cold cream cheese with the small amount of room temperature butter , the initial texture will be dense but will quickly soften into a creamy swirl; the sound is a steady, even whir as the beaters move through. Gradual addition of the powdered sugar prevents a gritty texture and helps you control sweetness and consistency. The final frosting should be glossy, fluffy, and easy to spread with a knife, leaving soft peaks as you smooth. One pitfall is using warm cream cheese which makes the frosting runny and unstable; cold cream cheese is intentionally specified for structure. After frosting, the cake should be stored out of direct sunlight and can sit covered at room temperature for a short while, though refrigeration will extend freshness if your kitchen is warm.
Notes
- Soak Time Adjustment Adjust soak time for the raisins if you want firmer or softer fruit; shorter soak leaves them firmer, longer soak makes them very plump.
- Sugar Level Lower the granulated sugar by up to 15 percent if you prefer a less sweet cake, but keep the brown sugar for moisture and depth.
- Oat Texture If you prefer a smoother crumb, use rolled oats instead of quick cooking steel cut oats, but expect less chew.
- Frosting Consistency If the frosting is too thick, add a teaspoon of warm water at a time; if too thin, add a tablespoon more powdered sugar.
- Make Ahead Bake the cake a day ahead and keep it loosely covered; frost the following day for fresher looking topping and easier slicing.
- Storage Store slices in an airtight container at room temperature for up to four days or refrigerate in warmer climates for longer freshness.